Platz 1/144 C-46D Commando Build Review
By Fotios Rouch
| Date of Review | February 2013 | Manufacturer | Platz |
|---|---|---|---|
| Subject | C-46D Commando | Scale | 1/144 |
| Kit Number | PD-21 | Primary Media | Styrene |
| Pros | Easy build, nice details | Cons | Nothing noted |
| Skill Level | Basic | MSRP (Yen) | ¥2,940 |
The Kit
For a look at this kit out of the box, look here.
The Build
What can I say, this is probably one of the best kits I have ever had the pleasure to build in 1/144 scale. I do build lately quite a few kits in 1/144th scale but this little guy takes the pie! Having the Eduard photo-etch set for it helps a lot. The surface detail is great, maybe a bit heavy for 144th scale but I will take it any day over some of the Academy zero surface detail on similar subjects.
Assembly on this little gem started with the cockpit and what a pleasure it was to put together. The Eduard photo-etch is very nicely done in color and went together great. I found many pictures on the web on C-46 cockpits and there are many differences between Korean era looks and Alaskan or US CONUS birds. I came up with a look that looks reasonable for a 50's Commando.
All looked good and fit great. I chose to have the cockpit door left ajar but there is no way to tell with everything buttoned up. At best I hope to have the instrument somewhat visible through a Futured canopy.
The wings went together perfectly. The fuselage also as well. This kit does not have locating pins but it has locating tabs and basically almost snaps together.
There is a need for a bit of filler and there are some fuselage gaps to take care of but no big issues at all.
The model came together pretty good but be it a natural metal finish I had to pay extra attention to seams. Especially on the fuselage and the engine nacelles. A little extra Mr. Surfacer here and there and a little more putty and the necessary sanding and polish and all was done. I reconstituted the panel lines and maybe it is me but while doing it with Dymo tape I noticed that some line up perfectly and some do not. Maybe it is just me.
Once I was happy with the surface finish, I turned my attention to the photo-etch application. I really planned only an hour or so but it took me almost four hours to put down all the photo-etch! There is so many parts and they are so tinny and cyano glue application has to be done so carefully that it was an eye straining operation even with magnifying lenses on! What helped a lot and I use it in all of my projects is the photo-etch folding tool kit by Mission Models Etch Mate. It makes photo-etch parts easy to fold with great accuracy.
What blew my mind is the photo-etch treatment of the wheel wells! All the walls are lined completely and there is even a structure built right in the middle of the wheel well. Great detail even for a 72nd scale or larger kit. There is still plenty of photo-etch parts to add but this will be after the model is completed due to how easy it is for me to damage.
One thing of note as you look at the photo-etched wheel well is how stupid of me was not to note how extremely thick the lower cowling flaps are! Please remember when you do your build to thin them out! One a side view they are fine but when you flip the model to show off the wheel wells they will really look bad. While you are at it see if you can do something about that gaping cavity between the firewall and cowling flaps.
I tested the Eduard wheel overlays and painted them steel color. I painted the plastic insert wheels silver for contrast. I am showing them with the plastic hubs inserted in the tires and with the photo-etch overlays resting on the plastic. I liked the brass effect and went with it. There is more of a difference and detail on the inner side of the wheel than the outside wheel.
I carefully masked the outside areas around the wheel wells and sprayed a blend of interior green and zinc chromate. The photo-etch wheel well wall dressing pops out really nice even after the paint is on. Platz did a great job with the Japanese paint schemes but they left the US version in boring schemes and applicable to A models.
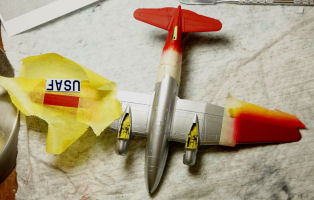
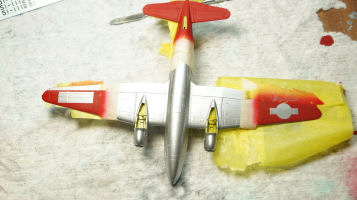
I decided to do the 44-78019 scheme from the In Action book on the C-46. It has a red tail and tail wing tips with some smart details. However I will need to create the torch/star/wings logo and carefully paint the NMF underlying surfaces for the national insignias and tail number. This will be accomplished by masking rectangular areas over the insignia red after careful calculations and measurement of the actual decals. The USAF rectangle will be easy but the star and bars will take more work.
The Commando is taking longer than I budgeted but it is worth it. It is really my doing for it taking so long. I really wanted a USAF theme although the Japanese themes offered in the kit are not bad looking at all. The largest difficulty with painting was the fact that the USAF and the stars and stripes decals on the wings as well as the serial on the tail have to be laid on top of NMF that slightly overlays the provided decal size. Very careful masking was required for that.
I cut out the decals off the decal paper as close as I could and then used their dimensions to plan out the masking areas. For the USAF decal I had an easier time but for masking out the star and stripe insignia it took two steps. One for the blue circle and white star and then another step for the stripes. The same story had to happen twice for the bottom and top part of the wings. The fuselage side does not require that as the decals lay on top of NMF anyway.
Next was the masking and painting of the de-icer boots. No biggie, just lots of masking.
The most difficult part, for me, was the masking of the complex under engine nacelles black pattern. For the Japanese variants it is all black nacelle and wing stripped undersides. The kit even provides decals for that. For the exact variant I am making and based on period photos it is a rather elaborate masking pattern, especially in 144th scale!
Lots of Tamiya masking tape was used and X-Acto sculpting. I think it came out OK in the end.
The last step as far as painting goes are the two little but distinctive white stripes that adorn the tail tip. Well, all the painting was completed together with the final assembly of all the fiddly bits.
The Platz decals went down really well and they reacted beautifully to Decalset and Decalsoft. So much so that they even covered and conformed over the Eduard photo-etch fuel-caps. Very elastic and of high quality.
Then my turn came to make my own decals. After some failed attempts to make them out of using existing decal stock, I ended up using Testors clear decal paper. Prior to applying the custom squadron logo decals I punched out white decal circles using a punch set for the underling layer to provide the missing white background that cannot be provided from clear decal stock. The black numbers were easy to do.
I used painted human hair for the antenna wires since none of the elastic thread stock I have is fine enough for 144th scale.
Overall I am very pleased with this little model. It has some surface imperfections here and there but overall it is one of the finest small scale kits out there.
My sincere thanks to Platz Hobby for this review sample!


