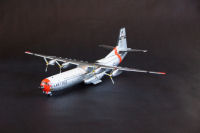
Nostalgic Plastic 1/144 C-133A/B Cargomaster
By Fotios Rouch
| Date of Review | January 2012 | Manufacturer | Nostalgic Plastic |
|---|---|---|---|
| Subject | C-133A/B Cargomaster | Scale | 1/144 |
| Kit Number | 44001 | Primary Media | Resin |
| Pros | Nice looking model of C-133 | Cons | See text |
| Skill Level | Intermediate | MSRP (USD) | $110.00 |
Background
After the completion of the small C-124 from Anigrand featured here, it was inevitable that the next kit to do would be the C-133 from the same company. For an in-box review you can click here.
The Kit
As far as kit accuracy goes, this kit is exactly the same as the 72nd scale Cargomaster recently released by the same company with the same exact errors just in 144th scale. If you want an expert analysis read the review by my good friend Bondo Phil Brandt over at Hyperscale.
The Anigrand kit even in 144th scale is not very small at all. The general impression is that it is an example of a limited run resin production with not very high quality standards. The parts are full of blemishes both from casting inadequacies but also from the master being rough around the edges. File marks and other tool marks are evident in many areas.
Construction
Just the same I decided to go for it and fix whatever I could and cover up all the problems. This too, like the C-124 is going to be a present for a good friend and lover of the old "heavies" so I wanted to make it look good.
Work as always with all resin kits started with washing all the resin parts with 409, warm water and a toothbrush. I let the parts air dry and then I start cleaning up the resin imperfections.
The fuselage comes in four parts and this means that you have to be very careful with how you decide to mate all the parts. Either you do the front two halves first or you assemble the complete left side and right first and them mate them in the conventional way.
I decided to complete the left and right side separately since it was easier to align the parts front to back. I used steam as always to get the parts back to shape since they had deformed while in their box. It worked out OK but I still had to sand down the mated surfaces for a flush fit and look.
The cockpit is very simple but it includes a center console, yokes, instrument panel and the engineers stations but in the end little will be visible. A little space is provided for adding lead weight under the cockpit but I decided to add a few pennies behind the front bulkhead.
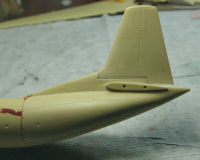
Before joining the fuselage halves I had to fix a nasty defect on the fuselage front where there was either a big air pocket that did not allow resin to flow in the rubber mold or not enough resin got to the end of the mold. The gap was big enough to put styrene in there and then cover it with a bunch of superglue. Accelerator was then used and then the glue was immediately sanded down to shape.
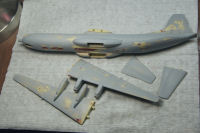
The fuselage halves then came together with reasonable success. That is because after the halves were completed, I run them over a large sheet of sandpaper over my workbench to get rid of small imperfections. Next I had to work the many pinholes evident in most of the kit parts. I used either superglue and accelerator or 3M automotive putty. The fuselage joints were then puttied over and then the tail went on. The tail left some big gaps that were large enough to slip in some resin sheet cut to shape.
Speaking of gaps, the engine nacelles did not fit very well to the wings and there too I had to use styrene sheet to improve the joints.
After the fuselage was all together I applied 3M Red automotive putty on the joints and also filled the ramp doors that are scribed for a C-133A variant. The instructions provide outline instructions for scribing the C-133C doors for the ICBM transporters.
The same was repeated for the top of the fuselage and the wings. Multiple pinholes are present all over the fuselage and wings.
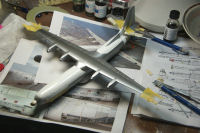
All the main sub-assemblies were primed with Mr Surfacer 500. 500 is pretty rough and heavy and I use it for lesser quality resin kits only because it fills in a bit of the rough panel lines, and light scratches but not pinholes unfortunately.
All the pinholes are then filled with repeated applications of Mr Surfacer and a fine brush.
The clear resin gave me big trouble as it would not fit at all in the cutout.
I gave up trying to coax it in the cockpit opening and decide to form a new one in clear thermaform plastic.
The new part fit acceptably well but I did not trust it for strength and for taking on putty on the joint with the fuselage so I added a bunch of little tabs for it to sit on.
At this point I have dipped the new clear part in Future and when I get some time this long weekend I am going to tackle the most difficult part in building this kit, joining the clear part with the fuselage and feathering it as best as possible since this is another NMF model.
The clear homemade vac worked out pretty well and I was able to secure into place with not to much hassle.
Acryl Red went on to feather in the small imperfections. It was wet sanded once dried and airbrushed with Alclad to see how it looked. A little more polishing was necessary but it was all good. One thing I was not happy with was that my vac canopy replacement did not pull in all the window framing detail.
Next I went on to do the different Alclad shades in multiple masking sessions.
After that I masked again to apply the insignia white paint on top of the fuselage. It is important to use white or light gray wherever an application of dayglo is desired. Dayglo does not come out well at all straight on NMF.
The next step is to mask again and apply the Day-Glo paint. The tough part after that will be to mask for the tinny, in 144th scale insignia blue cheat lines!
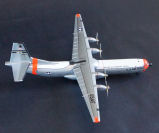
Dayglo Orange went on after careful masking. I had made sure that there was white paint underneath the areas that would receive the dayglo paint. This paint is very nice but it is translucent and does not cover well at all over dark substrate colors. Light gray is fine and white underneath brings out the orange very well. Masking prior to spraying the dayglo was tedious and lots of masking tape was used to protect all the previous paintwork. I made sure I laid a very thin pin stripe between the thimble nose base and the fuselage. That small area would remain natural metal and it would be there as an indication of the reinforcing strap between the fuselage and the radome.
The landing gear struts and prop blades were also painted at that time in natural metal and insignia yellow. I am glad that Anigrand provides extra blades since many have molding defects. I painted all of them with the intend to choose the best ones in the end.
The next step was to mask again and paint the nose, the tires, the prop blade anti icing boots, the wide black walkway areas and anti-icing boots on the wings. I painted the wide walkways in two steps due to their complicated shapes and proximity to one another.
Lastly, the masking tape was off and the insignia and thin stripe walkways were laid down. The donor kit for the walkway stripes was a Classic Airframes Canberra. That brought back memories of the three Classic Canberras I built in the past! Also the masking tape was taken off the clear parts and I hope it was not a premature decision.
The next step will be to mask and paint the fuselage windows gloss black and then use insignia blue thin stripe decals for the cheat line between the white and natural metal.
Well, finally the Cargomaster is completed. It took me much longer than I thought to finish a 144th scale kit. The last stages included applying the decals and attaching the landing gear and props. Getting the landing gear and wheels to all be touching the ground was a much tougher proposition than I thought.
The reasons were that the resin wheels were not really round and that the sponson/landing gear relationship was not quite right. This is what I did and you might find it useful too. I glued in place the front landing gear strut. Then the rear most landing gear struts. Then I added the wheels to the struts. I had to fiddle a bit with the main landing gear wheels until they all touched the ground. Then I added the forward struts and added the wheels one at a time making sure that they did not upset the existing balance. In the end and despite my best efforts the main landing gear would have the front wheels a millimeter off the ground. The solution was to take a sanding stick to all the wheels and adjust them so the end result was correct stance and all ten wheels touching the ground.
The decals are a serious shortcoming in this kit. I am glad that the kit provides all these decal options but the carrier film was very thin and fragile and the longer decals like the US AIR FORCE and MILITARY AIRLIFT COMMAND fell apart. The worst part was that as I was trying to line up the parts there was more disintegration. At some point I had to just quit messing with them and leave them alone. Some misalignment is still evident.
I would say that the end result is eye catching and pleasing and the subject looks good in its arctic dayglo colors and natural metal.
This project took a while but I think that it was worth the effort.


