Anigrand Craftswork 1/144 Douglas C-124A/C Globemaster II Build Review
By Fotios Rouch
| Date of Review | October 2011 | Manufacturer | Anigrand Craftswork |
|---|---|---|---|
| Subject | Douglas C-124A/C Globemaster II | Scale | 1/144 |
| Kit Number | 4024 | Primary Media | Resin |
| Pros | Nice detail | Cons | See text |
| Skill Level | Intermediate | MSRP (USD) | $116.00 |
The Build
If you do not know the Globemaster II then you are not someone who appreciates these old giant transports and you probably are not looking at this article. Old Shakey was the MATS main heavy lifter from 50s to the early 60's but flew with the MAC, the reserves and the various ANGs until the early 70s. About 10 examples or so survive today in various museums and displays.
As people grow older, they say that people get wiser. So I decided in my late 40s to go to a smaller scale and tackle another resin kit!
The Anigrand kit even in 144th scale is not very small at all. The general impression is that it an example of a limited run production with not very high production standards.
The parts are full of blemishes both from casting inadequacies but also from the master being rough around the edges. File marks and other tool marks are evident in many areas. I have two copies spanning a year apart and they have the same scratches.
Just the same I decided to go for it and fix whatever I could and cover up all the problems. This was going to be a present for a good friend and lover of the old "heavies" so I wanted to make it look good.
Work as always with all resin kits started with washing all the resin parts with 409, warm water and a toothbrush. Air dry and then start cleaning up the resin imperfections.
The fuselage comes in four parts and this means that you have to be very careful with how you decide to mate the parts. Do you do the front two halves first or do you assemble the complete left side and right first and them mate them in the conventional way?
I decided to complete the left and right side since it was easier to align the parts. I used steam as always to get the parts back to shape since they had deformed while in their box. It worked out OK but I still had to sand down the mated surfaces for a flush fit and look. I also blanked the two forward crew oval portholes because the later Globmasters did not have any on the starboard side.
I then primed the fuselage side to find defects and to see how successful the fuselage front and rear halves had been integrated. All the portholes were slightly worked over with a circular file to make sure they were clean and could accept the clear resin windows.
The clear resin window parts were then super-glued in place but I had to cut them in smaller groupings to get them to fit. The cockpit is very simple and that is OK since little will be visible. I did make some simple yolks and center and side consoles anyway. The fuselage halves then came together with reasonable success. That is because after the halves were completed, I run them over a large sheet of sandpaper over my workbench to get rid of small imperfections. Next I had to work the many pinholes evident in most of the kit parts. I used either superglue and accelerator or 3M automotive putty.
Some parts were much hard to work on and fix than others. Having to work in such a small scale is definitely did not help matters! The radar radome was very badly formed and took a lot of work to clean up putty and reshape.
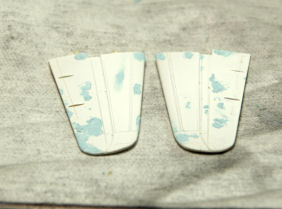
The tail wings were absolutely full of pinholes. I primed them white and then used Acryl Blue to fill the defects.
The top and bottom of the fuselage certainly needed attention at the joint and after masking more Acryl Blue was used.
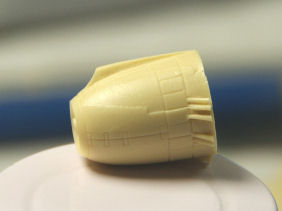
Attention was then focused on the main wings which come as single castings. Pinholes were also everywhere and also bigger holes around the base of the engine nacelles. I took two images and combined them so both nacelles are in focus. The engine cowlings come complete with engine exhausts and a nice heavy casting ridge that needs serious cleanup. Unfortunately they were also oversize or undersize and/or out of round when I tried to fit them to the engine nacelle bases. I had to mix and match and see which combination looked the best.
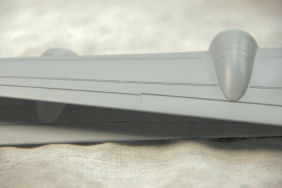
The aux wingtip combustion heaters were available in the kit as an option for the C variant but they needed a lot of help. Where the intake is supposed to be there was a chunk of resin from the casting process. A mold ridge run across the pod and the exhaust fairing was a square shape as opposed to how the real thing looks. (ani-c-124 -11.jpg) The pods went on to the wings OK but the wings were either broken at their tip or incompletely molded. (ani-c-124 -12.jpg) I used superglue, accelerator and a sanding file to complete the joint.
The front wheel well covers did not look very nice and they had to reshaped and puttied to cover the poor resin casting. (ani-c-124 -13.jpg)
The main wings also had many issues that became more apparent once I primed them. Priming parts is your best bet for an an early defect detection and correction when sub-assemblies are simpler to handle. Note how the panel lines are inconsistent, and the flaps have run away scribing. (ani-c-124 -14.jpg)
The wheels are also another problem that needs attention. They are mostly oval with huge casting imperfections. This is going to take a lot of work. (ani-c-124 -15.jpg)
The prop blades come in individual parts and they need to be cleaned one at a time and have all the little pinholes taken care of (ani-c-124 -16.jpg)
Work on the C-124 continued with trying to fix the prop blades and then painting them. Try and fix and mask twelve tinny individual prop blades four times for four different colors! Masochism taken to a new level! They are by no means perfect but this is all my visor aided) eye sight could take! (ani-c-124 -17.jpg)
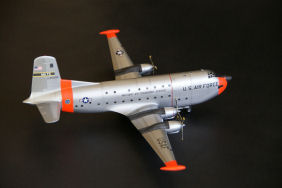
Once the model was sprayed with Mr Surfacer 1200 and polished with 8000 and 12000 polishing cloths I sprayed the first layer of Alclad II Aluminum shade. Once dry and as you know it does not take too long, I polished it again with 8000 and 12000 polishing cloths and soapy water. (ani-c-124 -18.jpg)
Alclad II takes handling and masking really well (if the surfaces have been prepped well and are free of demolding agents and grease). Masking is safe to the finish and was applied first for all the different Alclad II metal shades. There are plenty in the series so you can choose from light to dark shades and get great looking results. Masking was also applied for the dayglo and later for the black color which goes over the dayglo on occasion. Period photos were used for the color application. (ani-c-124 -19.jpg)
The next step in the painting process was to paint the exhaust stacks with ModelMaster Metalizer Burnt Metal which I applied with a fine brush. MM metalizers are supposed to be sprayed on but the Burnt Metal paint can handle hand brushing just fine. I just shake well and pick the paint off the bottle cap.
I used a little interior black and brown mix for the radar nose. It was rarely seen in the same black as the anti-glare black in front of the cockpit. A coat of dull varnish will bring out the proper look. (ani-c-124 -20.jpg)
The next step will be to paint the framing for the clear canopy resin part. I have not made up my mind if I should hand paint it and with what paint or if I should mask and shoot the same Alclad II aluminum shade.
Most of the hard work was over on the little C-124 and what was left was putting it all together. I chose to do the landing gear and the tinny props last so as not to damage them.
I decided to mask and spray the same dull aluminum fuselage shade for the canopy frame.
I made navigation lights out of consecutive applications of crystal clear and then once dry painted them with Tamiya clear red and green.
The decals are not of the greatest quality and mostly fictitious for the serials. I do not have much of a collection of spare decals in this small scale so I made do with what was in the kit. The decals also did not want to go down smoothly or react well to decal softening solutions. I added the red prop warning stripe from the spares box but I did not add the warning lettering.
The model definitely needs some weight up front so it sits on its landing gear. My guess was right and I was pleased that I could get all the wheels to touch the ground.
Finishing touches included drybrushing here and there and also adding exhaust stains.
This model is built for a good friend that loves old heavies and I will be presenting it to him in few days.
The next kit will be the C-133 from the same company and same scale.


