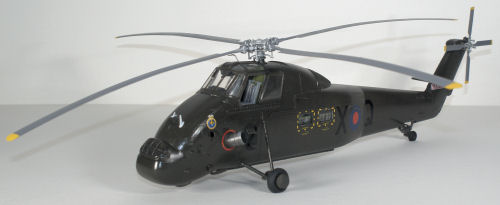
Italeri 1/48 Wessex HU.5 Weathering
by Michael Benolkin
| Date of Review | August 2016 | Manufacturer | Italeri |
|---|---|---|---|
| Subject | Wessex HU.5 | Scale | 1/48 |
| Kit Number | 2720 | Primary Media | Styrene, Photo-Etch |
| Pros | Nice kit of the H-34 series | Cons | See text |
| Skill Level | Experienced | MSRP (USD) | $41.95 |
Weathering
Every now and then, it is fun to pull a model off the shelf and 'update' it a little. When Italeri released their H-34G/UH-34J kit recently ( look here), I looked at an earlier release of this tooling that was the Wessex HU.5 which we looked at here
and then built here. A number of interesting things have transpired since that build four years ago. First, the retail price dropped by $20 USD to $41.95 and there has been a number of nice products released for weathering aircraft models that evolved from the armor modeling world.
This is where I left off with the HU.5 four years ago - decals applied and protected with a final coat of Future. What I pulled off the shelf was weathered with dust so I gave the model a good cleaning and put on the bench to dry. One danger of cleaning is that you may knock a few small bits off the model and indeed I succeeded in removing the windshield wipers, one antenna, and a boarding step. These were put aside for safe keeping.
I decided to use the panel line wash made for black camouflage produced by AK Interactive. This is a light gray wash which made sense for RAF Green which is really dark when glossy. My model had a coat of Future when I completed the model, otherwise I would start this process by applying a coat. You don't want to apply these washes to flat paint because it will be more difficult to remove (but not impossible). If you painted your model in glossy paint, I would still apply a protective coat of Future, especially if that gloss paint was acrylic-based.
I grabbed a small paint brush and simply painted lines of the wash along panel and rivet lines. There are no problems if you make a mess, just keep going. I started with the front half of the model, let the wash dry for a few minutes, then took a clean paper towel and started to rub down the model to remove the excess wash. You'll see that what remains will reside in the panel lines and rivet holes. If you remove too much, simply reapply the wash, let dry, then remove more carefully. For those areas where the paper towel wouldn't reach, a cotton swab worked fine. If you have a spot where you can't remove enough of the wash, take a cotton swab, barely dip the tip into odorless mineral spirits, then gently dab it on the problem area, then wipe with the dry end.
I repeated the process on the tail section and set the airframe aside. I had left the rotor head where it could be removed and I took a wide brush with AK's gray wash and applied it to the blades and rotor head. In this case, I had not protected the paint with Future and the gray was flat. While the wash did indeed highlight the panel lines in the blades, it also darkened the gray paint which was my intent. The wash also made the details in the rotor head stand out better.
While I was happy with the interior four years ago, it lacks depth to my current perspective. I took that same wide brush of gray wash and applied it liberally inside the main cabin and in key areas of the flight deck. I wiped away the excess, but there were a few areas in the side walls that wouldn't wipe clear. Again, the cotton swab dipped in odorless mineral spirits solved that problem.
You don't have to use the light gray, they have a formulation for green camouflage though that would have been another dark color and the result would have been too subtle for my purposes. The gray panel line wash brings out the detail produced by Italeri but lost in many paint schemes.
One other technique to note - when you think you're finished with the model, take lots of photos like these and look at them on a big monitor. You'll spot the flaws you overlooked while on the bench which gives you the chance to correct them before putting your model out in front of the modeling community. As we gain experience with our modeling and apply new products that didn't exist when we first made a model, we can bring our models up to another level or give us an excuse to do one (or more) over again. Have some fun!


