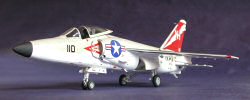
FM 1/48 F11F-1 Tiger Build Review
By Fotios Rouch
| Date of Review | June 2006 | Manufacturer | Fonderie Miniature |
|---|---|---|---|
| Subject | F11F-1 Tiger | Scale | 1/48 |
| Kit Number | 6045 | Primary Media | Styrene, Resin, White Metal, Photo Etch, Vac |
| Pros | Very nice details in this multimedia kit | Cons | |
| Skill Level | Intermediate-Advanced | MSRP (USD) | $75.95 |
Background
The F-11F is a great and very important subject to all the US Navy aircraft modelers.
The long nose variant has only been done so far by Collect-Aire. It was a great seller for Collect-Aire that carried on for many years and might still be around once FM runs out of their production run.
The FM kit is a classic example of very low pressure injection molding with many areas that are either short shot or full of ripples or other evidence of garage production standards, Maybe gravity injection molding would be a better description of the process followed by FM!
In any case the kit is what it is and the modeler can bypass it or spend the quality needed to make a good looking replica of this great jet.
More details and an in-box review of the FM 1/48 F11F kit can be found here.
As per the usual practice for any and all kits that I build I started with washing all the parts in warm soapy water and brushing them with a toothbrush and 409 grease cutting cleaner.
The parts were dried and then inspected just so I could get an idea of what I was up to. You see I just finished the Alize (seen elsewhere on this site) from the same company and I had great reasons to believe that this kit was not going to be any better. Sure enough I noticed the same idiosyncrasies with the molding of this kit as well.
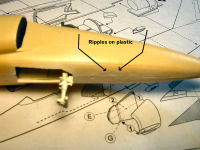
The wings and fuselage were full of ripples and excess plastic that would have to be carefully sanded and reshaped.
First I studied the plans and parts. Then I cut all the parts from the sprues and started test fitting them together. I realized that I would have to follow a different assembly sequence from what the instruction indicated. The instructions are not really wrong it is just that the tolerances are not good at all and I could foresee that the fuselage would not go together at all if I would follow the instructions.
I started with the wheel wells. I cleaned tem up, painted them and test fitted them numerous times until I was satisfied. I glued them on each fuselage side with superglue. The main wheel well is molded in gray resin and the smaller part of the well for the strut is molded in tan resin. The kit provides bulkheads to secure the wells but since I was going to skip all that I decided to use super glue for added safety.
Next I decide to test fit the fuselage parts by themselves to see how they went together without any internal components. The fit was not good at all and I had to sand the parts on a wet piece of sand paper to take off the roughness and straighten out the parts. Things improved a lot and by the way this is a good thing to do even on high quality kits to ensure a good match between the parts.
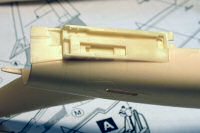
Once this was done I decided to add the tail hook and exhaust cradle resin piece. More sanding and test fitting was required the fit was good after the adjustments and all was secured with superglue.
Next step was to paint every interior part with dark gull gray. Details were painted black and raised detailed was dry brushed with lighter shades of gray and picked with a brush to bring out the details.
The instrument panel is done in photo-etch but no film or any other indication of instrument decals is provided. I used my trusted set of Reheat decals (I wish these guys would still be in business) and I placed them behind the empty photo-etch panel. The result was pleasing enough.
Next I moved on to building the rest of the cockpit. I wound very fine gauge wire around thicker gauge wire to simulate the oxygen hose. I painted it green and left it to dry.
I constructed and painted the rest of the cockpit, laid the photoetch and soft metal parts in place and scratch built the throttle quadrant that is missing from the kit. There is an opening for it on the photoetch fret but the part is absent in the kit and the instructions.
I taped the fuselage parts together to see how it all fit together. I had to sand the resin wheel wells and areas of the cockpit walls to get it all to fit reasonably good. Test fitting the instrument panel revealed a big gap between the resin and the fuselage plastic which would have to be dealt with later.
Just to be on the safe side I added lead weights on the nose area.
I then went on with gluing the fuselage. I decided to do it stages. First was the tail and the nose areas. I secured them and left them to dry for a while.
I then went on to the main wings. I sanded them down with circular motion on a wet sand paper until they looked reasonably thin. I glued them and used clips to make sure that all was tightly fitting with no gaps.
Next step was to join the fuselage halves. I could tell by test fitting that not all of the panel lines would match. It was a mater of choice what portion of the fuselage I was going to rescribe.
I opted to redo the middle-rear portion of the fuselage and ensure that the front portion matched well. After the glue had set I evaluated the problem again.
I flipped the fuselage to see how bad the front underside fuselage "ripple" was on the plastic. It looked worst when the fuselage parts were apart. It still would need work but it was definitely salvageable.
The gaps and ripples were big so I went for Acryl Red from 3M. To protect the panel lines I first masked the fuselage with Tamiya masking tape and then I applied the automotive putty. Maybe a little too liberally but I wanted to make sure that no gaps or irregularities were left unattended.
After the putty was dry I sanded the fuselage down with sanding sticks to take out the big stuff and then I followed with Micromesh polishing pads. You can see where the problem areas where by the concentration of the Acryl Red that has been left behind. Note that I covered up the starboard half of the vents on the top fuselage with the intent to rescribe and match them to the port side. I also decided to putty in the seam lines where the intakes meet the fuselage. The joint was fairly rough and I wanted a very fine panel line there.
The wings were next. The starboard wing was my biggest problem. There were sunken areas and there was no way to fix it other than using putty and rescribing the lost panel lines.
The Acryl Red came through again and the wings finally looked good after wet sanding with sanding sticks and polishing pads.
All the parts were primed next with Mr.Surfacer 500 to see what I had missed and to prepare them for final assembly.
Well to my surprise I noticed something that I am used to seeing in resin models. There were a bunch of pinholes on the fuselage that became evident after priming. This was a real surprise to me because I have not seen such a thing in a plastic kit before. A good friend suggested that maybe it was the result of FM having set the temperature of the plastic set at too high and the molten plastic started boiling. Who knows what happened but it certainly got me on my bandwagon and thinking again that FM should be making resin copies of their masters! In any case, I covered up as many of the pinholes as I could see with a brush and Mr. Surfacer.
Once all was dry I decided to attach the problem of the mismatched vents on the top rear fuselage. I used Dymo label tape and a scribing tool. I tried to match the scribing style as much as I could and I also tried to fix up all the other panel lines that had been erased in the process of smoothing things out.
The wings went on next. I tried pretty hard to get them to mate with the fuselage as close as possible but no matter how much I adjusted the mating surfaces there were still gaps. Once again once the glue was dry I used Acryl Red and masking tape and filled the gaps as best and smooth as I could.
Then I sanded down the joints and got the model ready for the paint shop. Note. Although the underside of the Tiger is to be painted Insignia White. I chose earlier to paint the wheel wells RLM 21 white just because it is a bit off-white with a hint of yellow and it contrasts a bit with the bright white surfaces. I thinned down the Testors Insignia White quite a bit and started painting in slow wet coats until I got a nice gloss finish. In the end all will be semigloss coated but I wanted a gloss coat so the decals would stick down well.
The white coat took almost three days to dry. White is a tough paint to do well. Thin coats are best. Here is the dry and hot desert shooting thicker coats is no big deal because the weather usually helps to speed the drying process. Except we are in our monsoon season and humidity is way up! After the white coat was dry I masked the areas that were to remain white and shot the Gull Gray color in nice thin coats. I learned my lesson and the gray paint dried within a day.
Next I masked the areas that were supposed to me natural metal. I used Alclad II for the job. I sprayed a very thin Alclad II coat to seal the enamel underneath because Alclad can attack the enamel and craze it. The subsequent coats were a bit thicker. I used Alclad II Aluminum for the leading edges and Alclad II Dark Aluminum for the exhaust area.
Next I fabricated the tail pitot tube out of .20 and .30 plastic rod. The kit does not supply on but it tells you in the instruction the dimensions and the location.
I masked the model again for the red paint on the tail. I realized I was out of gloss Insignia Red so I had to use 31136. I will use Future to cover it before applying decals because there is no way anything will stick to this type of finish.
I then added some styrene strip to the area in front of the instrument panel coaming because there is a hefty gap there that will show under the canopy. Next item to attend to is the vacform canopy. Stay tuned.
The project was nearing its completion with all the major painting completed. The next step was to work on the vacuform canopy parts. The parts were carefully cut out and trimmed with fine small scissors. Some filing around the edges was necessary to bring the canopy edges into shape. The canopy parts were test fitted to the fuselage and more trimming was necessary to get the windscreen frame to fit properly and with no gaps with the fuselage. The vacuform canopies are reasonably clear but do not expect Falcon/Squadron crystal clear clarity. Dipping them in Future improved the canopy parts a lot. After the Future had dried up I masked the clear parts with Tamiya masking tape and MicroMask. Then I shot a layer of Dark Gull Gray to represent the interior color of the framing. Once dry the gloss Gull Gray coat went on and the parts were left to dry for the night. The parts were unmasked and cleaned up with Googone for the areas that had some tape residue left behind. The canopy frame was attached to the vacuform canopy and the clear parts were left aside and not to be used until the model was weathered and sprayed with all the varnishes.
The decals were to be applied next. I noticed that they were a bit glossy and looked much better that the ones on my previous FM Alize build. One problem I noticed was that the national insignia blue was too light. I hoped that it would look ok in the end. The decals were cut and only were applied a few at a time to avoid any of them drying up on the carrier paper. They went down reasonably well and dried fairly snug and conforming to the contours and panel lines.

 Once the decals were dry, I glued on the photo-etch wing fences on the tops of the wings. The wing fences are placed on top of the decals. I find it much easier this way instead of having to cut the decals and place them on ach side of the wing fences. I chose to keep weathering light and represent a well maintained aircraft early in the cruise. The final stage was to spray Testors semi-gloss all over the model except the black nose and natural metal exhaust area.
The vacuform parts were attached next. The canopy was posed open just so the model looks busier and more interesting. In conclusion I can say that this model went together much faster than the Alize with less problems.
Conclusions
I still wish that FM could improve on their injection process so less quality problems end up on the customer’s hands. I feel that this would have made for a magnificent resin kit as the master is quite nice. It is the translation to plastic that has things falling short. Yet, this is the best Tiger in 48th scale presently and a great addition to any US NAVY collection.
Recommended to experienced modelers.


