Academy 1/48 F-4B Phantom II Quick Build Review
By Michael Benolkin
| Date of Review | November 2012 | Manufacturer | Academy |
|---|---|---|---|
| Subject | F-4B Phantom II | Scale | 1/48 |
| Kit Number | 12232 | Primary Media | Styrene |
| Pros | First new-tool Phantom in this scale in decades | Cons | Multi-color parts won't please some modelers |
| Skill Level | Basic | MSRP (USD) | $69.00 |
Background
For a look at this kit as it appears out of the box, check out our Academy 1/48 F-4B Phantom II first look here.
The Project
With a kit like this taking on the undisputed king of 1/48th scale Phantoms, it only makes sense to do a quick build of this kit to see if there are any bugs or challenges in the kit. Given that we are taking on the king of the Phantoms, is also makes sense to build the Hasegawa F-4B
to see how the two kits compare. As always, I'm building this kit straight out of the box with no aftermarket parts and assembling it using Tamiya Extra Thin Cement. No fillers or painting will happen so you can see the results without any cover-ups.
Before we start on the build, let's take a look at how the fuselages line up:
The light gray fuselage half is the Hasegawa 1/48 F-4B with raised surface details. The dark gray fuselage is the new Academy 1/48 F-4B with scribed details. As you can see in the images above, the aft engine fairing edge, intake trunk, canopy sills and radome edge all align almost perfectly. You won't get a sense of height comparison simply because I don't have the fuselage bottom installed on the Academy kit at this stage.
The Build
The first step was to build up the ejection seats. Both sets of seats go together but the Academy kit has around twice as many parts to create its seat. While I was impressed with the details in the Academy seats, you can see in the image below that the final results aren't that different. You can see that the basic seat does pretty well though it lacks the harness detail. If you're putting a crew in your model, you need to use the kit seat and then add lead foil (or whatever) straps to depict your crew properly strapped into the seats.
The resin seat is what they should look like and with some proper photo-etched harness details added to the kit seat, either seat could do the job. It looks like the Academy seat is wider, so I'll have to do some butt measurements to see if the original Hasegawa (and the resin aftermarket) seat is too small or if there is a not-so-subtle supersizing going on in the Academy kit for contemporary American butts.
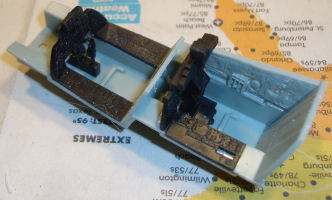
Next is the cockpit. The cockpits have some great details and I like the separate side panels in the kit to make painting the details even easier. The Academy kit provides the starboard sidewall for the rear cockpit (there's a retractable refueling probe on the other side of that wall) while the Hasegawa kit doesn't capture that detail. Neither kit provides throttles.
The next steps build up the wings and engine ducts. I wasn't sure how those intake ducts were going to fit but I placed them into their mounting points per the instructions. Ditto with the afterburner chambers and nozzles. Before adding the upper wing surfaces, I build each of the main wheel well boxes which consist of five parts. The instructions have you assemble them and set them aside. I elected to ignore that approach and mounted them straight to the lower wing half while the glue was still wet so I could shape the wells to fit into the molded-in recess for the wells.
I had one of the aftermarket F-4 seamless intake ducts sitting on the bench and compared the parts with the kit intake ducts. The kit's ducts are a bit smaller at the far end as is the engine compressor face, but what's interesting is that the proportions are right. Rather than engineer a full duct, Academy provides a 'forced perspective' to give the illusion of a full-depth duct and it is deep enough to look right as you can see in the image below. Unless IPMS judges start carrying laser range finders, it will be difficult to tell the difference between this forced perspective and the aftermarket ducts after the model is finished.
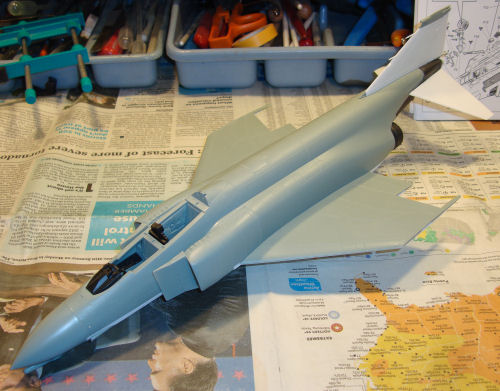
Here is where I deviated from the kit instructions. The instructions have you mate the subassembly that has the cockpit, nose gear well, and the underside of the nose with the wing centersection. I dry-fit the two assemblies and the mechanical fit of the two parts is very poor. I decided to mount the wings to the fuselage and then add the nose underside. In the image below, I mounted the fuselage to the wing and it dropped into place with a snap. The wing/fuselage join is perfect - no gaps! It is so rare to have one of those perfect moments in modeling where you want to have a cigarette afterwards (too bad I don't smoke!).
Adding the nose section separately wasn't as successful as there is a slight gap there at the underside joint. I had aligned the front of the nose section for a flush mounting of the radome which left that slight gap, but you can see that this also slightly displaced the undersides of both intakes. The takeaway here is that there isn't anything wrong with the kit, I should have trusted the instructions. When I do this build again, I'll probably reinforce that joint with some Evergreen strips to make a more solid subassembly before mounting the whole thing to the upper fuselage.
Here are the radome and tail feathers installed. This kit really does go together nicely. Note that the square hole atop the fuselage is now plugged. There are two parts that go in that hole - this one which is blank for the Navy Phantoms while the other has the air refueling receiver doors (closed) for the Air Force variants.
The model is now on its landing gear with the outer wing panels and ailerons also installed. I really do like the superior design of the landing gear mounts in this kit over the Hasegawa kit.
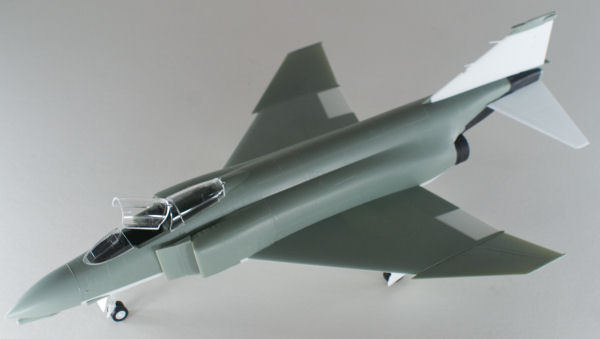
Here is the model completed with the ejection seats, canopies, and a few other small details installed.
Conclusion
This kit goes together very easily. It takes a little longer to build than the Hasegawa kit only because there are more parts. Nevertheless, with all of the external stores options and the multitude of aftermarket decals available, you won't be lacking for subjects to build.
With an MSRP of $69.00 USD, this kit is only a few dollars more than the Hasegawa kit when it is available. Street prices will definitely be lower. Oddly enough, Hasegawa's 1/72 F-4 kits are even more expensive than the 1/48 scale kits (?!?) and Academy has also announced that they're doing the Phantom series in 1/72 soon.
Should you throw out your Hasegawa kits and start collecting these Academy releases? No and yes. No, the Hasegawa kits are still good models but they are somewhat dated now. And yes, with these new Academy Phantoms, you now have scribed panel lines for the F-4B/C/D/N as well more accurate cockpits and even intake trunks provided. The choice is yours but now that I've build both kits, I like this new Academy kit and plan on doing some full-build and fully armed examples in the near future.
My sincere thanks to MRC for this review sample!


