PROUDLY SPONSORED BY:
NOTICE:
The appearance of U.S. Air Force, U.S. Army, U.S. Navy, U.S. Marine Corps, U.S. Coast Guard, Department of Defense, or NASA imagery or art does not constitute an endorsement nor is Cybermodeler Online affiliated with these organizations.
FOLLOW US:

Hasegawa 1/48 F-4B Phantom II Quick Build Review
| Date of Review |
November 2012 |
Manufacturer |
Hasegawa |
| Subject |
F-4B Phantom II |
Scale |
1/48 |
| Kit Number |
07105 (P5) |
Primary Media |
Styrene |
| Pros |
Great kit of the F-4B in 1/48th scale |
Cons |
No intake ducts, limited externals, missing starboard sidewall in rear cockpit |
| Skill Level |
Basic |
MSRP (USD) |
$47.95 (Out of Production) |
Background
The Hasegawa 1/48 F-4 Phantom II series has remained as the best kits of the subject for many decades and for good reason. The Hasegawa designers developed an easy-to-build kit that has lots of possibilities. To keep the kit simple however, they provided a minimum of external stores options and provide a wide variety of external stores in their separately packaged Armament sets. We'll focus on the basic airframe and see how well this kit has held up over the years. This build will follow our quick-build format and as always, I'm building this kit straight out of the box with no aftermarket parts and assembling it using Tamiya Extra Thin Cement. No fillers or painting will happen so you can see the results without any cover-ups.
The Build
The first step was to build up the ejection seats. The gray seat below is the kit seat and the other is an aftermarket seat designed for the Hasegawa kit. You can see that the basic seat does pretty well though it lacks the harness detail. If you're putting a crew in your model, you need to use the kit seat and then add lead foil (or whatever) straps to depict your crew properly strapped into the seats.

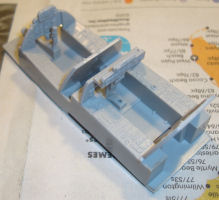
Next is the cockpit. In the images below, you can see that there is some nice detailing molded into the instrument panels and side consoles that will really look good with some careful detail painting. You can also see that there are a few artifacts in there to show how this cockpit tub is used for other Phantom variants including the floor mount and hole for the rear control stick (not used on Navy/Marine Phantoms) and the lack of a starboard sidewall to cover the retractable air refueling probe bay that is just on the other side of the RIO's right shoulder. No throttles are included.


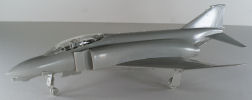
The cockpit mounts into the fuselage halves and you can see in the image below that the fuselage goes together without any problems. You'll also see the blankout plates where the intake ducts would be on the real aircraft. This 'feature' has been the subject of numerous aftermarket detail sets to put intake trunks into the airframe so you can see J79 compressor faces at the end of the trunks, just like on the 1:1 examples.

Like the fuselage, the wings go together with no problems. Mounting the wings to the fuselage results in a slight gap as you can see in the images below. This can be corrected/adjusted by adding a sprue rod inside the mid-fuselage to spread out the fuselage bottom ever so slightly and close the gaps on both sides of the fuselage. These are very minor and are easily adjusted with some patience and dry-fitting.


The rear fuselage goes together with no problems. You'll only have to pay attention to the stabilators while the glue is drying to ensure that you have the correct and symmetrical anhedral set into the stabs.


In this early release of the F-4, the windscreen, centerframe, fore and aft canopies were all molded separately and can be positioned open or closed. In later releases, Hasegawa also included a 'one-piece' canopy which positions both canopies closed with one part. I didn't have any problems closing up this model with four parts. You might also note a few parts missing on this bird like the starboard chin intake, only because this kit was a flea market acquisition many, many years ago and a number of the parts had come loose of the trees. While the previous owner did their best to protect the loose parts, a few still got away over the years.


Conclusion
This kit goes together very easily. There will be a little seam smoothing as you can see on the dorsal spine but this too is very minor. While I did not work on the external stores, the kit provides the 370 gallon tanks for stations 1 and 9, a 600 gallon tank for the centerline (station 5), and correct pylons for stations 2 and 8 with twin rail AIM-9 missile rails. These rails don't actually have any rail detail so you'll want to add some Evergreen strips to create the rails before adding the AIM-9s. Four early AIM-9s and four AIM-7s are included in the kit, though I'd replace them all with aftermarket options. No bombs, rocket pods, gun pods, etc., are included in the box as these are available in the separately sold armament sets as I mentioned earlier.


Despite this kits age (this one was first released in the late 1980s), there is a good reason why the Hasegawa Phantoms have remained as the best kits of the subject in 1/48 scale. You can see for yourself how well this model goes together.
Still recommended!
References:


