Tamiya 1/32 F-16CJ (Block 50) Fighting Falcon Kit First Look
By Michael Benolkin
| Date of Review | December 2004 (Updated June 2020) | Manufacturer | Tamiya |
|---|---|---|---|
| Subject | F-16CJ (Block 50) Fighting Falcon | Scale | 1/32 |
| Kit Number | 60315 | Primary Media | Styrene |
| Detail Media | Styrene/Metal | ||
| Clear Media | Styrene | ||
| Pros | The best F-16 kit in any scale, excellent packaging, many options | Cons | No provisions for Block 52 (Pratt-powered), no ALQ-131 |
| Skill Level | Basic | MSRP (USD) | $167.00 |
First Look
 |
 |
 |
 |
 |
 |
 |
 |
 |
 |
 |
The Wild Weasel concept grew out of the USAF's first encounters with the SA-2 Guideline system over the skies of Vietnam. The initial concept was to modify an F-100F to carry specialized radar detectors and marking rockets. When a site was located electronically, the crew could then find it visually and mark the target for the accompanying F-105s using a hunter/killer approach.
The Weasel concept grew as better avionics, weapons and aircraft were applied to the problem. The first dedicated radar-killing missile, the AGM-45 Shrike gave way to the AGM-78 Standard ARM and then to the current silver bullet, the AGM-88 HARM. Likewise, the F-100F gave way to the EF-105F, the F-105G, the EF-4C, and then the F-4G.
Even as the F-4Gs were getting upgraded in the 1980s, it was becoming clear that a newer aircraft was needed. The big debate centered around either the F-15 or F-16, but two-seat F-15s were not available in sufficient numbers and F-15Es were too expensive. Conversely, two-seat F-16s didn't have the fuel and neither the single or two-seat F-16s had the internal capacity for the specialized Weasel avionics. The ideal airframe was the Panavia Tornado, but politics would prevent that thought from going far. In the interim, the F-4Gs needed some help with getting more missiles into firing geometry, so the 'manned pylon' concept moved forward with early F-16Cs modified to carry and launch HARMS. Flying formation with an F-4G, the HARMs on these 'manned pylons' could be fired at targets from directions provided by the F-4G WSO.
While the problem of internal avionics capacity was never resolved, an improved version of the 'manned pylon' concept was evolved giving an F-16 pilot with the situational awareness needed to effectively engage SAM sites. This concept was developed into the specialized Wild Weasel variant of the F-16, the F-16CJ. This designation is given to the GE F-110-powered Block 50 F-16Cs and to the Block 52 Pratt & Whitney F100-powered Vipers. The key distinguishing feature of the F-16CJ (aside from HARM missiles) is the HARM Targeting System (HTS) pod mounted to the right side of the engine intake.
While many skeptics didn't believe that a single-place Viper could effectively replace the specialized avionics and the extra set of eyes that all of the previous Weasels possessed, the F-16CJ has proven itself in combat operations.
Tamiya's 1/32 F-16CJ (Block 50) Fighting Falcon kit represents their first 1/32 F-16, their previous 1/32 aircraft releases being variations of the F-14 Tomcat, the F-15 Eagle, the F-4 Phantom II as well as their breath-taking A6M-5 Zero. As with their previous releases, it is clear that we'll be seeing many variations of this aircraft to come.
The box is the same size as the boxes used for the F-4, F-14 and F-15 kits. The internal packaging of the parts looks more like the great works found in the larger Trumpeter kits. Each of the larger parts trees is individually packaged, while the smaller trees were usually two per wrapper. The delicate parts (canopies, landing gear struts, etc., were all in a specially compartmented internal box that ensured that everything would arrive to your workbench safely. Despite the great efforts taken by Tamiya, I noted that the leading edge of one of the vertical stab halves had been damaged, probably when it came out of the molds. Great packaging, but not-so-great quality control.
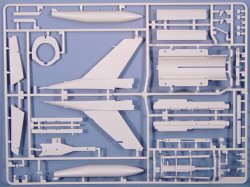
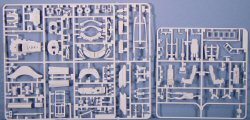
The kit is molded in light gray styrene and of course the details are all appropriately scribed or raised on the kit's surfaces. The parts are provided on 14 parts trees, plus a number of separate parts including the radome and your choice of clear or gold-tinted canopies. In addition, the main and nosewheel landing gear struts are cast metal, and two frets of etched parts are also included for seatbelt/harness buckles, radar face, chaff/flare launcher faces, and an F-16 data plaque. A bag of screws and a screwdriver are also included as assembly of the major components is accomplished with screws and glue, just as they are on the other 1/32 kits.
Assembly begins with the highly detailed engine stand, which is a nice replica of the unit used to install and remove the engine from the F-16. Next comes the General Electric F110-GE-129 engine, which is a complete scale model of its own right. The rear portion of the inlet duct is assembled, which also serves as the inner portion of the main wheel wells. With this ducting comes some internal fuselage structural details which are visible with the engine removed from the aircraft, so should you opt to build your Viper sans engine, you won't be staring at a hollow plastic fuselage shell when looking up the rear of the model.
The wide-mouth inlet duct is next, which is one of the unique features of the GE-powered Block 40, Block 50, and most of the Block 30 F-16s. The underside of this portion of the duct also serves as the inner portion of the nosegear well. Parts are not included in this release to replicate the narrow-mouthed inlet aircraft nor the engine nozzles for the Pratt & Whitney F100 engine. However, the way this kit is engineered, it is clear that we will see some Pratt-powered versions in the future.
With the complete intake ducting assembled and installed in the lower fuselage half, it is time to assemble the landing gear. As I mentioned earlier, the gear legs are all cast metal, which will provide a firm foundation for this not-so-light model. With the rubber tires on the rims, I think the wheels will flatten under the weight naturally.
By the time we get to Step 27, it is finally time to assemble the cockpit. The cockpit is highly detailed and even includes an ability for the ACES II ejection seat to move up and down the seat rails (for some reason). A nicely detailed pilot figure is also included with the proper helmet and survival gear worn by contemporary Viper pilots.
With the cockpit installed in the lower fuselage, it is time to join the forward and rear halves of the upper fuselage. With the forward section of the upper fuselage molded separately, it will be a snap for to Tamiya to use these molds for a two-seat Viper as well.
As with the Hasegawa 1/32 F-16, the kit also features a gun bay that can be posed with the access panels removed.
The instrument panel cover is also a separate part, enabling it to be replaced with the humped cover and larger HUD on the Block 40/42 F-16CG Night Falcons. Among the options you can choose for your Weasel Viper:
- Positionable leading edge flaps
- Movable trailing edge flaps
- Movable rudder
- Movable/removable horizontal stabs
- Removable engine
- Removable ejection seat
- Removable vertical stab (making transportation easier)
- Positionable speed brakes
- Removable radome to reveal a detailed radar
- Choice of AIM-120A or AIM-120C fins for your four AMRAAMs
- Choice of 300 gallon centerline fuel tank or ALQ-184 ECM pod on Station 5
- Choice of HARMs or GBU-31 JDAMS on Stations 3/7
- 370 Gallon tanks provided for Stations 4/6
- Choice of AIM-120 or AIM-9 on Stations 2/8
- Choice of clear or gold-tinted canopy
- Boarding ladder and wheel chocks also included
While Tamiya includes just about anything you might ever want for an F-16CJ, I am disappointed that the ALQ-131 pod wasn't an option. Hopefully we'll see an aftermarket pod soon. On the plus side, all of the external stored are mounted with polly caps, so you can change your loadout whenever you'd like.
Another interesting bonus to this kit is the box itself. It includes a cardboard tray that can be used to store or carry the completed model without worrying about damage. This feature alone sets a new standard for kit packaging!
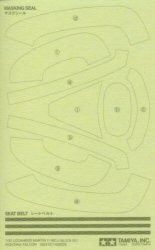
Rounding out the features of this kit are a sheet of canopy and detail masks and a sheet of 'Remove Before Flight' tags.
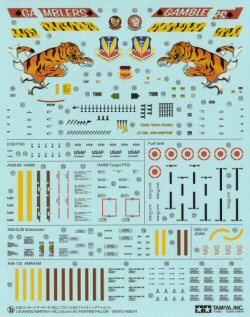
Decals are provided for four examples:
- F-16CJ, 91-0379, 79 FS/20 FW, SW, Tiger Meet of the Americas, August 2001
- F-16CJ, 91-0348, 77 FS/20 FW, SW, Operation Iraqi Freedom, 2003
- F-16CJ, 91-0399, 13 FS/35 FW, WW, Operation Iraqi Freedom, 2003
- F-16CJ, 92-0886, 14 FS/35 FW, WW, Operation Iraqi Freedom, 2003
Possibilities
If you have the Hasegawa 1/32 F-16 and some of the aftermarket accessories, it should be possible to backdate the Tamiya kit to an F-16CG with the help of the Black Box 1/32 cockpit and some LANTIRN pods, or even back to an F-16A with the appropriate inlet/nozzle and tail parts as well as a few other mods. While Tamiya will no-doubt be releasing many of these same versions in the future, you have the opportunity to have some fun with this kit.
This kit finally fills a void in the 1/32 kit world as the best we've had up until now was the Hasegawa kits which were initially models of the early prototypes or Block 5/10 aircraft. While they did issue the F-16A Plus/C kit, which offers the F-16A Block 15 or F-16C Block 25/30/32 as options, the molds were all based upon raised details. Up until now, the best F-16s in any scale were the Hasegawa 1/48 kits which featured up-to-date details and have covered almost every variant of the Viper. Tamiya has definitely raised the bar on the F-16 and I feel several of them coming on.
Here is a list of paints Tamiya identifies for use with this kit and the equivalent colors from other brands (Note: the first two colors are matches to the early war colors applied to USAAF aircraft, the remainder are the Tamiya-recommended colors):
H052
N052
XA1112
B032
C032
XA1036
H008
N008
C003
36190
X11
XF70
H308
B037
C037
A065
XA1136
H305
B031
C031
A066
H306
B053
C054
A064
H001
N001
B125
C125
A014
36104
X02
H004
N004
B290
C290
X08
H028
N028
X10
H008
N008
B003
C003
36190
LP11
X11
H009
N009
36194
X12
Aotake
H063
N063
X13
N01
H094
N094
H090
N090
X27
Dilectric Green
H026
N026
B327
C327
X28
H012
N012
B041
C041
XF01
H011
N011
XF02
H413
A036
36115
XA1213
H016
N016
H422
B020
C020
A060
XF05
XA1125
N013
C132
36131
Hull Red
H017
XF09
H061
N061
XF12
C078
XF16
H334
H074
B026
C026
XA1007
H417
B038
C038
A050
XF23
XA1208
H081
N081
H423
B022
C022
A061
XF51
XA1226
H336
H313
B090
C090
H309
B016
C016
XF65


