Revell 1/25 Impreza WRX Kit First Look
By Phil Cooley, Front Range Auto Modelers (FRAM)
| Date of Review | December 2005 | Manufacturer | Revell |
|---|---|---|---|
| Subject | Subaru Impreza WRX | Scale | 1/25 |
| Kit Number | 1548 | Primary Media | Die Cast |
| Pros | All the tedious is done for you. Beautiful paint job. | Cons | Directions are hard to discern, especially for novice. |
| Skill Level | Basic | MSRP (USD) | $20.95 |
First Look
 |
 |
 |
 |
 |
 |
 |
 |
 |
It seems like they are everywhere—small foreign cars with high-revving engines that dart ahead and change lanes with abandon. They are the tuners, the car of choice for many of the youth of today. They are not like the muscle cars of my youth… . They are not made by the “Big 3”, they don’t have big V-8s, many have 4 doors, and not only do they go quickly in a straight line, they also stop and handle well. And for many, its just as or even more important to have a great stereo as it is to be able to accelerate quickly.
These small foreign cars are nicknamed “tuners”. Many are highly modified by their owners, but, like the Big 3 did back in the 60s, the foreign manufacturers have taken advantage of the trend: they are selling “pocket rockets” straight off the showroom floor. The Subaru Impreza WRX is one of them.
The WRX comes with a turbocharged flat four, or boxer engine. It packs well over 200 horsepower which is a lot of power for such a small, light car. And, being a Subaru, it has full-time 4 wheel drive, which means that all that power is efficiently routed to the pavement. Plus, it even gets decent gas mileage. What more could you want in a performance car?
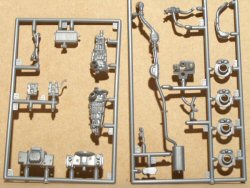
Engine: The engine is molded in two colors, gray and black. By my count, there are 20 parts, including a separate starter, oil filter, cam covers, and turbo setup. The fan belt is has accurately shaped pulleys—one of which is slotted, just like the real thing. In assembling it, I had difficulty getting the upper radiator hose to fit properly. I’m not sure if it is because the instructions are wrong or the part is shaped incorrectly. The directions show you gluing the fan belt guard in place before you glue the upper radiator hose. Yet in a later assembly, it looks like the radiator hose is routed under the fan belt guard. I ended up taking the radiator hose off, bending it and installing it after I screwed the chassis to the body.
Interior: The interior is a platform type, with separate sides/door panels. The front seats are two-piece; they go together easily and the seams are barely noticeable. There is also a console complete with separate shifter, emergency brake handle, and armrest. Interior options are a (chromed) fire extinguisher and a rollbar. I did not include these in my build, preferring more of a stock look. The instrument panel is a two-piece with a nicely detailed separate, main gauge panel. Finally, there is a steering column with dash stalks and a steering wheel. It all built up easily and looked nice when done.
Chassis: The chassis is two pieces, with a separate front and rear suspension. The front includes struts and a steering rack—I did have some difficulty positioning the struts. I erroneously glued them in the holes where you screw the front of the chassis to the body. It became evident this was wrong when I did the chassis/body assembly and that's when I repositioned the struts into their correct locations. If I was to do another one, I wouldn’t install the front struts until the chassis/body assembly step.
The rear chassis assembly has separate shock absorbers and driveshaft. Finally, there is the exhaust system. This is molded in gray and includes a separate, metal, chromed exhaust tip. I had a little difficulty getting the front of the exhaust system to line up with the engine’s exhaust manifold, but with a little bending of the exhaust system, this was easily rectified.
Wheels/tires: Two sets of wheels are included, a spider web set and a set of 5-spokes. Both are chromed—I chose the spider web set. Included is a set of no-name low-profile tires with directional tread, which is annotated in the directions. Finally, there are 4 separate disk brakes complete with caliper detail. I “painted” the calipers with a red Sharpie.
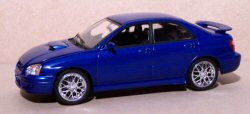
Body: The body is diecast. The hood opens and the body is nicely painted and detailed. It includes the details that I usually mess up when I was first starting to build models. The windows are pre-installed, including a rear-view mirror, and the “Subaru” and “WRX” emblems are painted on the body, as is the Subaru symbol in the front grille. So, you won’t have trouble with glue prints on the glass or paint blobs on the emblems. As is typical of today’s kits, there are separate exterior mirrors, though these even have a chromed “mirrored surface”. Of, I almost forgot, the body is packaged in a plastic bubble, which should prevent scratches in transit. My sample kit did not have any.
Decals: Since this is basically an easy build kit, I was expecting stick-ons instead of decals. I was wrong. These are genuine water-slide decals and they are graphics one could see on a tuner. The main ones are a stylized Subaru symbol. I chose not to include them in my build.
I am not a big diecast or tuner fan. This kit should appeal to both. It builds up into a nice model that can be displayed or played with. It would be a good kit for a beginner.
Many thanks to Revell for the product sample.
Ed Note: Phil is a member of Front Range Auto Modelers.


