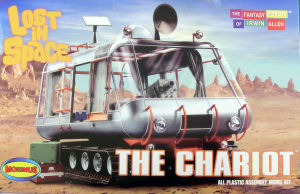
Moebius Models 1/24 'Lost in Space' Chariot Kit First Look
By Tom Grossman
| Date of Review | August 2008 | Manufacturer | Moebius Models |
|---|---|---|---|
| Subject | Chariot | Scale | 1/24 |
| Kit Number | 902 | Primary Media | Styrene |
| Pros | Very detailed | Cons | PVC tracks and tires may interact with plastic parts |
| Skill Level | Experienced | MSRP (USD) | $49.95 |
First Look
 |
 |
 |
 |
 |
 |
 |
The Chariot was the “family car” for the space colonist Robinson Family featured in the Irwin Allen 1960’s classic, Lost in Space. Departing Earth from the little screen in September of 1963, the Robinsons headed off towards a new future as the first colonists on Alpha Centauri. Things didn’t go well. Their trip is derailed and they crash on an unknown, hostile planet. Their terrestrial mode of transportation is the Chariot. It was alluded to that the Chariot can be disassembled for storage and deployment. It is kind of big to fit in that little space ship and pass thru that little door.
For filming, four Chariots were used. The 1:1 version was a converted Morton Thiokol snow cat. This convincing space ride drove like a tank. Left and right levers controlled speed, braking and steering. This practical vehicle could be driven right on to the set and parked beside the grounded Jupiter 2 for scenes requiring the vehicle. Also used was a 1/6 and two 1/12 models built by the special effects department at Fox. Irwin Allen had the forethought to film sequences with the miniatures in color so that the same shots could be used well into the life span of the series.
When the series was cancelled, the Chariot returned to its previous form and mundane life; hauling logs around at a ski lodge. In recent years, a collector has purchased the remaining chassis and is working on restoring the vehicle to space traveling past configuration.
This kit is an all new tool. We will dispense with consideration of the last model version of the Chariot as it was totally lacking. The Moebius 1/24 version is quite the opposite. This kit sports oodles of detail in all the right places. Since it is also in scale with the Space Pod, dioramas and vignettes will surely be popping up.
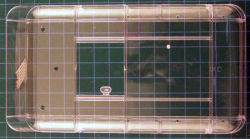
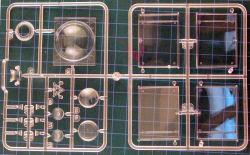
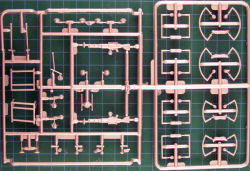
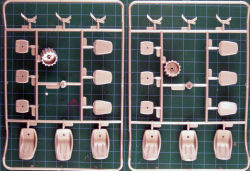
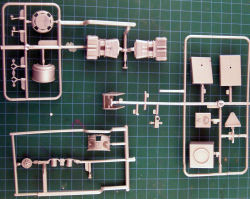
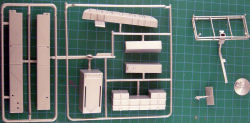
The kit is engineered very thoughtfully with over 175 parts on nine sprues along with a bag of loose parts. Looking over the instructions, the only major challenge seemed to be the handling and installation of the clear parts. But it wouldn’t be the Chariot without that.The interior is complete with seating for six with seat belts molded into each seat, control levers for the driver, front console, the front scanner, curtains, side benches and two laser rifles! You never know when you might see a nasty Cyclopes or a giant bouncing carrot!! The exterior also sports the sliding bubble canopy so, if posed open, all that detail can be clearly visible.
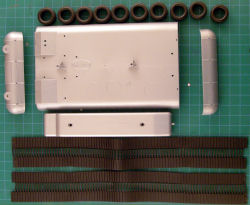
On the outside are all the bumpers, ladders and the luggage rack along with all the lights and the flat and dish antennae. The four door panels molded separately to allow choices in posing the kit. Great effort was also put into detailing the included Robot as it is assembled from twenty three parts, some of which are correctly clear. I can see the most adventurous and skilled modelers lighting it. Included with the interior is the Robot’s box where it sits at the rear of the Chariot. The undercarriage is designed with the same attention to detail seen in the rest of the kit. Separate PVC tires on styrene rims and the separate drive sprockets are mounted on metal axles. These are fitted with one-piece vinyl tracks. Screws are included to securely attach the chassis to the bottom bucket. The clear parts are packaged in their own plastic bags and relatively free of aberration.
Like the Space Pod, instructions are not what you may be used to seeing in other kits. They remind me a lot of what comes in old Aurora kits and others produced in that theme. An exploded diagram shows placement of all parts. An error made in the diagram is taken care of with a small correction sheet included with the kit. Major steps are separated with assembly described in text. Each step begins with a Painting Note. A color photo of the kit at completion of each major step accompanies the text at each step. The photos are mostly for paint reference but part placements are also visible.
Bare Metal Foil is mentioned as an option easier than painting for achieving a more realistic metallic finish than most easily applied paints can create. Paint references are made at each step with the alpha coding defined on the full page paint chart included on the instruction sheet. Color references are for Testors Enamel, Model Master Enamel and Model Master Metalizer paints. The presentation isn’t what we see in main stream kits. It relies more on verbal than graphic instruction. This might challenge some modelers and be a strengthening experience for others.
In my estimation, the biggest challenge this kit presents is painting the framework of the clear Body Top and assembling that section of the Chariot. The exterior frames and some of the panels are painted with Metallic Grey. That should present no more challenge than a large aircraft canopy. The real hard part will be the Orange interior. The interior surface of the Body Top is largely smooth. A clever modeler may be able to use home made paint masks for the outside framing to make a set for the inside. Rumor has it that Lou “Aztek Dummy” Dalmaso will be making a set of vinyl self-adhesive masks for the Chariot. That would help a lot!
Another problem noted during photography was that the PVC tired interacted with the plastic of the Body Tub. Upon opening the bag, the tires were stuck to the bottom of the tub, leaving circular scars. These are visible in the accompanying pictures. The scars were tacky indicating that some organic compound had leached into the plastic from the tires. The tracks are capable of inflicting the same kind of damage. That did not happen with the kit I reviewed. Moebius Models has been in contact with the Chinese production plant. It is the same plant that made car kits for Polar Lights. This problem has not been encountered before. But the silver plastic used in the Chariot kit is made from clear styrene with a powdered color additive.
None of the Polar Lights kits were made in that fashion so this problem may be the result of this novel combination. If you get a Chariot kit with this type of damage, Moebius Models will soon have replacement parts available. Replacement parts will be available to customers with kits that are damaged by the PVC tires and tracks. These will be available the last day of August or the first days in September. Contact Moebius Models Customer Service Department at customerservice@moebiusmodels.com and the damaged parts will be replaced at no charge. Moebius Models is also taking steps to insure that there will be such problems with future kits.
Inspect your kit immediately and separate the PVC tires and tracks into their own bag to prevent further damage. You may find that your kit is minimally damaged. My sample had a few semicircles from the tires on the bottom of the bucket and no marks from the tracks anywhere. It’s possible that running wheel assembly and chassis might cover most of it.
When you do build your kit, be sure to paint or clear-coat the surfaces of your wheel hubs that will be in contact with the tires to prevent the styrene wheel hubs from resuming the chemical interaction with the rubber tires.
I’m still very excited about the Chariot and the rest of the Irwin Allen series from Moebius Models! Yes, the tire issue is a bit disappointing but that is being addressed as quickly and efficiently as possible. Yes, the instructions are presented differently but the model is frankly not that complex. This is an opportunity to help the hobby grow. Some modelers will be challenged by the differences and that’s a chance to help them grow. Some who don’t model now but remember their youth could be enticed to start building again. That’s what clubs are for. Back to the story, these issues are minor in comparison to the excitement and memories the Chariot and the other Irwin Allen kits from Moebius Models are generating. There may be a little extra work and some extra challenges but you’ll get a highly detailed replica of something I’ve wanted since 1963.
I’d also be keeping my eyes peeled for after-market upgrade sets. I’m expecting to see lighting kits, perhaps photo-etch detail sets and, of course, 1/24 scale Robinsons and Major West! I suppose there could be a Dr. Smith figure, too. Oh the pain!
In short, looks like fun to me! Two thumbs up!
Thanks to Frank and Dave at Moebius! Keep up the good work!


