Hasegawa 1/48 F-22 Raptor Prototype Kit First Look
By Michael Benolkin
| Date of Review | November 2014 | Manufacturer | Hasegawa |
|---|---|---|---|
| Subject | F-22 Raptor Prototype | Scale | 1/48 |
| Kit Number | 07388 | Primary Media | Styrene, White Metal |
| Pros | Easy build, nice details | Cons | Surface RAM detailing overstated |
| Skill Level | Basic | MSRP (USD) | $89.99 |
First Look
 |
 |
 |
 |
When the F-15 Eagle entered service in the mid-1970s, it was billed as the air superiority fighter for the US Air Force. When the F-22 Raptor entered service, it was billed as the air dominance fighter. What's the difference? Trying to fight against the Raptor is like bringing a knife to a gun fight. The F-22 took an extraordinary period of time to develop prior to entering service, but the aircraft represents the integration of major advances in avionics, aerodynamics, flight control laws, stealth, and propulsion. Its gestation may have been long, but it has developed a significant leap in manned fighter capabilities.
Despite the aircraft's capabilities, the F-22 took a lot of flak from the press and others for becoming the most expensive fighter ever produced. What gets overlooked all-too-often is that it costs X dollars to develop an aircraft. The cost of that development is spread across the number of aircraft built. As the Air Force and Congress tried to 'save money' by cutting the number of aircraft built, the cost of development is spread across fewer airframes and the cost per airframe skyrockets. This vicious cycle of 'saving money' resulted in the Raptor setting new records for cost, not because the aircraft is expensive, but because of the politics of 'saving money'. It shouldn't be any surprise that the F-35 Lightning II has already surpassed the cost of the F-22 and the F-35 was supposed to be the 'budget' model.
In the beginning, there was Testors' huge 1/32 YF-22 kit, and it was really the only option for the Raptor until a few tiny scale kits were released. Next came the Italeri 1/48 scale F-22, and for the longest time, it was the only real kit option for a production aircraft. The problem with the Italeri kit was the designers didn't capture the angled down nose that starts behind the cockpit resulting in a rather odd appearance. When Academy rolled out their 1/48 F-22 kit, it instantly became the best Raptor kit on the market. Simple in layout, it did a good job in capturing the lines of the aircraft, though a few of the details were simplified, again due to lack of good information.
I was very surprised to see Hasegawa announce their version of the F-22 in late 2009 and even more surprised to see its first appearance in Japanese anime markings with the kit molded in bright colored styrene reminiscent of the old Matchbox kits. This was followed up in March 2010 with the F-22 in USAF markings and more conventional styrene colors.
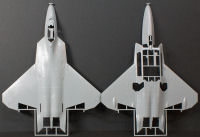
Here is the latest release of Hasegawa's F-22 Raptor, this time representing the first production prototypes. This is not to be confused with the early prototype YF-22 Raptors that competed against the YF-23 for acceptance into production as the YF-22 received a number of visible shape and detail changes to become the baseline F-22. Like the original PT45 release, this kit is molded in light gray styrene, is presented on eight parts trees, plus a single tree of clear parts, and a tree of tinted clear parts. This kit also includes a flight test boom for the nose cast in white metal (not shown).
As we observed in the first release, the kit has raised RAM details which are a bit exaggerated. By the time Hasegawa released the F-35A in 1/72 scale, they wisely represented that aircraft's RAM details with decals. I wish someone would produce the RAM patterns for the 1/48 F-22 in decals so the kit surfaces could be sanded smooth and still have sharp RAM detail. The reason for this effort is because this kit is easily the best engineered model I have seen in a while. The cockpit is nicely laid out. Given that the cockpit is essentially black inside, you'll still have lots of details to subtly drybrush in order to bring out some of that nice work. This is the first kit to have some good plumbing and good structural details in the weapons bays. The missile trapeze systems are very nicely done. Where the AMRAAM trapezes are provided with the missiles retracted in the bay, the AIM-9X rails are provided extended.
Once you get the cockpit and the weapons bays assembled and installed in their respective fuselage halves, you're going to be a bit surprised by all of the interesting structural elements that are installed inside the airframe. This is the bit of engineering I'm quite impressed with! These various structures (and there are more than 20 of them) serve as mounting points for the turbine ends of the afterburner chambers, the intake ducts and engine faces, and ultimately for the final assembly of the fuselage halves. Where the Italeri and Academy kits have a great deal of empty space inside the airframe that is easily squeezed during handling, Hasegawa has designed an interior structure for the kit to essentially make it squeeze-proof. This was some serious CAD engineering here.
As for the intake ductwork, gone are the awkward duct angles of the Italeri kit and the simplified ducts of the Academy kit. This kit has captured the curved profile and provides good compressor and turbine faces (another weakness of the Academy kit. Then there is the landing gear. Hasegawa seems to have nailed the Raptor's struts to match up with the nicely done wheel wells and gear doors.
Another big plus are the weapons bay doors. All of the doors have nice interior detailing that are actually molded as separate parts. You do have the option of posing the weapons bays open or closed, with closed doors separately provided to eliminate the complexity of trying to close up the door halves.
The kit does provide a complete set of armament - six AIM-120C AMRAAMs and a pair of AIM-9X Sidewinders. Unlike the Academy kit though, no external ferry tanks are included.
The trailing edge flaps, stabilators, and engine nozzles are positionable. Actually the stabilators are movable. The kit provides some healthy mounts for the stabilator shafts.
Assembly wraps up back at the cockpit with the assembly of the canopy and the optional pilot figure. The pilot has your choice of the standard lightweight helmet or the newest helmet that aims the missiles at whatever he or she wants to wipe from the sky.
Two sets of clear trees are provided in the kit. One is clear, the other is smoke tinted. You can use the smoke-tinted canopy to represent the stealthy canopy or use the clear and tint it to your own taste.
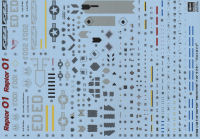
Markings are provided for two aircraft:
- F-22A, 91-001, 411 FLTS/412 TW, AFFTC, Edwards AFB, 'Raptor 01'
- F-22A, 91-002, 411 FLTS/412 TW, AFFTC, Edwards AFB
The decal sheet has a nice set of maintenance stencils for the airframe and the weapons as well as the distinctive markings for each of the subjects above.
Overall, this really is an impressive kit. If Hasegawa hadn't overdone the surface RAM details on the airframe halves, this kit would be a slam-dunk best kit ever of the Raptor. While this kit brings to mind the old equation of how many 'attaboys' does it take to erase one 'aws#@t', for me I think this kit is still a must-build.
My sincere thanks to Hasegawa USA for this review sample!


