DML 1/48 Ta 152H-1 Kit First Look
By Michael Benolkin
| Date of Review | April 2006 | Manufacturer | DML |
|---|---|---|---|
| Subject | Ta 152H-1 | Scale | 1/48 |
| Kit Number | 5501 | Primary Media | Styrene, Photo-etch |
| Pros | Exquisite detailing | Cons | |
| Skill Level | Intermediate | MSRP (USD) | Out of Production |
First Look
 |
 |
 |
 |
 |
 |
 |
 |
Doctor Kurt Tank was the designer of the Focke Wulf Fw 190 series and put the name Focke Wulf forever in the history books. Nevertheless, Tank was given his own design team to tackle the problem of developing a high-altitude interceptor. The resources of Focke Wulf were left to production of the existing Fw 190 line.
The task at hand was to develop an interceptor that could reach higher altitudes with a combination of greater lift and more power. To counter the effects of prolonged operations at altitude, the cockpit had to be pressurized. The result was the Ta 152H, an aircraft that bears a strong resemblance to the Fw 190D series, but was in fact a completely different aircraft. The wingspan alone was significantly greater.
Deliveries of the Ta 152H commenced around December 1944 with some 60 examples being produced before war's end. How effective was this aircraft? Rather than quote some book, let me share an insight from a friend who flew the Mosquito for 418 Sqn (Canadian) and became an ace, then was drafted into the USAAF to fly 'weather reconnaissance' (OSS) missions with the Mosquito for the rest of the war. According to him, as long as both Merlins were running, there wasn't anything that Jerry could put up that could catch him on his high-altitude profiles. That changed with the Ta 152. The aircraft could easily reach his flight level, but could not mount an effective intercept unless it got above or in front of him. Evidently a few came close. If I recall correctly, one of these close encounters resulted in the loss of an engine, but they still managed to get away and limp home.
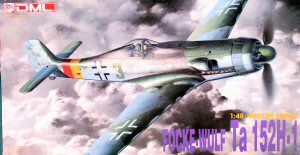
Here is one of Trimaster's greatest kits, the Ta-152H. This kit, along with the others in the series, was way ahead of its time in terms of detail and molding technology. This kit is still the best injection-molded Ta 152 in any scale, with the best kit status going to Jerry Rutman for his resin 1/32 Ta 152.
This was the ninth kit in Trimaster's line-up, but the first one released when DML acquired the molds. Nobody has matched the Trimaster kit to date (in styrene).
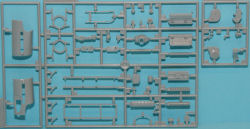
The kit is molded in light gray styrene and presented on four parts trees, plus a small tree containing the clear windscreen, canopy, gunsight, and light lenses. Two small frets of photo-etch are included containing seatbelts/harness, rear cockpit deck, canopy hood locks, antennas, and more.
While most aircraft kits start off in the cockpit, this one starts under the cowling. The first task is to assemble the Jumo 213E engine that is quite a detailed model in its own right. You might wonder why you'd build up a detailed engine? Two reasons actually.
- Tank's long-nose fighters did not have a completely enclosed main wheel well. This allowed the engine to draw more air through the cowling when the landing gear was down. Since you're likely to build this kit gear-down, you'll want to see more than an empty plastic shell up where the engine would be
- While you see that the nose is molded closed-up, you'll also note that there are a pair of cowling access panels molded separately in the third frame. You have the option of cutting away the molded-on doors and replacing these with the provided doors in the open position to display that nice-looking engine
The cockpit is next, and like the Focke Wulfs that preceded this kit, the detailing is very nice! The instrument panel is molded with nice relief to make painting easy, but the kit was released long before photo-etched instrument panels with acetate instruments. If you prefer this sort of detail, Eduard released a detail set (48224) that will help you along.
As I recall, some of the details in the Trimaster version of this kit were actually cast in white metal, but DML recreated these parts in styrene for their subsequent releases.
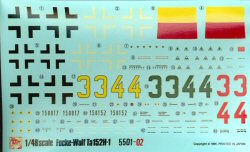
Markings are included for two aircraft, W.Nr. 150017 and 150152. The profile shows a representative aircraft from JG 301 (to match the enclosed Reich Defense Bands), but no indication which aircraft wore which markings. It appears that the artists were not certain if these aircraft (numbered 3 & 4) wore yellow, green, or red numbers, so all three are included.
The instructions are nicely illustrated and clearly show the colors for all of the parts using Gunze Sangyo color numbers, though a table is included to translate those colors into generic color names. If you'd like to have an equation of Gunze numbers to standard RLM colors, go here.
This kit has been reissued a few times but is currently out of production. Nevertheless, the kit is still readily available at hobby swaps and on eBay. You may even have one or two of these beauties stashed on your shelf! Dust one of these off and build this unique piece of aviation history.


