Airfix 1/72 Jet Provost T.3 Kit First Look
By Michael J. Gething
| Date of Review | March 2017 | Manufacturer | Airfix |
|---|---|---|---|
| Subject | Jet Provost T.3/3A | Scale | 1/72 |
| Kit Number | A02103 | Primary Media | Styrene |
| Pros | Excellent detail | Cons | Some delicate parts |
| Skill Level | Moderate | MSRP (GBP) | £9.99 |
First Look
 |
 |
 |
 |
 |
The Hunting Percival Jet Provost was the follow-on to the company's piston-engined Provost T.1 and went on to replace the de Havilland DH.115 Vampire T.11 as the standard jet trainer of the Royal Air Force (RAF). The prototype JP (as the aircraft was affectionately known), featured side-by-side seating and was powered by an Armstrong Siddeley Viper ASV.5 turbojet. It made its maiden flight on 16 June 1954 and was followed by nine production JP T.1 (plus two used by the company) and four JP T.2 development aircraft, which were trialled in the basic jet trainer role.
In 1957, it was announced that the JP would become the standard ab initio trainer of the RAF, the production version being designated Jet Provost T.3. The first of 201 aircraft flew on 22 June 1958, powered by the Viper 8 Mk 102, rated at 1,750 lb st. It entered service with 2 Flying Training School (FTS) at Syserston in June 1959. Some 70 T.3s were later upgraded with improved avionics as the T.3A model, which was finally withdrawn from RAF service in 1992.
In 1961, the Jet Provost T.4, powered by the Viper 11 Mk 202 having some 40% more power than the Viper 8, entered service. Externally it was identical to the T.3 model and the RAF procured 198 T.4s in all. The last RAF T.4 was withdrawn in 1989.
In 1960, Hunting Aircraft (as Hunting Percival had become in 1957) was taken over by the British Aircraft Corporation (BAC), which went on to develop a pressurised cockpit version, the Jet Provost T.5, first flying in 28 February 1967, which also spawned the light attack BAC 167 Strikemaster variant. (Airfix released a JP T.5/Strikemaster kit in 1974.) The RAF withdrew its last T.5s in September 1993.
The whole JP family also enjoyed export success, being acquired by Ceylon (now Sri Lanka), Ecuador, Iraq, Kenya, Kuwait, New Zealand, Oman, Saudi Arabia, Singapore, South Yemen, Sudan, , and Venzuela.
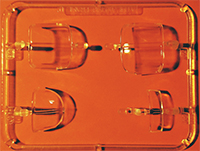
And so to the kit ... three sprues in light grey plastic plus one of cockpit transparencies present a well detailed set of parts to build the model, to the standards we have now come to expect from Airfix. It is, of course, eminently superior to the original JP kit, first issued in 1959 to coincide with the type's introduction into RAF service. There is an 8-page set of instructions, which includes two colour pages showing the two colour schemes offered. These are a T.3 (XM413) of 2 FTS, RAF Gaydon 1967 in silver with many day-glo orange panels (provided as decals and accurate in colour, although the accompanying scan of the sheet renders them pink!); and a T.3A (XM461) of 1 FTS, RAF Linton-on-Ouse 1984 in the later white/light aircraft grey and red livery. A line diagram on an additional sheet shows the location of the many small stencil markings also provided on the decal sheet.
A fully-detailed cockpit floor is provided, together central console, control columns and instrument panel (with a decal) plus the ejection seats, each comprising four parts – the sides, seat with straps, and the head (complete with ejection handle). The fuselage interior sides feature raised detail and two well sculpted pilots are also included. Don't forget to add nose weight so the model does not become a tail-sitter! The canopy option allows closed or open versions, although if memory serves (I last flew in a JP3 [XM412 as it happens] in 1975) the main canopy bracing strut was an interior one and not, as moulded, on the outside. Providing you are equipped with fine files and abrasive cloths/liquid, this can be corrected; if not, it is not the end of the world.
The lower wings come as one moulding including the centre lower fuselage and include with wingtip fuel tanks. The upper wings (port and starboard) are fixed after the lower set is in place. The tailplanes come as one moulding, which slots into the rear fuselage before the jet pipe fairing is fitted, thus eliminating the 'aggro' associated with ensuring the two are level in construction. The undercarriage features weighted wheels, so make sure they are attached the right way up! The kit is completed with the various little antennae and pitot sensors, best left until after painting/decaling before fixing.
Overall this looks a splendid little kit and the examples I have seen built are fine models. A word of caution: one modeller with whom I talked told me he'd had great difficulty applying some of the day-glo panels, while another had no problems. I note that there are already some aftermarket products available to add further detail for the cockpits and alternative markings/insignia. I would like to build mine as XM412 (in which I flew) but, as I was unable to photograph "my" aircraft, I remain unsure of which colour scheme it used. Back to trawling the inter-web, I suspect.


