Quinta Studio 1/32 F4U-1A Corsair Interior 3D Decal Set Review
By Michael Benolkin
| Date of Review | August 2021 | Manufacturer | Quinta Studio |
|---|---|---|---|
| Subject | F4U-1A Corsair Interior 3D Decal Set | Scale | 1/32 |
| Kit Number | QD32040 | Media | Resin-Printed Decal |
| Pros | Sharp 3D-printed details | Cons | Nothing noted |
| Skill Level | Intermediate | MSRP (USD) | $22.95 w/free shipping in the USA |
Review
Here is the 3D resin-printed detail set from Quinta Studio for the Tamiya 1/32 F4U-1A Corsair. This is my second project using this system and I learned some good information since my previous review. My first project was using this system on Zvezda's 1/32 Mi-24V interior which had no surface details molded onto the instrument panels/side consoles. In that example, the details simply went down over the interior paint using Tamiya Gloss Clear as the laminate coating. The folks at Quinta Studio later suggested using thin cyano which turns out to be a better method once the parts are all in position. More on this later.

The first step was to identify all of the kit parts that these parts are going to be placed upon and to carefully remove the molded-on details. I used my Sujuburido planing file to make the surface smooth, then painted each part NATO Black. When the parts were ready, it was time to apply the decals, or rather, resin parts.
To be clear, these aren't really decals. There is no clear carrier film and not much of any adhesive, so the parts won't really stay in place without some help. As recommended by Qunita Studio, I cut the decal sheet to remove the parts I needed for any given step, then put them into the water. Like a decal, the resin-printed parts come off the carrier sheet, but I place them onto a paper towel to dry.
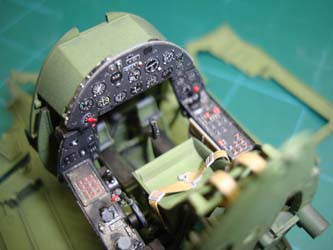
Following the kit instruction, I built up the front portion of the cockpit making certain I was happy with the airbrushed colors before getting started with the Quinta Studio parts. I did make the mistake of adding some of the smaller detail parts to the side consoles like the trim wheels on the left side and the radiator levers on the right side. I started with the left side console and noted that the holes in the Quinta left side console had holes for the trim wheel parts (no carrier film, so no trimming required). I used Future this time as my clear gloss and used this to get the part laminated to the console. The holes were almost large enough to go over the trim wheels, but with some coaxing, I was able to get the part over the trim wheels without harming the resin-printed part and the part otherwise fit perfectly. I was able to remove the radiator levers and laid down the right console resin-printed part onto a coat of Future. This process was repeated for the main instrument panel and the lower sub-panels. Once the Future had dried and I was happy with the positioning of the parts, I used my tweezers to pull up a corner of each part and apply thin cyano to fix the parts into permanent place.
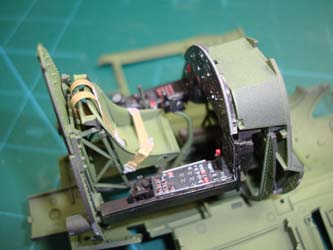
Following the instructions, I built up the rear cockpit bulkhead, seat mount, and pilot's seat. The kit provides photo-etched steel pilot restraints, but I used the Quinta Studio parts instead. This time I placed each strap using the thin cyano, but of course there was shiny spots on the seat where the thin cyano ran out from under the parts. This was easily corrected by lightly spraying Gunze Aqueous Flat Clear and all looks great now.
At this point, the front and rear portions of the cockpit are dry-fitted together and sitting atop of the lower wing/fuselage for these photos. I still have some small parts to add to the cockpit subassembly as well as the various control boxes that mount to either fuselage half that also have corresponding Quinto Studio faces. The details on the Quinta Studio parts is so clear, you can even tell the time (13:44 local time).
These interior detail sets are easy to use and provide your project with stunning details!
The good news is that HobbyZone USA has this set in stock.
My sincere thanks to HobbyZone USA for this review sample!


