Kits-World Decals 1/48 A-10A Interior Detail Set Review
By Michael Benolkin
| Date of Review | August 2021 | Manufacturer | Kits-World Decals |
|---|---|---|---|
| Subject | A-10A Interior | Scale | 1/48 |
| Set Number | 3D1481023 | Skill Level | Experienced |
| Pros | See text | Cons | See text |
| MSRP (USD) | TBA |
Review
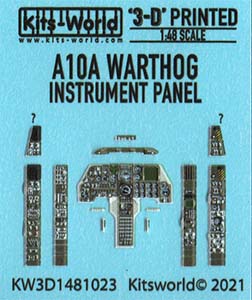
Kits-World has joined several other manufacturers in employing color 3D printed detail/decal technology with the release of several new cockpit detail sets including this one. This set covers the interior details of the A-10A Thunderbolt II sized for any one of several kits.

First and foremost, these sets do not provide any sort of instructions, nor are there any provisions for them. All that is provided in the pack is the cover sheet (title image) and the decal sheet above. If you've never used 3D-printed decals before, these aren't really decals, so you don't drop the sheet in water, slide the decal into place on the plastic part, and move on to the next step. There isn't any real adhesive on these 'decals', so it is best cut the sheet into sections, drop one section into water, slide each 'decal' off of the backing paper and onto a paper towel to dry. When you've removed the surface details off of the part receiving a 'decal', apply Tamiya gloss clear or Future to the surface, and lay the dry 'decal' into place atop the still-wet clear. Some suggest using cyano to place these 'decals' but I suggest using the clear mediums to get your 'decals' into position, and when they've dried, you can use tweezers to pull up a corner and apply thin cyano to make the lamination permanent. You can see this process in my recent F4U cockpit here. The problem is that these facts are not noted anywhere on Kits-World's products or even their website (as of this writing).
There are two real problems here; first, unlike the Quinta Studio sets which number each 'decal' and provide color-printed instructions for which kit parts receive each 'decal', this set has no identifying numbers provided. Second, this set is supposed to work with either the Revell/Monogram (same kit) or Tamiya kits. If part of a panel is too large for the selected kit, which part(s) of the detailed 'decal' must you slice away? Note that Italeri isn't mentioned though that is covered by another company. There are two styles of side consoles and alternative ends for one set of them (noted with quesion marks{?}. but no information regarding which 'decals' to use with what kit. To top all of this off, there is no mention that you must first remove any molded-on detail from each part that receives one of these 'decals'. Kits-World, please rethink these products and generate some proper instructions, even if they're only on your website.
My sincere thanks to Kits-World Decals for the review sample!


