ZZ Modell 1/87 ZiS-151 Build Review
By John Kelley
| Date of Review | August 2011 | Manufacturer | ZZ Modell |
|---|---|---|---|
| Subject | ZiS-151 | Scale | 1/87 |
| Kit Number | 87002 | Primary Media | Styrene, Photo etch brass and vacformed windscreens |
| Pros | Well detailed and simple to build | Cons | Vague instructions |
| Skill Level | Basic | MSRP (USD) | $16.95 |
Background
The ZiS-151 was produced from 1948 to 1965 and was an all wheel drive general purpose truck produced after the war. The ZiS-151 was produced in the thousands and was used by numerous countries. It was replaced by the ZiS-157 in 1958. The difference between the two was a different grille and single rear wheels instead of double wheels. The chassis was used for the BTR-152 APC and the BAV 485 Amphibious Vehicle.
The Kit
ZZ Model has produced a kit of the ZiS-151 truck in 1/87 scale. The kit comes with some items that I am not used to seeing in this small of scale. Things like photo etch grill work, mirrors and screen, and a vacuformed windshield.
Assembly
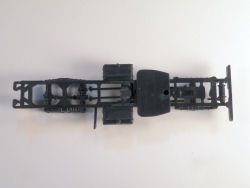
Starting with the chassis, I fit the one piece rear axle assembly onto the location pins. I found this to be a difficult task because the springs will not spread out enough to clear the pins. I broke one off trying to put them on. Looking back, I would recommend sanding down one of the pins until you are able to slip the axles on.
The next item added was the gear box and drive shafts. The drive shafts were a little short, so I added some plastic rod to the ends so they would make contact with the axles. The exhaust location was rather vague on the instructions so I took my best guess. I added the front axle, winch and bumpers and this completed the chassis.
Next came assembly of the cab. I cemented the cab to the fenders and added the photo etch pieces. I drilled holes in the door sides to add the side mirrors. The cab and interior were assembled and set aside to be painted. Because the windshield is one piece, I found it easier to build the model in sub assemblies, paint, and then assemble them all together. The fuel tanks were assembled and added to the chassis using the rear wheels as a guide to make sure that I had enough clearance between the tank and the wheels. The mud guards were then added to the cargo bed and this completed the major assembly.
Painting and Finishing
The tires were painted Tamiya German Gray and the wheels and chassis were painted Model Master Interior Black. The cab, spare wheel rack, and cargo bed were sprayed Tamiya Olive Green. The body components were then sprayed with Pledge Floor Wax with Future and after this had dried, a wash of Windsor & Newton Lamp Black and Turpanoid was applied to the details and recesses.
Final Assembly
The vacuformed windshield was carefully cut from the sheet. I left an extra quarter inch on the bottom and carefully trimmed it as close as possible. When I installed the windshield, it bowed in two places. To eliminate this, I cut out small triangles of plastic near the rear cab corners and one on the passenger side of the windshield. This allowed the windshield to lay flat against the openings.
I attached the windshield with white glue and allowed it to dry. I then began work on the headlights; two clear discs are provided by ZZ to simulate the lamps in the headlights. These were so small that during construction I lost them and still haven't found them! In keeping with the spirit of the kit I added clear plastic disk punched out using a Waldron Punch and Die Set. I painted the headlamps silver and added the clear disks using white glue. These were then added to the fenders. The holes were a little small, so I opened them up with a drill. Next the interior was added and the cab attached to the chassis.
The running board supports were quite thick and interfered with attaching the cab to the chassis. I broke off a support doing this but after a little sanding on the chassis I was able to fit it in. I then reattached the support to the running board. The spare wheels were added to the rack and the side pieces were glued on. This assembly was then added to the chassis. The cargo bed was added next and the side mirrors were painted silver. The kit provides a metal rod that must be cut in three even lengths to be used as the axles for the tires. After the wheels were added, this completed the kit.
Conclusions
I have built other 1/87 scale kits in the past, but I did find this kit to be a pleasure to build and with detailing on a par with larger scales. I highly recommend this kit to anyone interested in modern Soviet wheeled vehicles. If you've never tried a 1/87 scale kit, you will not be disappointed in this one.
My thanks to HobbyTerra for this review sample.


