Wolfpack 1/48 T-38A Talon 'NASA' Build Review
by Fotios Rouch
| Date of Review | January 2014 | Manufacturer | Wolfpack |
|---|---|---|---|
| Subject | T-38A Talon 'NASA' | Scale | 1/48 |
| Kit Number | 10001 | Primary Media | Styrene |
| Pros | Easy build | Cons | A few minor glitches |
| Skill Level | Experienced | MSRP (USD) | TBA |
Build Review
For a look at this kit out of the box, look here. For a look at our quick-build review, look here.
This is the Wolfpack T-38 model. A nice kit overall so far with just a few design errors.
I always liked the NASA Talons. Their slick lines nicely accentuated by NASA's smart schemes. I dare you to find a boring looking NASA Talon! The project idea remained in the back burner until the fundecals Talon set came out: fundekals.com.
Actually, I had already looked at the superbly researched online decal instructions available at the link above and noticed that all of the NASA schemes were included and then some! I promptly ordered two sets, one to use and one to archive. Just as importantly, the decal instructions have recommendations for great resources and references. I purchased them all.
One truly inspirational reference is the Story Musgrave book titled "The NASA Northrop T-38 / Photographic Art from an Astronaut Pilot" www.t38jet.com. Talk about inspiration mixed with poetry, amazing photography and genuine love for the aircraft.
One more note before we get into the build: So I am reading the Musgrave book in bed and my wife says to me - "I know this guy, I met him at the 2013 Arizona Science and Astronomy Expo". Go figure. Serves me right not to go to her shows... The good thing is that she got me in touch with good Doc. Musgrave and he has been a great source for info for my build.I am dedicating this build to his enormous devotion to the field and this beautiful machine. I decided to build this kit mostly out of the box. No dropping the ailerons or flaps or any other mods. I had to buy the resin Wolfpack seats but that's about it.
So the build started with the cockpit. I decided to paint the instrument panels and not use the decals. That is except for the artificial horizon. I pre-painted the artificial horizon top with bright blue prior to applying the tinny decal. The rest of the details were picked off with a fine brush. Useful nuts and bolts details for this build are available in DACO's "Uncovering the Northrop T-38 Talon". I tried to find photos that show the parachute and the survival pack left on the seats but i could not. Not clear if Wolfpack overreached here.
The fuselage halves went together OK as they sandwiched the cockpit. The problem comes as you try to install the front instrument panel coaming. The instrument panel stands too tall. I trimmed it down and thinned out the inner surface of the coaming.
The front bottom fuselage plug fit OK but not perfectly. I had to mask it out and use Acryl Green on the seams.
I was not very happy with the fit of the bottom fuselage to the top fuselage, especially towards the rear. I had to use spreaders to get it to line up really good. The rear spreader had to be removed later after the glue set well to allow for the exhaust cans to fit.
The speed brakes and the engine cooling intakes have large sink marks and I used a new product I came across. It is called Mr. Liquid Putty. I am experimenting with it and it seems to work great and it dries fast.
The tail needs attention so look at you references. There is detail on the plastic tail that is not present on the Talon. Also the rear position light needs some augmentation.
One other thing that needs a little work is the front wheel. I chose to thin it down to something more realistic. Just be careful with your saw blade and cut it slow so you do not end up with uneven halves.
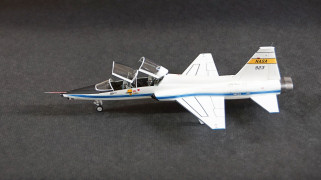
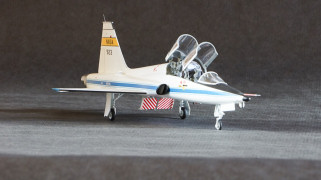
I decided to model the 923 NASA Talon from the 80's Space Shuttle program. For that you need the enlarged bolted on speed brake plates. These guys were necessary to slow down the Talons on their simulated Shuttle 20degree landing approaches. The Fundecal instructions tell you how to build them. I made mine from styrene stock. Once dry I will thin them down a bit.
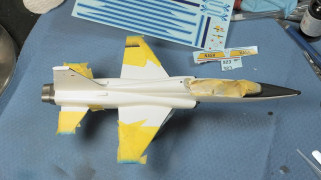
The model has been primed with Mr White Surfacer 1000 and will be polished with polishing cloths prior to the application of gloss white.
The Testors Gloss Insignia White went down in multiple thin coats. The underlying white primer helped a lot. I chose not to mask the natural metal areas and use the gloss white as a base instead. If the Alclad II is sprayed thin and in multiple coats it will not affect the paint.
Next I painted the speed brakes. I applied the Fundecals candy stripes to a pleasing final result. I test fitted the brakes in place and all looked well. I liked how nicely the decals behaved with the softening agent and how they snuggled down on the brakes and their arms.
I used the masks provided for painting the wheels.
Next job was to mask for the black paint. Lots of masking went down to protect the white paint. I will check my other Talons but it seems to me that the nose tip engraving is not perfectly even from left to right. Careful masking took care of that.
The next thing I worked on was the intakes. They fit OK but they are missing the small aux inlet feature at the front of the splitter plate.
It is funny because the instructions show a photo of the plane head on with the inlets prominently showing. I have included a picture with the inlet opened up on one intake and not the other. No biggie but it would have been nice to have had it included in the kit design.
Next I sprayed Alclad II shades for the exhaust areas and then while the airframe was still masked I polished them off with SNJ powder which embedded itself into the Alclad II creating a slightly different tonal effect.
Fundecal instructions show the main and tail wingtips being painted in OSHA Safety Blue (FS15092). I carefully masked the wings allowing the black leading edge to slightly overlap the wingtip corners just like the instruction tell you and just like the photos show. I really like the Fundecal set's attention to detail.
Next job was to start laying down the decals. They come off the decal paper very fast and they went down really nicely. They engraved panel lines show really nice underneath the decals without any solvent assistance. I also added decals from the kit. It could be that WP does not have the expertise to mold engraved detail on all complex surfaces so some top surface fuselage detail is given in decal form. You can see that in the image just behind the top fuselage aux engine cooling intakes. I can live with it but it seems that I would have to add some paneling enhancement with ink perhaps to match the effect.
The decals went down without any problems. Do not discard the WP decals as you will need some of them that are not included in the Fundecal set.
Do not forget to scratch-build the windshield that protects the trainer. I used clear acetate and traced the inside diameter of the middle frame. While you are at it you might want to add some more detail to the middle frame such as ribbing and mirrors.
This was a fun build that could have gone faster if there were no glitches to fix. The next one should go faster.


