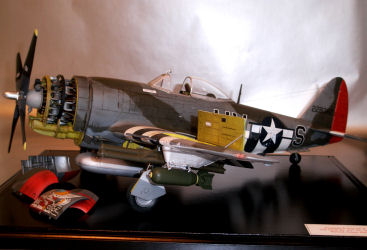
Vintage Fighter 1/24 P-47D Thunderbolt
By Rob Pollock
| Date of Review | May 2012 | Manufacturer | Vintage Fighter Series |
|---|---|---|---|
| Subject | P-47D Thunderbolt | Scale | 1/24 |
| Kit Number | 2405 | Primary Media | Styrene |
| Pros | First kit of this subject in this scale (in styrene) | Cons | See text |
| Skill Level | Experienced | MSRP (GBP) | £60.00 |
Background
The Thunderbolt was the largest and heaviest single-seat, single-engine fighter of WWII. Produced at plants in Farmigdale and Evansville, the design evolved around the Pratt & Whitney R-2800 engine with turbo-supercharger. Operational from 1943, visibility issues reported by pilots were overcome with use of the RAF’s Hawker Typhoon’s ‘bubbletop’ canopy. The P-47’s fuselage was modified for the installation of the tear-drop canopy, fitted with an electric actuator for emergencies, and the windscreen was redesigned with a bullet-proof panel. Armed with eight wing-mounted .50 calibre Browning machine guns, and hard points for a formidable selection of ordinance, the rest, as they say, is history.
The Vintage Fighter Series (VFS) 1/24 Republic P-47D Thunderbolt is the first model of this important aircraft in this scale.
I first saw VFS kit VF2405, a P-47D 25/26 series machine, at the Hornchurch Southern Expo (UK), I think in 2009. I was speaking to VFS Managing Director Ray Thomas about a prototype Spitfire Mk 22 he was previewing at the Expo, and I picked up one of his business cards to find to my surprise that the unit where he based his business was about half a mile from where I lived at the time in Essex. Small world. From the selection of VFS Thunderbolts available at his stand, I purchased the kit above, which languished in my stash for three years. I don’t think I was necessarily put off by the scale. It was just that it took a little time to find ‘the right time’ to build it. However, if you’ve built the Revell Ju-88 in 1/32, or similar kits, you’ll get an idea of the size of this single-engine fighter.
I researched the five machines catered for in the kit, and decided on the livery of Major Donovan Smith, for P-47D-26 RA (Evansville plant), ‘Ole Cock III’, 56FG, 61FS, based in Boxted, Essex in 1944. Smith was not the highest scorer in the 61st, which included Gabreski, Johnson, and Shilling, but I particularly liked the nose art, and there are several nice photographs on the Internet of this machine in maintenance, and with load-outs similar to those pictured on this model.
The Build
The kit is finely detailed. Individual parts exhibit subtle, accurate panel lines and rivet pattern. Of particular interest is the cockpit and engine, which are excellent, although the latter was the source of some frustrations later in the build (see below).
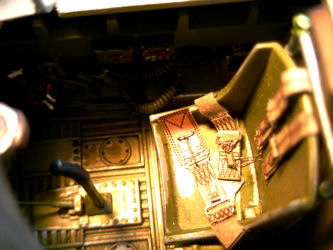
In the photograph above, some of the starboard sidewall can be seen. Cables and switch boxes were fitted additionally to the kit parts. Step 1 (a full page of the instructions) is for the cockpit build alone. Interestingly, the kit provides four gun sight choices, which arguably is overkill for a relatively minor part when fitted. Two of these were single-piece clear sprue sections, while two others were assembled from the standard sprue parts. I decided on the Mark VIII version.
Although not photographed here, the port sidewall is equally well-kitted.
In the above photo, although part obscured by camera flash, are details of the seat and floor. Rather than adding silver highlights after painting, I sprayed the interior surfaces in Alclad lacquer, then sprayed the finish colour in enamel (my preference). When dry, a cotton bud was damped lightly with white spirit to lift the top coat to the hard lacquer base below, thus creating the appearance of metal with a naturally weathered appearance. The practice is reserved to raised edges and hard-wear areas.
The moulded-in oxygen hose detail was removed from the sidewall and replaced with lead wire wound around with still smaller gauge lead wire, painted and washed with burnt umber thinned with artist’s distilled turpentine.
Tensioning supports, one of which can be seen just forward of the stick, were made from two gauges of brass wire (Albion).
The seatbelts are Eduard 23001 USAF/USN 1/24, the only aftermarket item used in the build.
A detail of the main canopy. Clear parts were flawless. The kit allows for a canopy in the closed position, but as I wanted to display the fine (and large) cockpit, I removed the small nipple tab to the underside of the canopy, and filled the corresponding tab hole. To note, the Republic maintenance manual states that the raised flat area behind the cockpit is finished in olive drab, as would be the anti-glare panel forward of the cockpit (none in this case as the disruptive camouflage pattern does the job).
Here is a detail of the port wing gun bay. Generally, yellow chromate was used for all bays/wells, and general engine framework. Green chromate was used only for flap levers and engine fixing points where visible. Lead wire was used for hydraulic lines. The bay cover numerals are kit decals.
Starboard gun bay with underside of the panel on view, again in yellow chromate, weathered for effect.
A detail photo of the gun barrels. These are simply kit plastic. I used a new No. 11 scalpel blade to ream the blank ends a little. They are painted with Humbrol Metal Cote 27003, with the edges polished off with a little graphite powder.
The bomb grapples required a little fettling to settle into the ordinance correctly. All were test fitted again and again, painted, and set aside as sub-assemblies.
The port nav light. The clear piece was ‘corner drilled’ and clear red was pushed into the hole. P-47 nav lights had clear covers with the coloured light fitted into the wingtip itself. Similar operation for the starboard light but different nav colour as per spec.
Some detail of the port wing ammunition bay is also visible here.
Engine detail. The black secondary ignition ring is Evergreen plastic strip. As it was a scrap piece I don’t know the gauge, but it has to be reasonably thick to withstand the circular bend for the circumference of the engine perimeter. The harness is lead wire, I think 1.0 mm, painted Tamiya XF-60 Dark Yellow. It should be noted that the engine is in fact three sub-assemblies, with a total of nearly 60 parts. In fact, I think the engine alone is a similar parts-count (and weight) to a 1/72 scale Thunderbolt!
Having built the engine except for adding the wiring detail, I sat it aside and completed the main model. It was only later when I attempted to fit the engine to the front fuselage aperture that I realised it was not going to fit. Steps 2-5 of the instructions allow for the engine sub-assemblies, and in Step 7 we see the cockpit and engine assemblies sandwiched between the main fuselage parts (wing spars having been fitted in Step 6). As the saying goes, it may be me, but… Engine assembly D is pictured as floating somewhere between the fuselage sections and engine assemblies A-C. By then, I realised that (1) I was never going to get D to fit within the fuselage halves, and (2) even if I could, none of it would be seen; only the A-C sub-assemblies would be visible. Again, having now completed the engine wiring, a little further test-fitting saw the A-C engine combination slip neatly into the recessed collar on the fuselage.
The prop is a Curtiss Electric Asymmetrical Paddle Type, one of four different versions in the kit.
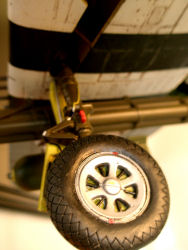
Here is the starboard wheel with additional detailing materials. The photo is about five times the normal size, so in fact doesn’t look quite so shocking in person. The hubs are something of a chore to fit into the vinyl tyre surrounds, but they do in fact look ‘right’. The hubs pictured are one of two choices available in the kit.
The fit of the undercarriage legs to their wheel well positions was problematic. The mouldings didn’t seem to want to set true. A little judicious trimming in the wells seemed to work. The undercarriage legs themselves looked excellent when painted and detailed.
However, I must report than the leg stubs where the wheel hubs are fitted are woefully small. I think they should/could be at least double in length. I became so concerned about this that when the model is stored, I have it lifted off its base with polystyrene packing sections, so that the weight of the aircraft rests on these and the wheels themselves remain off the display base unless at exhibition. I thought about drilling out the sections and replacing them with brass/aluminium tube, but at the moment I’ve opted for the storage route so as not to disrupt the detailed finishes, as the issue wasn’t noticed until late in the build.
There are at least two build articles about the VFS P-47s on the Internet, although neither seem to have included the complete engine-build, as the cowls are all in the closed position. The model’s weight is therefore dramatically reduced and in those cases the issues regarding standing weight are less relevant.
Painting and Markings
The colours for the 61st were widely reported as those available from local RAF stores, e.g., Dark Green and Ocean Grey over Medium Sea Grey. I won’t enter into Forum debate about natural metal undersides in whole or part, or whether Invasion stripes were undersides only, as it’s likely there were variations, but I do know that Gabreski and his Crew Chief have both written to confirm Gabreski’s machine was in RAF colours as available, and with the red cowlings and rudder, it’s probable in my view that the schemes were not uncommon across the squadron.
I tend to model to ‘theatre of war’ effects rather than pristine finishes, to create a worn look that may not be to everyone’s taste, but it suits me okay.
Products used in this build were:
- Modelmaster RAF Dark Green 2060
- Modelmaster RAF Medium Sea Grey 2058
- Modelmaster RAF Ocean Grey 2057
- Modelmaster Yellow Zinc Chromate (acrylic) 4851
- Modelmaster Insignia Yellow 33538
- AK Interactive Streaking Grime 3030
- MIG Pigments Panzer Grey (fading) PO35
- Vallejo Model Air, Green Zinc Chromate 71094
- Vallejo Model Air, Olive Drab 71043
- Vallejo Model Air, Russian Green 71017
- Tamiya XF-69 Nato Black
- Tamiya X-19 Smoke
- Tamiya Clear colours various
- Tamiya X-21 Flat Base
- Vallejo Acrylic Matte Varnish
- Revell Email Colour Red 31
- Alclad gloss and semi-matte varnishes
- Winsor and Newton Artists’ Acrylic Ink (Peat)
- Foil tabs for placards for cockpit, panel internals and undercarriage legs
- Lead wire in various gauges
I used the kit decals, although I had purchased a set of dry transfer stencils made by a new (I think) Korean company. They appear to be the only 1/24 Thunderbolt stencils available. I have used dry transfer items previously, and so knew the drill. Unfortunately, these transfers didn’t want to work; they simply wouldn’t come free of the backing. Perhaps they were old. In any case, I reverted to the kit stencils, which were less numerous, but ok, apart from the fact that there was no direction as to their placement. I was able to utilise the dry transfer layout as a guide for the water-slide kit stencils, so not a complete waste!
Conclusion
Having invested 150 hours in this kit, I’m in a position to report that it builds into a fine model, but I would hesitate to recommend it to modellers without some experience of limited run kits, the category into which I believe this kit falls.
As mentioned earlier, the cockpit and engine exhibit some of the finest detail I’ve seen in styrene, and even modest additional work for wiring etc will provide outstanding quality.
I found the fit of wings at the wing root to be troublesome. To overcome the issue, I fitted the tops of the wings to the fuselage to get a perfect wing root, and then fitted the lower wing sections to their top counterparts, a process that required only a modest amount of filler underside.
The fuselage itself went together without any problems at all, and the miscellaneous stores were no problem apart from the minor tidying issues mentioned previously.
Other issues with engine placement and undercarriage have been discussed previously, and were not a major issue in build terms.
The kits can still be found listed on hobby sites, but often as ‘out of stock’ or ‘future releases’. The cost is usually tagged at around £60 (UK Sterling). The kit 2405 reviewed here was I think one of three versions of the P-47 produced by the company, along with their range of P-40 Warhawks (the latter retailing at a somewhat lower value).
I read somewhere that Ray Thomas ceased trading in 2011. If this is correct, I’m sorry to hear it, as kits of this overall quality are uncommon, and offer a challenge to modellers in this impressive scale.
Useful References
- P-47 Thunderbolt in Detail and Scale, Bert Kinzey, Squadron Signal Publications 8254
- P-47 Thunderbolt “Bubbletop”, Robert Pęczkowski, MMP Books (Poland) 6128
- P-47 Thunderbolt Reference Section


