Unimodel 1/72 Ba-3 Armored Car Build Review
By Llarry Amrose
| Date of Review | September 2009 | Manufacturer | Unimodel |
|---|---|---|---|
| Subject | Ba-3 Armored Car | Scale | 1/72 |
| Kit Number | 364 | Primary Media | Styrene & Photo-Etch |
| Pros | Nice detailing | Cons | Vinyl road wheel tires |
| Skill Level | Basic | MSRP (USD) | $13.20 |
Background
Armored cars were developed early in the twentieth century, as the automobile became more widespread. There had been armor-clad vehicles before, but the automobile was more flexible than rail-based transport, and less vulnerable than horse-drawn. Even after the invention of the tank during the Great War, there was still a place for the armored car, being generally lighter and cheaper, and with better road performance. Between the wars, most nations continued to develop armored cars and during World War II, there were plenty of scouting and garrison duties suited to such a road vehicle.
In 1932, the Soviet Union introduced the Ba-I, built on a Ford chassis and mounting a 37mm gun and machine guns in a turret. Two years later, the Ba-3 saw this body fitted with the same turret used on the T-26 light tank, with a 45mm gun. With 168 built, the Ba-3 was one of the most produced, and saw service in a few different configurations. The series culminated in the Ba-10.
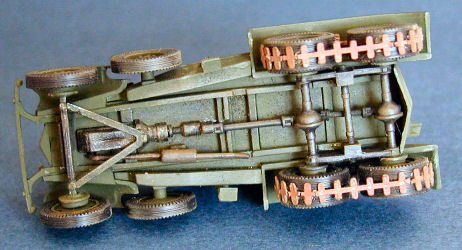
In addition to the standard road wheels, many countries modified some of their armored cars to run along railroad tracks, useful for transport net security as well as improved mobility at times when the roads were in poor shape, whether due to damage or weather. The Ba-3 took this one step further, becoming rail-capable through the addition of special wheels which fit over the standard tires, allowing for much quicker switching between modes. Finally the Ba-3 could also be fitted with a set of tracks which wrapped around the tires on the rear two axles. While this was intended to improve off-road performance, the narrowness of these tracks make me wonder how effective they truly were.
The Kit
Inside the usual blue end-opening box are the usual green sprues. No photoetch, but 12 vinyl tires. The hull and suspension parts, sprues A, B and E, are the same as in the Ba-I kit, and the turret comes all on its own sprue (D), familiar to anyone who has built a UM kit utilizing the T-26 turret. The track-links, rail wheels and a section of railroad track are the unique pieces, sprues F and H. The set is completed by the decal sheet, which as usual contains more markings than are called for in all the provided schemes, and the standard 4-page instruction sheet. If there is a consistent weakness to UM's work, it is these instructions. The decal placement is always very vague, and the construction diagrams are not always as clear as needed. As far as the build diagrams go, this is one of their better efforts.
The Build
Having previously built the rail-version, I turned my eye towards the tracked configuration. As the tracks were to be added to the rear wheels after the tires, and the rear axles could be held off the chassis until after most of the building and painting were done, this did not significantly impact the build process. Likewise, if you choose to build the rail version, the rail wheels go on right at the end.
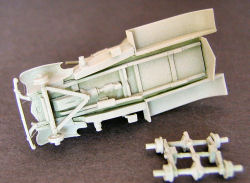
The turret was a self-contained subassembly, so was built up at a convenient point when other parts had glue or paint drying. The hull and chassis were the main focus of work. The upper hull is relatively simple, but with a fair number of parts, doors/panels/fenders, to be attached. The underside of the hull and the frame are a bit trickier. Dryfitting these parts as a group, rather than one at a time, will help make sense of the instruction drawings, and then it goes together fairly quickly. The suspension unit with the two rear axles needs to be built up separately for reasons of fit, painting, and in this case, the tracks. The front axle and most of the drive train could be added to the frame before painting, with just the wheels held off.
If building the rail version, proper attention must be paid to the fit of the axles and wheels. It may also be necessary to thin the inside of the rail wheels, but I'm not sure about that. I ended up with a vehicle a bit too wide to sit on the provided track section, and so ended up removing the rails from the ties and using stock plastic to make my own ties to remount the rails to, at the needed spacing.
The kit's rails are very nice, particularly the flanges, and generally it is the ties that are seen as needing some work. There are a few ejector pin marks, and little or no wood grain detail. Before having to rebuild my tracks, I had gotten good results sanding out the pin marks and then taking a strong needle and scratching in a little bit of an irregular grain pattern, just a couple of swipes, just enough to stand out just a little under the paint.
The tracks consist of six-link lengths for the top and bottom and a series of individual links to go around the tires. Be careful removing the single links from the sprue as it’s kind of hard to tell where the link ends and the sprue starts. The links do not fit tightly together so you need to be careful to avoid leaving any noticeable gaps. Use a slower-setting adhesive to allow some tweaking, and it should be possible to hide any remaining small spaces under the fenders, ground or weathering.
Most of the Soviet vehicles that UM has modeled have unshielded headlights, but UM doesn’t include lens detail. The brackets and the back of the headlamps are nicely detailed, but you need to add the lenses yourself. I’ve tried CA glue, and epoxy would be another option, but I haven’t been satisfied with the results. This time I got some lenses made by MV Lenses, which are often used by model railroaders. #116 turned out to be the right size, and look nice in place. Not necessary by any means, but a nice little upgrade.
Markings
You can have your Soviet vehicle in any color you want, as long as it's green. Well, that's not exactly true, but it's the way to bet. There were some two-tone camouflages, and winter white schemes, but green predominates. There were specifications, but no matter how closely they were followed, variations will exist. Whether due to a bad batch, bad application, or just differences in wear and tear, two tanks sitting next to each may be different shades.
Normally I use Vallejo's Russian Armor Green, but I like to introduce some variation, often simply by using different undercoats and keeping the green coat thinner.
The instructions include two vehicles, neither of which are in any way identified. They are depicted as one on rails and one on tracks, and using the same generic decal callouts of a set of stripes around the top of the turret, with a number in a square below that. The decal sheet gives you three options of each, and it’s up to you to choose. I figure the safest bet is to match the colors of the stripes and square, but really have no idea. These decals are the older UM decals, which are very thin and matt, but with a fairly wide carrier.
I had to trim the top edge of the stripes, and had no problems. Generally I find it better to leave the entire carrier in place, as it tapers down well in thickness towards the edges and snuggles down to the surface pretty well. Lastly, Tamiya Weathering Master pastels were used to finish off the look.
Conclusion
All in all, an enjoyable and recommended build. The kit goes together quite well and appears quite accurate. Dimensionally it matches the specifications I have perfectly, and the shape matches the drawings and photos I have rather well, though I will admit that I am not an expert in Soviet armor.
I love UM kits. While the moldings and engineering may not be quite up to state of the art, they are far better than what we usually call "short-run". They're pretty affordable, and cover subjects and variants that have rarely if ever been kitted in 1/72, and to a reasonable standard of accuracy. The rail and track versions are both unusual and make nice additions to the display shelves.
I would like to thank Squadron Mail Order for the sample kit.
References:
- Wikipedia.com, and various books off the book shelves


