


Unimodel 1/72 M4A1 with T1E3 Mine Roller Build Review
By Llarry Amrose
| Date of Review | January 2011 | Manufacturer | Unimodel |
|---|---|---|---|
| Subject | Sherman w/T1E3 Mine Roller | Scale | 1/72 |
| Kit Number | 0221 | Primary Media | Styrene/PE |
| Pros | Unusual subject | Cons | Thick photoetched brass |
| Skill Level | Basic | MSRP (USD) | $12.80 |
Background
It’s big, green, and the U.S. produced about a billion of them during World War II. It’s the Sherman tank. The M4 Medium tank entered service in 1942 and continued through the war and beyond. Improvements were introduced progressively, so as not to disrupt production, and in the end, over 50,000 were built, second only to the Soviet T-34. While individually, it could not stand up to the best and heaviest German tanks, like the Panther and Tiger, it was fielded in much larger numbers. As they say, “Quantity has a quality all its own.” The Sherman was used on all fronts, in Europe, Africa and the Pacific, and supplied in quantity to the British and Soviets.
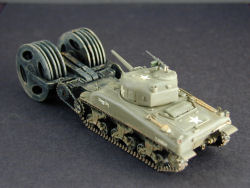
With so many in service, it was obvious that specially equipped vehicles would follow, from the simplicity of the Cullin Hedgerow device to the Duplex Drive amphibious variant used at D-Day. There were flamethrowers, bridgelayers, and bulldozers, and the reason we’re here, mine-clearing vehicles. The Sherman Crab used flailing chains, but for serious minefields, big heavy rollers are the preferred tools. A variety of designs were tried, and the T1E3, nicknamed “Aunt Jemima”, with two sets of five 10-foot metal discs was the most commonly used. Due to the weight of the roller, these tanks were usually fitted with a rear pusher plate, so a second Sherman could assist. After Normandy, it was decided that they could be better used when concentrated in Special Mine Exploder battalions.
The Kit
Inside the usual blue end-opening box are the usual green sprues. Seven sprues, plus one sheet of photoetched metal (which may be copper instead of brass) make up the tank. These seem to be the same parts in UM’s M4A1 kit, #371. There are plenty of parts which won’t be used, but which might prove useful in any number of future conversions. Three more sprues make up the mineroller, which is practically a whole kit unto itself. The photoetch is pretty thick, which is usual for UM, and annealing (heat-treating) the parts before attempting to bend them is a good idea.
The decal sheet includes markings for two tanks, including “Aunt Jemima”, namesake of the T1E3 roller device. Finally, the standard 4-page instruction sheet. If there is a consistent weakness to UM's work, it is these instructions. The decal placement is always very vague, and the construction diagrams are not always as clear as needed. As far as the build diagrams go, this is one of their better efforts.
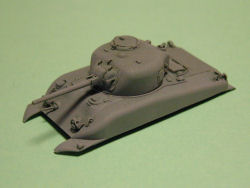
The kit represents the cast-hulled M4A1 version, with the low-bustle 75mm turret and T48 tracks. The pictures I have seen of Aunt Jemima and one other T1E3 Sherman are M4A1s, though I have also seen this roller attached to a welded-hull M4A3. What this kit is missing, however, is the rear pusher plate, which is a bit of a shame.
Assembly
Construction consists of a series of subassemblies. This allows work to proceed on one section while another can be left for glue or paint to cure. The turret is an early type with no loader’s hatch. The commander’s hatch is provided in two parts so it could be posed open if desired. No interior is provided but could be scratchbuilt, or the hatch filled with a commander figure.
The upper hull includes a number of small detail parts, including separate pioneer tools, which is always good to see in armor kits. The drivers’ hatches can be posed open and the engine cover is separate. This allows UM to produce different variants, but also leaves open the possibility of aftermarket engine parts. Other kit makers have included photoetched headlight and taillight brush guards, but this kit includes a new and wonderful improvement.
Parts 42B and 46B are forms for bending these brush guards into the proper shape. I’ve saved them and will use them to shape the parts in future builds as well. The instructions have you install the rear fenders (33A) before joining the upper and lower hulls. It helps with the painting, but you have to be careful when doing the join, and may have to do a little last-minute trimming to get the top and bottom to fit together correctly (at least I did…).
The lower hull seems pretty straight forward, but be careful of the transmission cover. Where this lower front piece joins the sides and bottom, it doesn’t fit in as tightly and smoothly as I would have liked. If you don’t get it as far back as possible, you will run into some trouble when attaching the connections for the mine roller. I ended up having to apply some Modeling Skills to tweak the connections for the parts representing the gears and chains used to drive the roller.

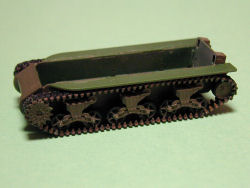
Like all UM armor kits, this has link and length tracks. With care, they will go together well enough, though I still have to say that I prefer the tracks for their T-34 kits. The suspension units (3 per side) are the real stars here. Each is made up of 8 parts, including a separate return roller and two spring pieces inside. When I first opened the box and looked at the parts I was concerned by the photoetched return skids, they seemed unnecessarily complicated. Having installed them, I now think they’re great. They bring these parts down to a more accurate scale thickness. Part 69B is a bending form for shaping them, which makes them surprisingly easy to install, though you should be sure to anneal (heat treat) the parts to make them more flexible first. I’m keeping 69B in a safe place, and expect that I may very well use it with some thin sheet brass I got at the hobby shop to replace the return skids on future Sherman builds from other makers.
Many tanks, like the Sherman, have upper hull sponsons which extend over the top of the tracks. Many kits have the bottom panels of these molded to the tops of the lower hull sides, which leaves them in the way while building up link and length tracks. UM has produced them as separate parts, which can be added after the tracks are installed. The only downside I found was that I needed to do a little trimming at the back end to get them in properly past the rear fenders as I mentioned earlier.
Finally there is the mine-clearing roller. It makes up five steps on the last page of the instructions. You will need to paint most or all of it before construction, particularly to get to the center portions of the inside roller discs. I built it up carefully in order, step by step, but I recommend looking ahead and doing some early test fitting. There were a couple of pieces that would have been easier to install and paint if I had looked ahead.
The directions as designed leave the left and right five-roller assemblies able to move up and down. This is really useful when attaching the roller apparatus to the hull and would be even more so if placing the tank in a diorama. At this point of final attachment, the chain and gear parts need to attach at one end to the drive sprockets and the other to the control axles of the roller frame. Because I did not get the transmission cover quite far enough back, this distance was just a little (no more than 1mm) too far to attach normally. I had to do a little cutting and drilling to get the front gear properly connected.
Painting and Finishing
You can have your Sherman in any color you want, as long as it's olive drab. Well, that's not exactly true, but it's the way to bet. There were some two-tone camouflages, and winter white schemes, but olive drab predominates. There were specifications, but no matter how closely they were followed, variations will exist. Whether due to a bad batch, bad application, or just differences in wear and tear, two tanks sitting next to each may be different shades. Lifecolor has a whole series of shades of olive drab of varying degrees of weathering. I have a couple of them so that my US armor builds don’t all look alike. To get a better finish, I start with a sprayed gray primer coat so the Lifecolor paint has something to bite into.


The kit instructions say nothing about the color of the minerolling apparatus, but the back of the box shows it in black. From the pictures I was able to find, “Aunt Jemima” had a black roller, but some others appear to have been simply in olive drab. PollyScale Railroad Brunswick Green is one of the more popular “near-black” shades. Most of the T1E3 needs to be painted before assembly, particularly the interior faces of the discs.

The decals provide markings for two tanks, “Aunt Jemima”, namesake of the mine roller itself, with artwork, and “Crazy Crusher” with just the name. Unfortunately, somewhere between the preview article and my workbench, the decals vanished into the ether. The spares box came to the rescue with a fairly random serial number and a serviceable if unspectacular name. Lastly, Tamiya Weathering Master pastels were used to finish off the look. The pictures I found didn’t leave me with a great feel for how these rollers fared in use, so I kept the weathering to light wear and tear and a little dust and mud.
Conclusions
All in all, an enjoyable and recommended build. The kit goes together quite well and appears quite accurate. I have seen reviews of UM’s Shermans that include some criticisms of some of the details, though generally such that only the true Sherman fanatics will be concerned. On the other hand, the separate tools, openable hatches, variety of spare parts on the sprues, and the photoetched track return skids are fine features. The forms for bending the metal parts have gone into a drawer in my workbench for future use with other kits.


I love UM kits. While the moldings and engineering may not be quite up to state of the art, they are far better than what we usually call "short-run". They're pretty affordable, and cover subjects and variants that have rarely if ever been kitted in 1/72, and to a reasonable standard of accuracy.
My thanks for the kit to HobbyTerra.
References:
- Absolute Air Land & Sea CD-Rom (Cassell / Tamiya)
- Wikipedia.com
- www.172shermans.com
- Sherman Register