Trumpeter 1/35 Soviet SU-152 Late
By Cookie Sewell
| Date of Review | November 2012 | Manufacturer | Trumpeter |
|---|---|---|---|
| Subject | Soviet SU-152 Late | Scale | 1/35 |
| Kit Number | 5568 | Primary Media | 553 parts (281 in grey styrene, 240 in light brown styrene, 28 etched brass, 2 clear styrene, 1 turned aluminum, 1 twisted copper wire) |
| Pros | New mold, nicely done kit of this big SP gun; excellent use of slide molding on the muzzle brake | Cons | Tracks wrong width (see text) |
| Skill Level | Experienced | MSRP (USD) | $54.95 |
Review
Many views of Soviet heavy armor in the West arise from myths or failure to understand Soviet military concepts. The creation of the heavy self-propelled howitzers armed with 152mm weapons is such a case.
The Soviets decided early on to have two basic classes of guns – light to medium high velocity weapons for general purposes, and medium to heavy howitzers for destruction of objects such as buildings, bridges, pillboxes or other "engineer works". While these were initially 45mm and 76mm weapons, after the initial foray into Finland the numbers changed to 76mm and 152mm. The initial solution was the KV s Bol'shoy Bashni or what became the KV-2. It was armed with a 152mm howitzer and was successfully tested in flattening pillboxes on the Mannerheim Line. But it was too tall and unbalanced, and while over 200 were eventually produced, between their unbalanced design and the poor design of the KV chassis they soon broke down and were mostly lost due to mechanical problems.
The solution at the time was a low, casemate design which was tried with various weapons arrangements. With the appearance of the KV-1s, a much more mechanically refined version of the awkward KV chassis, the combination of the casemate on the KV-1s chassis was a natural evolution. With the prototypes dubbed KV-14, the new design was tested in mid 1942 and at the end of the year it entered production as the SU-152. Changing over in September 1943 to the improved ISU-152 design, a total of 670 had been built. These served (albeit in dwindling numbers) through the end of the war.
While designed to destroy fixed objects, the SU-152 was found to be a deadly antitank weapon due to the simple law of physics: mass times velocity equals energy. While the ML-20 howitzer was not a high velocity weapon - its maximum muzzle velocity with an armor-piercing (or concrete breaking) projectile was only 1,970 feet per second (600 mps) the fact it was firing a 95 pound projectile (43 kg) made up for many sins. In 1945 famed Soviet tank commander Dmitriy Loza noted that an SU-152 firing such a round at a Panther at 100 meters sheared the entire turret off the tank (along with the unfortunate turret crew). It soon received the nickname "Zverboy" – beast fighter – from the troops.
Some years ago (1999) Eastern Express released a kit of an early production SU-152 using their KV-1s parts. It was not too bad for the time but suffered from some design problems and poor tracks. Now Trumpeter has released a nice new state-of-the-art kit of a late production version of the "Zverboy" and it is a really good effort.
Trumpeter came up with a great system of "building blocks" for its KV series tank kits (which are still the best KVs on the market) and has adapted it to the KV-1s series of tanks. These have a different hull profile and running gear, and as such Trumpeter has changed to match. The kits are based on a common lower hull pan, common running gear, and common engine deck details. But they change out the turret or casemate, hull sides, and detail fittings to match their specific kit. It also comes with a new set of single link tracks instead of the choice with the earlier kits of either black vinyl single runs or "link and length" styrene tracks.
Based on Neil Stokes' outstanding KV history ("KV Technical History and Variants", Air Connection, 2010) the model is a near dead-on match for the September 1943 final production variant. (The main differences between "early" and "late" are the addition of ventilators and a loading port in the hull sides between the tracks.) Trumpeter, like many other companies, does do research but often makes mistakes. Here is one of them. Initially the KV-1s was to use a purpose designed track (based on cutting weight, as the KV-1s shaved more than five metric tons from the weight of the KV-1) 608mm in width. This had triangular end sections when you examine photos. But these tracks were apparently inferior, and so what Chelyabinsk did was replace them with a 650mm track using "split links". These links were half-links, based on the premise that a complete flat link from other tracks could be used to extend the track by more than 300mm (e.g. 950+) for use in very soft ground or snow. Both the toothed and toothless links had squared-off ends like the original KV tracks. These initially had a slight rise ("bump") where the guide tooth had been, and later no bumps; Diagrams exist that show the split link/full link arrangement fitted but very few photos of the tracks being used in that manner.
Trumpeter provides a lovely set of split link tracks - but unfortunately used the 700m track width of the KV-1 instead of the 650mm width of the KV-1s. Both tracks look very similar (other than the split link/toothless ones when seen from the running side). The result is that the tracks are just under 1.5mm too wide. While purists have complained about this error, somehow I think most modelers will simply live with it. Note that as they are A/B links you must install them in pairs (e.g. no odd numbers).
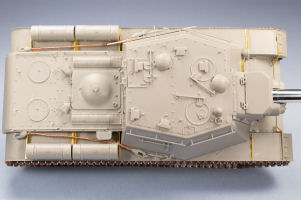
Building the kit is pretty straightforward but the directions do call out where holes are to be drilled in the major parts for this variant. Note that the sides of the hull tub are smooth but there are some major ejector pin marks on the insides of the applique sides which must be smoothed off to get a firm fit against the hull tub; miss them and you will have seams. You also must shave off the parent KV-1S hull front and glacis plate area to accept the casemate and new glacis plate.
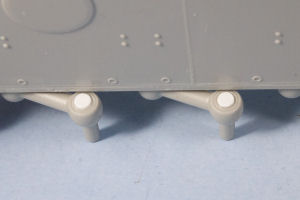
Trumpeter did make some minor errors in the suspension, as they left off the rubber bumpers on the bump stops (parts WA21) which need to be made from punching out .040" styrene disks. Also they left the rear of the axles off the road wheel arms (WA16) which must be made from .010" disks. They don't show up most of the time but those are things which personally annoy me.
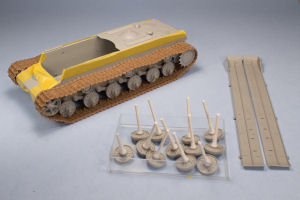
This kit has a fixed idler and adjustment bracket assembly which will not permit fiddling around with it to get the tracks to fit, but fit is not bad and both runs came out right with no "fudge" needed due to the use of A and B links (WT1 with tooth, WT2 with bump as described above. I had no problems attaching the tracks but left the outer row of road wheels off for painting.
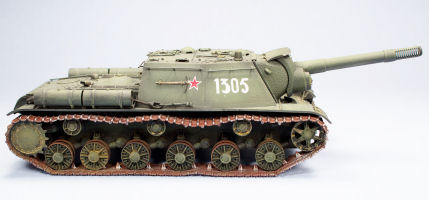
At this point I masked off the relevant parts of the upper hull and used masker on the fender edges, plus stuck the outer road wheels on sections of Q-Tips for painting. I prefer to paint the track work and running gear to the point of needing only finishing and weathering before proceeding with the model. For this I used a base color of Floquil Brunswick Green topped with a lightened shade of Floquil Pullman Green for the hull and Floquil Oxide Red for the track base color. A light coat of Rub 'n' Buff Silver Leaf was added once the paint was dry. Also, the surface of the road wheels were painted Floquil Roof Brown as they have a higher level of tungsten for strength and tend to turn brown rather than red when oxidized.
Once the running gear and tracks were painted I finished assembly of the model. The only problems I had (and continued to have) were that the "desantniy" hand rails have no real area on the model for purchase and tended to easily sheer off. I found later on using a small round bit and drilling a shallow depression into the casemate meant for a better cement footing and more durable adhesion.
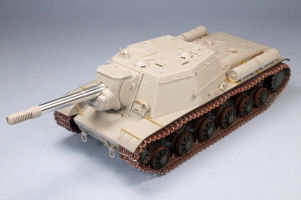
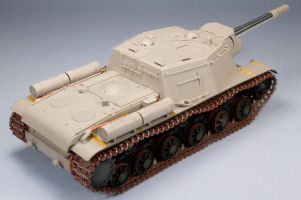
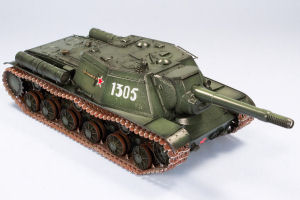
As well as Neil's invaluable book I used a number of photos of SU-152s for reference and one thing I saw was that unlike the kit the actual vehicles in the field took the tow cables and instead of facing them forward to the front tow shackles they strung them backwards over the fuel tanks and left them loose at the rear of the hull. After installing the auxiliary fuel tanks, I did the same with the model. As can be seen in these shots the rear "desantniy" rail came loose and actually vanished for some time when I painted the model; it reappeared on my paint bench as I was adding the headlight lens and was reattached.
I found a nicer marking scheme than the one recommended by the directions in a book on Soviet camouflage of an SU-152 in a heavy SP unit outside Poznan, Poland in March 1945. It was being used for a political rally and had been "spiffed up" for the occasion. While this vehicle was bort (side) number 1305, someone on one of the websites noted he had photos of sister vehicle 1308 which had a red star on the bow. 1305 had a white outlined red star, but given that evidence I added a plain red star to the bow. The image below shows the model with all of the paint finished and after coating with Future acrylic wax prior to decaling and then the application of the decals.
After Future and the decals the model was given several washes of both light and dark colors to enhance its details. As it had been cleaned up for the "politruk" and his exhortations I kept it relatively clean but left dust and dirt in areas which are hard to wipe off. When all of these were dry, I flat coated the model with Testors Dullcoat. Once that was dry, I added some weathering powders. I find they stick better to a flat surface and as such use them between my flat coat and the final coat of Floquil Dust. The last item added was a PSP 5mm headlight lens which is perfect for WWII Soviet armor.
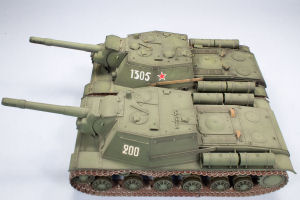
I decided to compare the new Trumpeter kit with the old Eastern Express one and the differences are clear between the two. It must be noted that the EE one is an early production version and does not have the loading port or ventilators on it, but does have correct width tracks. Its biggest flaw is that the rain/weather cover over the mantlet is too far back and does not fit properly if attached per the kit instructions, whereas the Trumpeter one is correct. It is also missing the headlight and has some shape and detail problems with the mantlet itself. Overall between the two the Trumpeter one is the clear winner, but the other kit is still a fun build and should not be condemned to the sale tables if you still have one!
My sincere thanks to Stevens International for this review sample!
For a look at this kit in the box, check our in-box review here.


