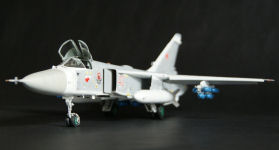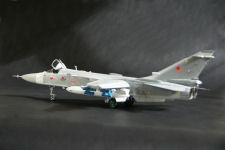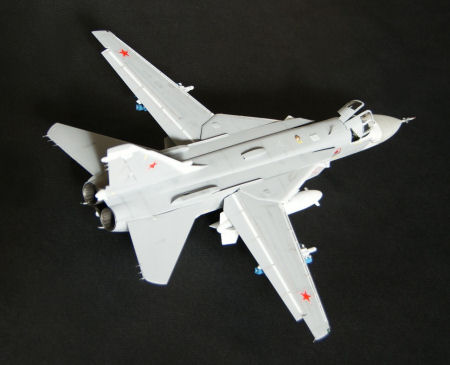
Trumpeter 1/48 Su-24M Fencer D
by Fotios Rouch
| Date of Review | December 2010 | Manufacturer | Trumpeter |
|---|---|---|---|
| Subject | Su-24M Fencer D | Scale | 1/48 |
| Kit Number | 2835 | Primary Media | Styrene, White Metal |
| Pros | First kit of this aircraft in 1/48th scale and best kit of the subject in any scale | Cons | Nothing noted |
| Skill Level | Basic | MSRP (USD) | $149.95 |
Introduction
After just having completed the HobbyBoss 1/48 F-111 ( look here), it was a natural progression to start building its sister plane from the "other side", the Su-24M Fencer!
For an in-box review please look here.
OK, I have said this before and did not manage to stick to my plan but this time I was really going to build an out-of-the-box kit. Really.
Construction
I washed all the parts in warm water and 409 cleaner and let them air dry.
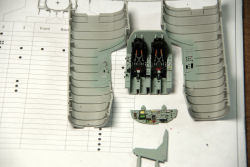
Work started with the cockpit parts.
The seats look quite convincing with quite a few parts and the only thing that I would have liked would have been lap belts. Staying true to my premise I did not use any of my resin K-36 seats. I painted the seat frames in gloss black and the cushions in mat black. The cockpit was painted with AKAN paints. They are acrylic and although I am not much of a fan of acrylic paints, I have to say that they go down very nicely. www.lindenhillimports.com
carries the whole line. The Su-24 interior is one of the color readily found in this line. The raised cockpit details were picked off with a fine brush using blacks and other colors. Some switch panels were painted gray and then were detailed with black switches .
The instrument panel came in a clear part with a deal provided for the instrument dials. I first used micro-mask to cover the dial faces and then sprayed the panel with the same cockpit gray color. I then painted the black details such as the instrument shades and some outlines and then the masking was removed. Then decal was applied on the back of the clear panel and produced a semi-convincing effect. Some details look great and some allow a lot of clear part to shine through. I believe that in the end after all parts are installed and canopy coaming covers the panel it will appear OK.
The front fuselage parts have some huge and pronounced ribbing for no apparent reason. If anything the injection guy would have to fine tune the pressure and cooling time to avoid having the ribs affect the outside smooth parts surface. Why add unnecessary trouble? The front fuselage parts include some instrument details which were painted in the same cockpit gray and were a bit touched up with black and light gray. The control sticks were added next and pay attention as they are different for the pilot and WSO.
The front fuselage was then assembled and was squeezed together with plastic clamps until dry for the night.
Since I was not going to add the radar I left out the support bulkheads. Once the front fuselage parts were dry I added the nest meant to house the refueling probe.
I then moved on to the rear exhaust area parts. They look OK overall but not to the discriminating eye. If you look at pictures the exhaust parts and the enclosing cans do not seem to fit snugly in their areas. Another part that I did not care for was the afterburner part resting over the exhaust blade parts. It is so thick and it is solid covering all details. I decided to modify it a bit. I know I was not supposed to change a thing but this was minor stuff. I cut off the inner and outer rings and kept them aside to install them later in the assembly process. The exhaust parts were all assembled and painted with ALCLAD II paints. I inserted the afterburner rings at that point. I admit that I claimed artistic license rights and chose to have one set of exhaust petals open and one closed. I have no idea how the Fencer parks and kills its engines. If it is like other jets then maybe I am right. If not and someone can show me otherwise, I have the spare parts painted and waiting.
The landing gear wheel wells were next. They look good out of the box but I am sure the Aires gang will easily outdo what is in the box.
The main landing gear assembly was then inserted and secured to one side of the main fuselage. I found that it was important to sand down all the printed production info that is molded on the inside of the fuselage and it interferes with the smooth mating of the parts. Once the glue on the one side was dry I mated the assembly to other side and clamped everything down and left it to fry for the night.
The landing gear was next. I painted the hubs green with Xtracolor enamels and left them to dry for the night. I love this paint line but I always feel that I want it to be really dry before I mess with it and mess with it I did. I inserted the plastic green hubs into the rubber tires and squeezed them pretty hard to mate them snugly. The result was pleasing to my eyes. The plastic main landing gear has metal inserts for extra strength and I feel that they look cool. I did not care to install the metal parts as they have less detail and no gaps. I chose not to install the other plastic gear support members since they would confine me later in my efforts to align and balance the landing gear. Once the gear looks straight and true it would be a breeze to add the other parts to it.
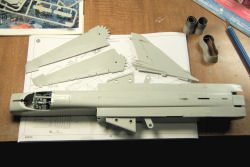
Next I mated the forward fuselage to the main fuselage, built the wings with the spoiler down and the tail with its separate rudder. tru_2835-11.jpg
The last step for now was to add the exhaust parts and the nose cone. I cannot say that all the parts fit great. Filler was needed in my assembly. Also the circumference of the forward fuselage did not match the back of the radome. I had to squezze the parts with clamps as they were drying to make sure that I did not have to do much sanding later.
Funny how projects come along nice and fast when the spine is not fixed and the outlines of the forward fuselage are ignored.
Next job will be to fine tune the fuselage surfaces with primer and re-engraving and then move on with attaching wings and flying surfaces.
After the fuselage was basically completed I moved on to getting the wings on it but before doing that the wing gloves need to be attached on the body first. I accomplished this task in the following manner. I first glued the bottom portion of the wing gloves and secured the wing pivot points to them. Next I attached the sensor units to the front of the bottom wing gloves and ensured their alignment.
Once the assembly was sturdy I attached the top portion of the wing glove and clamped it in place to ensure a gap free seam. If I build another Trumpeter Fencer I will do the top gloves first and make sure they line up perfectly with the top of the fuselage. They came out OK but not absolutely perfect. Give it a try and see if you getter best results that way.
Primer was applied over most of the airframe to help me identify whatever areas might need help and adjustments. Thankfully, I had not screwed up anything and very little work was needed.
The tail goes together fast and with no problems other that a little polishing required on the base for the little intake. I would have been OK if there was no separate rudder as I feel that iot leaves too much of a gap all around.
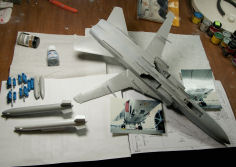
The decision time had come on what kind of armament I was going to use for the specific that caught my eye. In the very high quality Polygon Press book on the Fencer there are many photos of Fencers with the same exact decals provided by Cutting Edge. In one of the images you can see a Fencer taking off with the big tanks and a nice bomb load. My mind was made and I pressed on with building the tanks and the bombs. The tanks will go together well but you will need to sand and adjust for the seam joints. The bombs look great and they are so Russian with their peculiar look. What will really take up your time is building the MERs. There are so many parts and so much consideration is required to get the alignment of all the tinny parts right. Take your time on this and allow time for the glue to dry before proceeding. It will pay off later when all the bombs look nice and straight on their racks.
Painting and Finishing
I have decided on the gray/white scheme and since we always work from the lighter to the darker colors I prepped the model to lay down the white paint. I used Testor Modelmaster gloss white for that thinned down quite a bit and laid down a few thin coats until I had a nice solid white color.
After the white paint was totally dry I masked the model in preparation for the gray paint. I looked through all my modern Soviet and Russian paints including the very nice series from Akan but nowhere can I find a perfect match for the Fencer top gray.
I am not using the Trumpeter color paint instructions because they do not match any of the photos that I have of the specific Fencer the decals made for. Going off from photos of the real thing, I am going to try and get it as close as possible.
If anyone has any info on the best gray match I will be glad to hear from them.
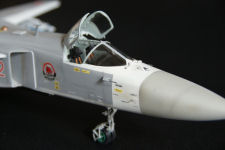
Well after consulting with modeler friends and info from the Cybermodeler color matching charts I decided to go with US Light Ghost Gray for the top side of the model and Ghost Gray for the airbrushed color touch-up depictions. The nosecone clearly shows in the pictures as a much darker and slightly brown tinted shade of gray. My first attempt (-->tru_2835-21.jpg) came out too dark and too brown so I had to make a new lighter mix and respray.
The next step was to uncover the cockpit and go for the finishing touches. (-->tru_2835-22.jpg) The refueling probe was painted in detail with the different metal hues based on photos and then the HUD was added after the Future coat had dried. A light touch-up with gray color pastel was added over the black instrument panel coaming for a hint of a weathered look. (-->tru_2835-23).jpg The front portion of the canopy was added and was secured in place with CA glue. The last step was to add the flaps and slats and the landing gear details. (-->tru_2835-24.jpg) Some items of note.
In all the pictures I have seen, the landing gear bays are always closed on the ground. The wings are almost always swept back with flaps and slats retracted when on the ground. The model is not designed to have the flaps and slats up and some surgery would be required to achieve that. I chose to leave mine hanging open because I like the look. Both exhaust petals appear to be always wide open on the ground. The main canopy parts are detailed on the inside and provide enough texture to allow for masking and airbrushing them in the interior green cockpit color. The effect is better than having painted the clear plastic parts on the outside with interior green and then gray on top of that. I have seen pictures with the MERs loaded with a six pack of training bombs on the outer pylons. I have not seen the bigger training bombs carried on the underbelly pylons so I guessed and added them for a better look.
The wingtip navigation lights can take a little drilling and a touch of clear red and green to simulate the colored lights under the lens covers.
For decals I mostly used the ones from the kit. The ones I have from Cutting Edge have turned very yellow with time although they were protected. I chose to use the red stars from the Collect-Aire Fencer kit. The decal with the flying bird goes only on the port side of the fuselage not the starboard side as the instruction show. The real Fencers from the era and squadron I have seen from photos also have a bunch of small red stars depicting missions but they are sadly missing from all the decal sets.
In the wish-list of aftermarket parts I would like to see a nicer and thinner probe for the nose. The one in the kit is very heavy handed. A nice and accurate exhaust area is a must as the one in the kit matches photos only superficially. The area behind the cockpit, the hump and the joint from the tail to the hump are very difficult to address with a conversion part so I guess I will live with it.
Conclusions
In the end the kit builds into a very impressive model. It is amazing how many parts are left over from the main assembly and especially from the weapons set. Great additions for the spares box!
My sincere thanks to Stevens International for this review sample!


