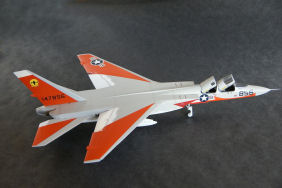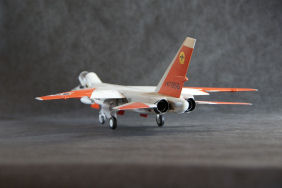
Trumpeter 1/48 A-5A Vigilante
By Fotios Rouch
| Date of Review | September 2009 | Manufacturer | Trumpeter |
|---|---|---|---|
| Subject | A-5A Vigilante | Scale | 1/48 |
| Kit Number | 2809 + CEC48493 | Primary Media | Styrene/Resin |
| Pros | Unique subject | Cons | Lots of rework required |
| Skill Level | Experienced | MSRP (USD) | Out of Production |
Background
The A-5A Vigilante was designed to replace the A-3 Skywarrior in the nuclear strike role. It first flew in 1958 and was an extremely sophisticated aircraft for its time. Very fast and with its clean lines it gave a hard time to its Phantom escort planes in trying to keep up with it. The A-5A did not last long in Navy service (1961-1963) and was converted to the RA-5C reconnaissance role variant. Only one A-5A exists today and it can be seen at Maryland's Naval Air Station Patuxent River.
Trumpeter was thinking about the Vigilante as a possible project as early as 2001 and work on it started in late 2003 and 2004. I was very happy to have helped them with this project through Mike Bass of Steven's International. Unfortunately, by the time I got to see the CAD drawings it was too late to influence with some changes that I thought would have made for a nicer model. In any case, in the end we got to see an injected model of this very important scale in 48th scale (and 72nd as well) from Trumpeter.
The basic shortcomings of the kit were addressed by Cutting Edge. The basic thing that hurt my eyes was the very chunky front fuselage that did not do much at all for showing off the elegant Vigilante profile. With this conversion and the resin intakes at hand a good RA-5C could be built. However for doing the early A3J-1 the modeler was left on their own. Some modelers had scratch built the early variant but the work is fairly serious. I was very happy to have helped Meteor with this project as well and glad to have been a part of the scheme and decal design for this set. All the modeler needed was included in the set with decals sheets, color profiles, photo instructions by Meteor, Black Magic masks, lots of resin parts and clear resin canopies. The only thing missing was a cockpit. Although a basic cockpit structure can be seen in the assembly photos, none was included in the conversion set. We will see how important this omission is later on.
Starting the Conversion
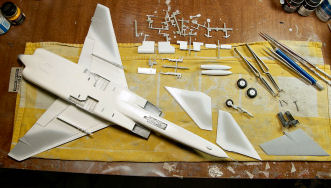
Prepping the parts resin and plastic alike is the usual affair with warm soapy water and air drying. I decided to use my complimentary early test shot of the Trumpeter kit that Mike Bass was so nice to have sent me. The kit was close to production standards but had very pronounced sink marks and unpolished canopies plus some other missing finishing touches that are commonplace with early shots. However with this CE conversion that required major cutting and throwing away of plastic the early Trumpeter test shot became a perfect candidate.
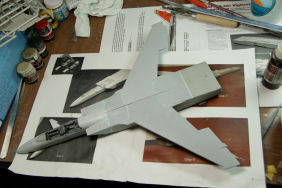
The conversion instructions are very clear and they are accompanied by color photos that make the steps easy to follow. I used Dymo tape to help me guide my razor saws and achieve clean cut lines. Note in this image the difference between the resin (sleek and slender) and the plastic fuselage (tall and portly).
Next step was to assemble the top resin fuselage part and attach the center reinforcement that did miracles with keeping the main fuselage strong and sturdy during the assembly process.
Test fitting the top fuselage resin part and the plastic showed that the resin had shrunk and did not fit perfectly well. The CE gray pigmented resin had been pretty good in the past with no appreciable shrinkage but this time we had issues. Maybe it was pulled out of the rubber molds too soon or maybe external temperature factors were to blame? Resin is a strange thing. With lots of variables coming to play. In a full resin kit when everything has shrunken proportionally it posses no assembly issues but when resin has to match plastic it's a different story.
Before I would close up the fuselage I decided to complicate things a bit more and add the Aires wheel wells. The resin parts are much more detailed and offer more depth as well. The resin wheel wells were secured in place with thick slow curing cyanoacrylate glue. While the glue was setting I added styrene strips to the matting points where the gaps were between plastic fuselage and the resin top deck. Mating the resin and the plastic fuselage parts became much easier with the inserted styrene and joint was much more secure and sturdy. Once satisfied I used cyano glue again.
The joints between plastic and resin were smoothed out with sanding sticks and then puttied over with 3M Acryl Blue. While I was working over the fuselage, I also puttied the huge sunken lines that occur along the fuselage corners. My sample being an early run was much worst than the regular production kits but even they have ample evidence of this strange sliding tool "defect".
Once the mail fuselage assembly work was basically completed I shifted my attention to the front fuselage plug and the major shortcoming of the conversion set. The kit comes with no cockpit parts whatsoever. Look at the assembly pictures and basic interior structure is evident. I am not sure if Meteor provided the parts and they were not used or what. As it stands, the Trumpeter plastic parts are designed for a much fatter fuselage and do not fit the slender resin fuselage. Using the Black Box resin cockpit is a no go either for the same reason. So I was left with the included parts from the Trumpeter kit and the option to cut them up and modify them to fit the resin fuselage. Out came all the parts and puzzle was left to be sorted out. The first thing to do was lower the side consoles to match the resin conversion. I used a fine razor saw for that and lots of patience to cut straight lines and not ruin the plastic.
As if things were not complicated enough, I wanted to use the front wheel well resin replacement because it looked so good. The problem is that Aires calculated it to fit the much fatter and taller plastic fuselage. So more surgery was required to make the wheel well fit right above its cut out. Once things seemed to be falling in place I painted the modified cockpit parts and glued them in place. The most tedious part was gluing the resin fuselage halves together. It took more attempts than I care to mention to fit everything in.
The next progress point was to attach the main fuselage assembly to the front fuselage assembly. It went OK actually with some minor adjustments. Some puttying would be necessary but the joint was solid and secure. Once the joints had set I attempted to attach the wings. Again, resin shrinkage was evident. We are talking resin to resin joints and still they did not fit well. Not the end of the world but still more work than necessary. The seams were filled with styrene and Acryl Blue.
The first coat of primer went on after everything received a light sanding. The primer revealed some areas of concern as always since it is difficult to see everything on just naked plastic. Another item of note is the resin tail which is an improvement over the plastic part. I am showing it in a side by side comparison and also on top of the plastic tail to see the difference in profile.
There are very few little details to cover next before it is time to get into the painting portion of the project. Meteor provided acres of Black Magic masking vinyl and it will be difficult making up my mind as to the scheme I want to choose!
Work continued with attaching the pitot tube which needed a lot of putty since it did not fit well. The mid hinge section between the two canopies was also attached, feathered in and puttied.
I was getting pretty close to starting the painting process so I had to decide the painting scheme that I was going to use.
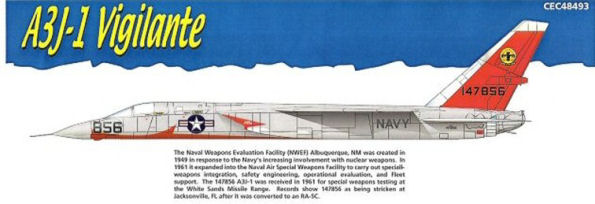
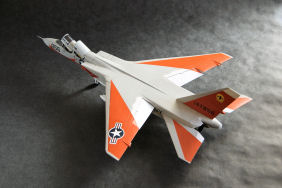
In my eyes the Naval Weapons Evaluation Facility scheme looks pretty good. With that decision made I also chose to modify the two included kit nuke shapes to something that looked close to what the A-5A carried while flying at New Mexico. Not sure what I see exactly in my photos but it looks like an inert nuke shape that was used for the evaluations.
The model was sprayed with a mix of 80% Insignia White and 20% RLM White semi-gloss just to tone down the brightness of the white. White is a tough color to spray well and it also takes a long time to dry properly for handling. Well, the time came to spray the 16440 Light Gull Gray part of the camouflage.
This part was done free hand while paying attention to follow the pattern of the gray scallop overlap as per the period photos. Prior to gray color being sprayed, I added the front portion canopy and made sure it fit perfectly flush. The masking was applied to the canopy and I made sure there was enough stuffing to protect the cockpit from getting oversprayed. I also added the 'Black Magic' vinyl mask for the national insignia on the top starboard wing side. The mask is sized to be just a bit larger that the actual national insignia decal. If things have been calculated right the end result will be very attractive and the decal will have a white background as with the real aircraft.
These gloss paints take an amazing amount of time to dry up to the point where they can handle handling and masking. I mean the smell for weeks after they have been sprayed which can only mean that they still have not fully cured.
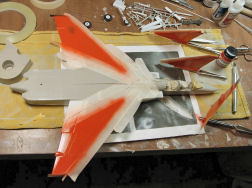
The next stage called for masking the model to get it ready for the 12197 International Orange paint. The painting instructions show it as red but in the color photos it is easy to see the color contrast between the intake and exhaust red cover and the orange color.
For masking I really tried to use the Black Magic masks but I was not successful in getting them to stretch over the flat wing surfaces from edge to edge. So I used portions of the vinyl and Tamiya masking tape to define the lines and then cheap masking tape to cover up the rest of the areas to be protected.
There was no way to spray the orange on top and bottom in one session. It had to be done in two stages and have the top fully dry before moving on to the bottom surface. Masking the forward fuselage was a lengthy process. The vinyl mask worked well for the forward part but it did not work for wrapping around and under the fuselage. Maybe it would have worked if there were no intakes in the way but it would not have been feasible for me to have done the painting prior to installing and puttying the intakes.
I also had to correct a lot of orange overspray. As much as I though I was careful with masking, paint still managed to go where it was not supposed to. That meant more time waiting for paint to dry and masking, etc. The very last thing I did was to mask around the wheel wells and spray again with white. The wheel wells will receive some raw umber color wash mix to bring out the detail.
What is left is to start putting parts together and finally start having fun with the details that bring out the look on a model. Speaking of adding the final details I was surprised to find out so late in the game that the main landing gear locating pins did not fit at all in the Aires resin wheel wells. For some reason Aires made the holes about half the size they should be and I have no idea what landing gear struts they were designing for. I had to cut off a major portion of the kit locating stubs, measure the width of the resin wheel well holes, drill into the kit stubs and insert styrene stock rods to match the locating holes.
Next I decided to spruce up the inside of the canopies with a little surface detail. Some styrene details were added and the inside of the canopy was masked and sprayed Dark Gull Gray. The details were brought out with some highlighting and the masking was removed. I had previously dipped the canopies in Future and I have found out that the masking tape gunk can easily be removed with a cotton swab dipped in "Goo Gone" cleaner. I really like this cleaner because it does not react with the acrylic nature of Future.
Before attaching the canopies I flipped the model so I could attach the landing gear doors and other details. In the Ginter book on the Viggie towards the end of the book and on the back page there are photos of this specific aircraft being parked and on display at some airshow. These photos were very helpful to me for camo details, color choices but also for showing that the Vigilante would drop down its landing gear covers, front and main on occasion. The back cover color photo shows that the inside of the landing gear doors were painted all red. The exhaust area was painted steel and burned metal from Alclad II. The fuel dump was made from styrene rod and I drilled its business end with a micro drill to give it some realism.
So things were coming along well and I was ready for decal stage. Here I have to thank Charles Landrum who noticed my incremental build and offered an exchange of decals. He gave me doubles of the decals I needed to do the New Mexico bird and I gave him my Forestall decals. Charles has done the only other Cutting Edge conversion that I am aware of on the internet and it can be found on the IMPS website. Charles has done a great job from what I can see from the pictures but he wants to redo the paint job and make his model look even better. Funny, how people not knowing one another and through a common hobby and the internet can do these helpful things for one another. The tail decals went on great and the yellow New Mexico NWEF logo went on great and was opaque to the point where I did not need to double it with Charles' decals.
When I went on to do the national insignia on the top of the wing I was met with a nasty surprise. I admit it was my fault for not being smart enough to remember that the national insignia's striped sides do not come out exactly from the middle of the star. Having said that, the vinyl masks do not come with instruction or any symbols on the to tell you which way is up or down. So, out came the vinyl mask again which I had saved for future projects.
I resprayed orange and then white and made sure I used ink on the vinyl so when I used the again in the future I will not have the same surprise. By the way, these vinyl masks last for many uses if taken care of. Once the paint was dry the national insignia went on fine and matched the white outline very well. After all the decals were on I added the pylons with the modified inert "shapes" under the wings. These planes were used for various tests including simulating nuclear bomb drops. I looked at the images in the Ginter book and decided that the Trumpeter ordinance was very close after some sharpening of the nose tips to match the photos. OK, now what is left is some light weathering, these planes were not beat up after all and a final coat of semi gloss varnish.
This conversion took a long time to finish. Too many things needed to be fixed up and that is not a fault of the maker but a fault of the resin shop. Something tells me that things were not running as well towards the end days of the Meteor empire. The leading edge flap to wing joint was atrocious and I know how Dimitri's conversion looked originally. The set did not include a cockpit and I know Meteor provided the basics. Most importantly, the set still does not capture the look of the real thing 100%. If the maker was left to make the whole fuselage from scratch then we would be better off. However, how in the world would Meteor be able to sell it as a conversion with nothing left from the original kit! Still, the thought remains that the most elegant lines from this super advanced bird have yet to be captured by anyone to this date. In the end, I finally have an A-5 in my collection and I am happy that Meteor tackled the subject.


