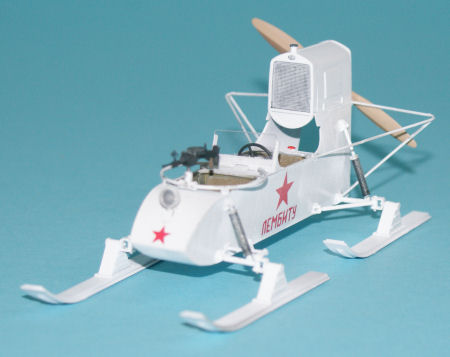
Trumpeter 1/35 RF-8 Aerosan
by Michael Benolkin
| Date of Review | September 2011 | Manufacturer | Trumpeter |
|---|---|---|---|
| Subject | RF-8 Aerosan | Scale | 1/35 |
| Kit Number | 2322 | Primary Media | Styrene, photo-etch |
| Pros | First styrene kit of this subject in this scale; very nice detailing throughout | Cons | Nothing noted |
| Skill Level | Experienced | MSRP (USD) | $10.95 |
Background
For a brief description of the RF-8 and the unassembled kit, look here.
The Project
When I received the Trumpeter armored Aerosan kit for review, I had already promised the kit to our armor editor but I liked the kit so much that I ordered that kit and this RF-8. I no sooner had the RF-8 parts out to photograph for an in-box review that I had them on the bench and they started getting painted and assembled. A quick check on the Internet revealed some useful information on the full-scale vehicle's composition and construction.
The kit has an internal structure similar to early biplanes and given that these were made of wood, the interior received a coat of typical military wood/metal primer. I drybushed the framework to bring out some of the details, then assembled according to the instructions. As with the full-scale vehicle, there isn't much to this kit. The 'fuselage' was assembled and the seats were painted and installed.
The automotive engine is nicely detailed though you can't see much of it inside that tight cowling (only the rear and underside are open). I assembled and painted the engine a dark engine gray. The engine was mounted onto the motor mounts inside the cowling and the cowling top was fitted. The radiator goes onto the front of the cowling and a support frame goes around the rear side.
The drivers dash board was painted and installed but the windshield was left off until the end.
The suspension and skis were assembled and installed per the instructions and the model received a first coat of primer (Tamiya Gloss White). With the few minor blemishes treated, the model was painted again with Tamiya Gloss White and set aside to dry.
The propeller was painted with three different shades of brown to simulate the laminated hardwoods used to create the propeller. The propeller hub was painted a light gray and this was set aside to dry.
The machine gun was the only part of the kit to receive a photo-etched part and this was a sight ring mounted on the barrel. The kit provides two which is nice as the first was eaten by my carpet.
The gun ring and gun were installed as was the propeller. This left the propeller guards to be installed and these were the trickiest part of the build. I took my time and let the Tamiya cement take hold on each part before adding the support arm also using Tamiya cement. I was tempted to use cyano here but these are very thin parts and any imperfections would have been difficult to clean up. The model received a touch-up of Tamiya Gloss White.
Markings
One reason I used Gloss White versus a faster drying Flat White was that this finish was decal ready. I put the Lembitu and red star decals into warm water and laid them into place. I coating of Tamiya Decal Softener finished the job and these decals laid down very nicely with no silvering.
Finishing Touches
The kit provides the windshield and the headlight lens as dye-cut acetate parts. The dye-cut wasn't that deep and I wound up cutting out the parts with scissors. To avoid glue marks at this late stage, I simply applied Future Floor Wax to the light housing frame and to the windshield and put the acetate parts into place. No muss, no fuss.
I opted to do the photo shoot for this article before applying any flat coats or weathering so you could see the model without any cover-ups.
Conclusion
This model didn't take very long to build and I spend more time waiting for the Tamiya White to dry than painting or assembling. I am quite happy with how well this model goes together and you'll have fun with it too. With a Manufacturer's Suggested Retail Price of under $11.00, this is also an inexpensive project that you can have a little fun with. I certainly did!


