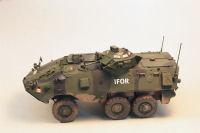
Trumpeter 1/35 Canadian AVGP Grizzly (Early)
by Matthew Quiroz
| Date of Review | February 2012 | Manufacturer | Trumpeter |
|---|---|---|---|
| Subject | Canadian AVGP Grizzly (Early) | Scale | 1/35 |
| Kit Number | 1502 | Primary Media | Styrene |
| Pros | Fairly low parts count; Decent detail | Cons | Missing critical step in instructions, vinyl tires, turret dimensions appear backwards |
| Skill Level | Experienced | MSRP (USD) | $35.95 |
Background
The AVGP (Armored Vehicle General Purpose) is one of three armored fighting vehicles (Cougar, Grizzly and Husky) that were ordered by the Canadian military in 1977 and were based on the six-wheeled version of the Swiss MOWAG Piranha I. They feature propellers and trim vanes for use during amphibious operations similar to the larger eight-wheeled Bison. Recent modifications have removed the marine drive system due to excessive maintenance costs. The Grizzly is armed with two weapons in the turret, a .50 caliber MG and a 7.62mm MG. The Canadian LAV-III, US LAV-25 and Stryker are also variants of the Piranha series of vehicles.
The Kit
First off, kudos to Trumpeter for bringing us this kit in the first place. This is one subject that has been missing for some time. Even though it’s nice to have a new kit, there were some issues I came across in my build. There are roughly 220 parts to the kit, but not all are used. Could we see some of the other variants in this family? Time will tell.
Assembly is straight forward beginning with the wheels/tires, moving onto the lower hull and drive train. Everything progresses easily until step thirteen. In step twelve you assemble the weapon system for the 1 Meter turret. Simple enough, until you get to step thirteen where you attach the completed turret assembly onto the upper hull. I thought I missed something during my instructions and went back to check. Nope. I was correct. There is nothing in the instructions on how to assemble the turret. It isn’t terribly difficult to figure out as the parts count for this are pretty low, but there are pieces to add to the turret that you will have to search out. Those being H11, H35, H10, H18, H28, H30, GP3, H19, H23, H17, H7, H9, H6, H8.
These are the parts that make up the turret side/top/bottom, lifting eyes, smoke grenades, smoke grenade boxes, spot light, its guard and the spot light lens. I think it must have been a mistake in the printing as they did include two steps showing the exact same process of installing the turret onto the completed hull. This is the sequence I used to complete mine:
- Build the guns/mount per step 12
- I added parts H10/11 (Turret sides) to part H35 (Turret bottom)
- Add part H18 (1/4 round piece) to part H35. There are two small slots on the inside of H35 where this goes. The slots are directly under the barrel of each weapon
- Trap the gun mount from step 12 between part H28 (Turret top) and the mounts on part H35 ensuring you don’t get any glue on them if you want them to elevate/depress. There is a small hole/slot above the .50 cal. Ensure this is facing up
- Parts H19 and GP3 are the spotlight and its lens. I painted this separately and added them at final assembly
- Add parts H17 (Smoke grenade boxes) to either side of the turret. There are two mounting holes per box.
- Grenade launchers are made from parts H7/ H9 and H6/ H8. H7is the top of the left side grenade launcher. H9 is the bottom. Assemble these two parts. H6/H8 are for the right side. Assemble them in the same manner as the left side
- Attach grenade launchers to their respective sides of the turret
- I saved these for last as they are somewhat fragile looking… add parts H30 (lifting eyes) to the holes on either side of the gun. Look at pictures of the completed assembly for guidance. The looped end goes towards the top
- Install part H23 (spotlight guard) onto gun mount. Again, check the pictures for placement. There is a “D” shaped hole where it goes
- Follow steps 13 and 14 as normal
As you can see, there isn’t a lot of parts involved in building the turret, but it can get confusing if you are a new modeler and don’t know what you are looking at. I’ve been at this awhile so it comes somewhat second nature to me. Hopefully my description above will help.
Conclusion
Due to the omission of the turret assembly in the instructions I dinged it. There is also an issue with the turret dimensions that will take some careful surgery to correct…if the builder so chooses. The angles are backwards. The angles on the back should be the front and vice versa. Not a big deal if you just want to put something on your shelf that looks like a Grizzly. More so if you want something that is as close to accurate as you can get it as you will have to cut the pieces off, swap them, remove the smoke grenade mounts and relocate them as well then blend all of that back in. Not worth it in my book…but that’s just my opinion. Your mileage may vary.Suffice it to say that the kit builds easily enough save for the turret assembly omission and will look the part sitting on a shelf. Again, thumbs up to Trumpeter for bringing the AVGP series to us. I just hope future releases are a little better thought out.
My sincere thanks to Stevens International for this review copy!


