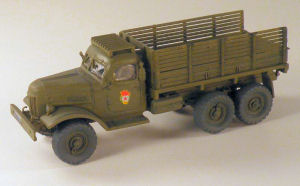
Trumpeter 1/72 ZIL-157 Truck
By John Kelley
| Date of Review | April 2010 | Manufacturer | Trumpeter |
|---|---|---|---|
| Subject | ZIL-157 Truck | Scale | 1/72 |
| Kit Number | 1101 | Primary Media | Styrene |
| Pros | Accurate shape, excellent stake bed detail, very easy to assemble | Cons | No detailing on back of wheels and sparse interior detail |
| Skill Level | Basic | MSRP (USD) | $7.98 |
Background
The ZIL-157 2.5 ton truck was the first post war Soviet cargo truck to enter service. Serving in many armies and in front line Soviet service until the introduction of the Ural 375. The subject of this build review is the Trumpeter kit in 1/72 scale.
Getting Started
Starting with step one, I glued all the parts except the pins for the tandem axle springs. I left these unglued so they could be adjusted as the assembly progressed. I made sure all the glued parts were given plenty of drying time so they would be strong when the next step was started. Step two is where the axles and drive shafts are assembled. Because the parts are interconnected, a little planning needs to be done. First I assembled the front differential and drive shaft. The holes in the differentials, Parts B-13 and B-12, are smaller than the metal axles that go through them. Fortunately, the axles are knurled at the ends so you can use them to drill through the differentials and enlarge the holes. That way, the axles slide in easily.
I attached Part B-13 to the springs by sliding the middle axle through the springs and the differential. I did not glue any parts until the entire chassis was built. This aids in lining everything up and making sure that all the parts are level and straight. I then added Part B-7 to the gear box B-11. After having built this, I would recommend that you assemble the last differential of the tandem axles before assembling the front one. I didn't do it this way and found it a little tricky to get everything lined up.
While building the long drive shaft, I found the hole in Part B-11 needed to be enlarged to accept Part B-9. I built the long drive shaft Parts B-9, 15 and 14 without glue and attached them to B-12. After this, I slid the axle into the differential into the springs and this secured this assembly. I did the same thing to the front differential except for drilling out the hole in Part B-11.
Once all the drive shafts, gear box, and axle assemblies were complete, I used liquid cement and a brush and applied it to all the areas that needed to be cemented. Once this was done, I set the chassis with the axles down making sure they were level and cemented Parts B-2 and B-3 together. This sounds more complicated than it is. The idea is to build everything first then glue it together.
At this point, I built the wheels and added the final details to the chassis. I lost the gas cap and I made another from stryene rod and a disc of plastic. I began assembly of the cab leaving it separate for ease of painting and then built the stake body, again leaving it separate. By this time, I had four sub-assemblies; the chassis, the cab, stake body and wheels. This completed the construction phase of the model.
Painting and Finishing
Trumpeter recommends Olive Drab FS34087 as the overall color scheme. From what I have researched on the web and from various forums, the color can vary from Dark Green up to a brown shade. I've seen some pictures where Olive Drab was an excellent match. As far as Soviet vehicles are concerned, it really depends on the modeller. I went ahead and used Modelmaster Olive Drab.
The tires and seats were painted Tamiya German Gray. The headlights, rear view mirrors and taillights were painted silver and clear red was applied over the silver on the taillights. The model was then gloss coated and the decals were applied.
The decals went on with no problems. The license plate that is applied to the left mud flap required setting solution because of a raised X on both flaps. Microsol was used and the decal settled down nicely. I then applied a wash of German Grey and then dry brushed the model with Olive Drab. After this, I applied a flat coat and added the clear parts. I attached these with Titebond White Glue.
After this was dried, I added the mirrors and windshield wipers. The upper and lower cab were assembled and attached as well as the stake bed.
Conclusions
This was a very easy and fun build. The parts attached to the model with no trouble. Unlike the ICM kit, there are location tabs and holes for the stake bed and the cab. The axles and drive shafts, while complicated, were easily assembled. While this is a very well detailed it with excellent wood grain that is simulated on the stake bed, I was a little surprised at the lack of detailing on the back of the wheels, which is nothing more than a plastic disc and no dashboard detail. You do get steering columns and gear shifts, but if you want to show the cab open, you will need to add some extra detail. You will also have to cut the door open if you want to show this as they are all molded shut.
Apart from this, I very much enjoyed this kit and I highly recommend it to anyone interested in post war vehicles. I would like to get another one and finish it in Syrian markings and camouflage.
I want to sincerely thank Stevens International for this review kit.


