Testors/Hawk 1/48 O-2A Skymaster Build Review
By Kelly Jamison
| Date of Review | October 2018 | Manufacturer | Testors |
|---|---|---|---|
| Subject | O-2A Skymaster | Scale | 1/48 |
| Kit Number | 514 | Primary Media | Styrene |
| Pros | Rare subject | Cons | See text |
| Skill Level | Basic | MSRP (USD) | $15.00 |
Build Review
The Air Force was looking for a replacement to the O-1 Bird Dog that had a little more speed and loiter time. Their search brought them to the front door of Cessna and they decided on the 337 Skymaster, a 6 passenger general aviation aircraft popular with civilian pilots for its speed and in-line twin engine configuration. So contracts were cut in 1967 for a modified version called the O-2A with the interior stripped out and a radio rack in the back and a gunsight for smoke rockets and close air support rockets mounted onto hard points that were added to the wings. A few other modifications were made to increase visibility by placing windows in the right side door and fuselage. They were very successful in their roll and were used by many countries.
The Testors kit first was introduced by Hawk in 1966 as a Cessna Super Skymaster Kit #565. The kit was upgraded to the Cessna O-2A Skymaster by Testors in 1991 with the added glass and decals. But the interior was still the old civilian version. An extra sprue was added for the antennas, weapons and hard points. You can also make an O-2B which has spinners instead of the bare prop hubs. It also has an unusual speaker that would be mounted on the right side of the fuselage, used in psychological warfare. So there was a lot of scratch building and additional parts that I would have to procure to make the kit I wanted. I decided to use DrawDecal's O-2A "Don't Shoot" decals, True Details #48536 LAU-3A rocket pods, Aerobonus Hydra 70 Marking Rocket Pods and Mike Grant instrument faces with photoetch Airscale #PE48BEZ cockpit bezels.
The first order of business was to get rid of the stock civilian interior and add a scratch built military interior to include a new back wall, cable tunnel and armor seats along with a new instrument panel and gunsight. Plastic card stock was used to fashion the interior using the kit part as a template for the floor. The pizza rack for the radio equipment was scratch built using plastic rod and different shape square and rectangle rods cut down to size and some extra photoetch I had found. Never throw away that unused photo-etch. It comes in handy. Some wires dressed it up and then I painted it to represent the different pieces of equipment.
I painted the interior pieces a green zinc chromate and detailed out the instrument panel. Then I thought that I would cut out the door to give better viewing access to the detail work I did do. More on that later. I also cut the small window in front of the door out by using the glass as a template. A micro drill helped get the shape right but slowly carving out the hole is the only way to ensure a good fit of the glass.
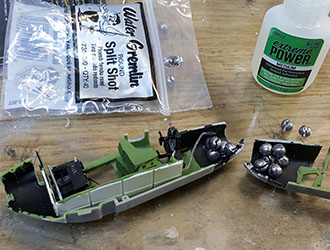
Then it was time to put the fuselage halves together. Because of the high wing you still have access to the interior if you need it for seatbelts or anything extra you want to add. I superglued lead fishing weights into the nose area before closing the fuselage halves. It will need nose weight to keep from setting on the tail. I tend to overdo it. I also hollowed out the engine intake areas and superglued small aluminum tube in there to represent the first set of piston cylinders. It isn't perfect but I thought the front area needed sprucing up.
The wings were conventional in construction. The wing consisted of one long top piece and then two bottom panels. The fit wasn't too bad. I scratch built the small plates that keep the landing lights from blinding the pilot. I wish I would have superglued the glass in for the landing lights and sanded them smooth. Gluing the clear lenses after paint caused a lot of issues because they do not fit well to begin with. I didn't put on the tail booms yet. It made it easier to handle the plane and deal with sanding the seams. The wing struts needed a little trimming to fit properly.
The next major problem to face was cutting out the areas for the glass modifications. I separated the glass from the clear sprue tree and then used a bit of pliable putty to stick the glass into place long enough to take a sharp pencil and draw the area I would cut out. This took a new #11 blade and lots of patience. Slowly carve out the area you need. I used a micro drill to start the process at each corner of the opening to help guild me. Under do it and then shape using files to get the exact fit. Testors did supply black decals if you want to just bypass the whole glass modification all together.
The elevator got sanded down along with the tail booms then all glued together. I used a jig made from Legos to keep everything in alignment. They had a tendency to twist so that the rudders were not vertical and also the booms didn't want to stay straight. A temporary jig sure took the guess work out of the problem.
I said I would talk about opening up the door to the fuselage later. Well now is the time. I thought it would be a good idea to vac-form the door out of clear plastic. That solves my window problem, modified window problem at the same time. Well the vac-formed door was easy but masking it off for painting and building an inner structure along with the hinge area was more effort than it was worth. In the end on the finished model, you still can't see into the area and it ruins the smooth lines of the Skymaster. On hindsight it just didn't turn out as well as I thought it would. As we say in the business "It is what it is." And press on to the next project.
There are little exhaust stubs on an oval shaped piece. Part #30 to be exact. I knew I could do better than that so the micro drill came out and the little stubs were replaced with some brass micro tubes. The upper air intake comes molded in a wrong profile for the actual scoop intake portion. It should be more oval in shape than flat on the bottom and curved on the top portion of the scoop. The landing gear is a strange thing to. The wheels are soft and look toy like. I found an old set of True Detail Zero wheels which were notoriously undersized for the Zero and useless until I found the right project for them. They are much better looking than the kit supplied wheels. I also took the exhaust stubs on the front landing gear doors, Part #16, and replaced it with brass tubes.
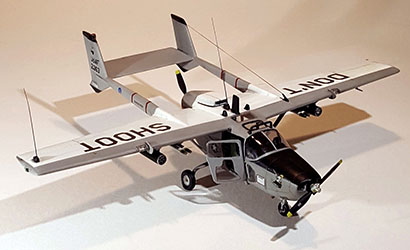
Once the wings, fuselage and tail assembly got sanded smooth, I filled the cockpit with tissue to keep paint off of it. I painted the antiglare panel with Vallejo Semi-gloss black to include the instrument dash. While I had the airbrush out and loaded with black, I sprayed the antennas, whip antenna mounts and loop antenna. Then masked the glare panel off and painted the entire plane with ModelMasters Acryl Aircraft Gray FS16473. The top of the wing got masked off and sprayed with ModelMasters Acryl FS17875. It took a lot of tape but was well worth the effort to get that classic Southeast Asia FAC paint scheme.
The DrawDecal's are actually for an aircraft that is currently flying the airshow circuit. This scheme is not accurate for a Viet Nam era aircraft so you need to decide exactly what scheme you want. I just couldn't pass up the unique "Don't Shoot" scheme. You might have a different take on it. They were a bit difficult to work with. Use the kit decals for the danger stripes on the tail. The Danger arrows were a bit out of register leaving a white off center shadow that you can't see until it is too late. It took a lot of Solvaset to get them to lay down right. A coat of future helps prior to placement of decals helps embed them a bit better too.
The prop shafts stick too far forward so I cut down the back of the prop shaft and replaced it with brass rod to get the distance from the nose and tail to look right. The glass around the fuselage was a good fit but the front single piece canopy needed lots of cleaning up and fitting. It was thick and a real poor fit. Looking back, I should have blended it in with superglue and masked it off prior to painting. The overhead windows were a disaster. I dipped them in future then superglued them in. Even then they fogged over and looked terrible. It is such a focal point of the model, I couldn't just let it go. So I made new windows with clear plastic sheet and dipped them in Future. While still wet I put them in place. The Future acts like glue. Dust is the thing to worry about so one of the wife's big Tupperware bowls became a protective dome until the Future dries.
The aftermarket weapons were painted and mounted using reference material. They help give the plane a more war fighter look than a stock aircraft. I found some small resin bit from who knows where to act as the antenna mount on the wing and used Flexi-line for the antenna itself. The aerials on the wing tip and center wing are from stretched sprue scrap from a Monogram P-61 kit. The black plastic just took a step out of having to paint them since they are so thin. Using the candle method of melting a stick of sprue then pulling them apart like taffy. They are just sitting in the antenna mount points since they are so easy to break. I glued the other antennas on with extra thin superglue to finish off the build.
The overall look of the kit is fantastic but the molds are so old. Rivets are oversized and the fit is rough to say the least. The molds are worn out. The additional clear parts are a real pain to use when you have to carve out the openings for them. There is no room for error that will not be obvious with the clear parts. Every single part had to be worked over or replaced. If you want an O-2A or B it is the only game in town.


