Tanmodel 1/48 RF-84F Thunderflash Kit Build Review
By Fotios Rouch
| Date of Build Review | February 2016 | Manufacturer | Tanmodel |
|---|---|---|---|
| Subject | RF-84F Thunderflash | Scale | 1/48 |
| Kit Number | 2201 | Primary Media | Styrene |
| Pros | Nice details and options | Cons | See text |
| Skill Level | Basic | MSRP (USD) | $79.99 |
Build Review
For a look at this kit out of the box, look here.
First of all, I would like to welcome this new company into the hobby business and especially in the 1/48th scale aviation subjects! I am very much looking forward to TANMODEL doing other similar subjects that are of interest to the Turkish Air Force such as the T-37 (that nobody seems to have enough brains to realize how much it was used around the world), maybe a TF-102, a T-41, etc. Being a new company, I am sure they have put a lot of their money and heart in this project and as such I will not be unreasonable and will only make constructive comments. The intent is to build it straight out of the box with no aftermarket stuff or scratch building. That all will come with a later build and I will take my time for that. Upon opening the box, the first impression is positive. Lots of parts, nice molding and a huge decal sheet.
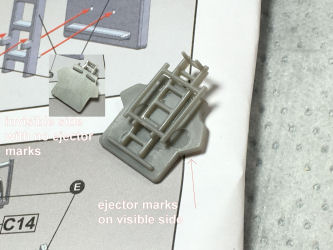
I started by washing the release mold off of all the parts. I then moved on to the cockpit assembly and painting. Overall it looks good, better than the Heller one but not all that much better from Monograms F-84F. Some things of note are that the right foot restraint master has not been machined right and the part is filled. The modeler needs to cut it off and scratchbuild another one or use a resin seat. The back wall of the cockpit has large ejection pin marks showing on the visible side but it perfectly smooth on the back side which is not visible. Maybe TANMODEL can plan such things better.
Speaking of ejection seats, the kit does not provide Italian AMI or Martin Baker seats for the German subjects. The cockpit went together OK, was painted and in the end the back wall ejection marks were not very visible. The lack of ejection seat harnesses is noticeable.
I moved on to the assembly of the cameras and the mount racks. It all went together easy but the camera mounting fixture instructions are very vague and I had trouble with the assembly later.
I then moved on the fuselage halves and I noticed inconsistent execution of the attachment points between the sprue gates and the fuselage halves. Some attachments are perfect and clean and some intrude into the fuselage mating surfaces. Not the end of the world and workable but not expected in this price range. They can be cut and polished with a little work.
I painted the interior of the camera bay silver and then a couple of mists of black. I rubbed the raised surfaces lightly to get the silver to poke through. I really did not need to do too much because I am not planning to open the camera bays for this specific build.
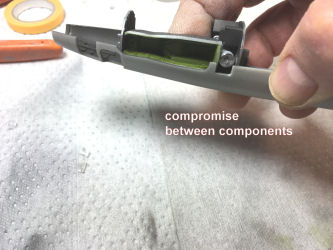
So I followed the instructions and added the front camera bulkhead and placed it in the well-defined grooves. Then I tried to place the front wheel well where I thought was the right place making it fit exactly to the contours of the fuselage opening. It does not fit since the front bulkhead is in its way. Was it a conflict between CAD and the plastic thickness? Before getting things too cramped I tried to fit the bottom lens glass cover but this would not fit since it is wider than the provided cut. Also the clear part that is to fill the opening is too low and will not make a flush fit as you can see from the images. I had to cut out the clear part from its frame and make a custom fit.
I tried a few things and ended up with some compromised fit that would take in the bulkhead and wheel well.
The front camera assembly was taken apart and rebuilt in place so the cameras point the right way on the sides. The instructions again are very vague and you have to look at the later assembly images to get some clue about how it all should go together.
I thought that putting the fuselage together would be next to impossible with all the sub-assemblies in place but I was very pleased to see it all fit!
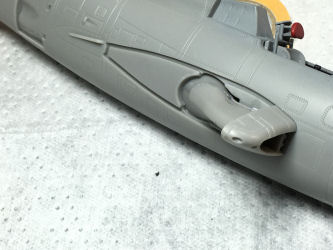
I am very impressed with the intake trunks. They look very complicated but they fit well within the fuselage but also to the intake lip nicely as well.
The wings went on just fine and fit great into the fuselage slots. The flaps and ailerons are positionable but leave large gaps between each other and the wing tips and fuselage.
Some items of note are that the exhaust area looks a bit poor. You can see straight through the hollow fuselage structure. Looking at the CAD instructions it looks like the designer planned on internal structure that would have accommodated the pipe and not shown a gaping hole.
The camera windows fit very snug and leave no gaps. Note that if your cameras are not perfectly aligned they will interfere with the windows.
The canopy too fits very snug and is nicely executed with leaving lots of surrounding clear plastic and allowing integration to the fuselage and sanding margins without marring the clear plastic.
Do not follow the instructions on the wing fences. The numbering is wrong but you can see what fence fits where.
The front landing gear takes some small effort to put together. The front well needs drilling in order to accept the axle.
Masking the clear parts took a bit of time and a nice pre-cut mask would be nice down the road, one thing I need to address is reshaping the clear nose cap so it fits the fuselage contours. It appears a bit bulbous at this point.
The next job was to mask the clear parts and get ready for priming and fixing the missing or faded panel lines. The panel lines and rivets are nice and vivid on the fuselage sides but there is either technology limitation or lack of know-how and the detail goes faint towards the top and bottom fuselage halves. I tried to scribe and poke rivets but my results cannot be as perfect as a machine's. Some primer was necessary in a few places. Maybe my next build will be more meticulous and require less.
After priming I polished the Mr Primer 1000 and then did one more coat of 1200. Originally, I was thinking of making my RF-84F in silver. Then after I realized how much polishing it would need, I decided on a NATO green Gray scheme. Why so much polishing on a plastic kit? Some surfaces are rough as if the tool was not polished enough.
Look at the main landing gear doors. Yes, I polished them off but this is not quite acceptable at this price range.
After I felt that the surfaces were good, I started with the RAL colors. RAL7001 on the bottom, RAL7012 and RAL6014 on top. It took me a while to get enough info to make some OK guesswork on the pattern. Even the images that I have when I was a little kid with my dad at Larissa show most of the Thunderflashes in SEA camo. I think I have the camo pattern down to a reasonable degree.
I masked almost the whole model before applying the final colors. Red was prevalent and contrasts with the camo. Then there is the gray fin tip and the bare metal exhaust.
After masking was removed, I gloss-coated the whole model. If I had the X-tracolor RAL6014 I would not have had to. In today's free market, not to be able to get Xtracolor in the US is ridiculous....
The next step is the decals. Sadly, the kit decals are not very good at all. The US decals are useless in color. The others are full of mistakes and or out of register and with wrong colors (some corrections are included).
Icarus Decals from Greece has a magnificent selection for Hellenic Air Force F-84s. He will be very missed. Get them while you can.
After the decals were dry, I cleaned the model from fingerprints, watermarks and excess Microset. I then attached the last parts like tanks and tail wings. I used Testors Semi-Gloss varnish to complete the finish and I used pastels for the weathering. Lastly, I unmasked the clear parts and polished them with a cotton swab and Novus polish solution. In this build I did not use Future for the clear parts as they looked really clear on the sprues. I think I should have used Future as they would have sparkled better. I like the final result. The NATO camouflage is a bit unique and also subdues the panel lines and rivets.
I enjoyed building this kit. If I were a king in the model world for a day here is what I would have liked:
- Lighter panel lines and rivets, they do not look fictitious but maybe more like they belong on a 1/32nd scale kit.
- Intake splitters: They fit great but they are way thick and totally out of scale. Please polish the molds a little better. Too many rough areas (tanks, bottom of the exhaust area, etc.).
- Use a molding company that knows how to get panel lines not to disappear as they round off cylindrical shapes. Hasegawa and Tamiya have no issues with that and they would charge $80 as well for such a kit.
- The tail fin clear light at the root is missing and I had to paint it silver to show its location.
- The flaps, although great that they are separate parts, they leave gaps on either side.
- The camera bay is absolutely impressive but difficult to build because of the vague instructions and no locating aids at all. Maybe it would be best to cut open the camera access doors and then build and test fit the cameras in place. It would look nicer and the cameras would be positioned as they should. Building the camera assembly ahead of time and thinking that the lenses would line up with the fuselage windows is a guessing game.
- The decals are useless. Not a big deal. Almost nobody uses the supplied decals in kits most of the time.
- Cockpit: Not bad but not complete by a long shot. Then again, today, modelers that pay $80 for a kit, usually buy decals, photoetch and resin for it as well.
My best wishes to this new company. I sincerely hope they take off and produce many more kits of interest to the Turkish Air Force (and by proxy to a myriad of NATO countries).
My sincere thanks to Stevens International for this review sample!


