Tamiya 1/48 F-14A Tomcat Build Review
By Michael Benolkin
| Date of Review | October 2016 | Manufacturer | Tamiya |
|---|---|---|---|
| Subject | F-14A Tomcat | Scale | 1/48 |
| Kit Number | 61114 | Primary Media | Styrene |
| Pros | Beautiful details | Cons | See text |
| Skill Level | Basic | MSRP (USD) | $115.00 |
Build Review
For a brief description of this subject and a look at this nice kit out of the box, look here.
As I mentioned in our kit first look review, my go-to kit for a simple build and a reasonable airframe to display one of the multitude of colorful Tomcat decal subjects as been the Academy kit, despite its well-discussed short-comings. While the Hasegawa Tomcats are well done and detailed, you only want to do that much work once or twice, otherwise the kit is overkill for having a simple display airframe. With the release of this kit, Tamiya has provided an easy-to-build Tomcat that doesn't sacrifice detail, but it doesn't attempt to offer the variety of options found in the Hasegawa kits. In other words, we may have a contender to replace the Academy kit. So does it build as easy as advertised? I am planning to build this model straight out of the box and I'll note anything that might be enhanced with aftermarket options for my next build. Let's get started.
After studying the instructions, I applied some basic colors to get the project started. Gray (XF-19) in the tub and sidewalls, black (X-18) on and around the canopy sill, ejection seats, and white (XF-2) in the wheel wells. I also took some time after painting the side consoles gray to mask them to paint the control faces black. The colors indicated are those recommended in the instructions, so I thought I'd see how they looked. The gray is close enough to standard cockpit gray for this project, but the black is semi-gloss black X-18 which doesn't look right on the instrument panels or side consoles. I sprayed these with clear flat and used flat black XF-1 to finish up the cockpit.
The details on the side consoles are brought out with a dry-brushing of flat white (XF-2) and followed up where needed with a direct application. The flat white over black comes out light gray which looks just right. The kit provides decals for the CRTs/scopes but I painted each scope face silver, and then applied two coats of clear green (X-25) or clear orange (X-26).
Before installing the sidewalls, I used a gray wash to bring out the details around various areas in the cockpit from the rudder pedals to the stowage bags in the front and rear cockpits. The effects are subtle and don't show up very well in the photos but look great in person.
The nose wheel well was one of the areas that I pre-painted flat white so it was almost ready for assembly. Before I assembled the well, I used the gray wash in here to bring out the nice molded-in details.
The nosewheel well mounts to the underside of the cockpit tub and both go into the forward fuselage halves. Don't forget to install the air refueling probe well or door first. I installed the door and the tub/well assembly and the nose simply falls together. The canopy sill mounts over the cockpit opening and it too fits very snugly.
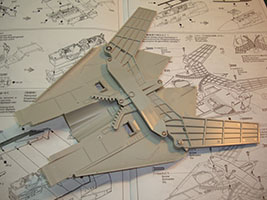
Here is a bit of deja vu as this wing sweep mechanism design is similar to Tamiya's 1/32 F-14A though they used a metal spar to span the two wing sweep hinges. This goes together with no surprises.
It's almost time to build up the main wheel wells but first I paint the well areas on the upper and lower main fuselage halves plus the appropriate areas of the intake trunks that will be assembled soon.
The intake ramps are installed followed by the main wheel well walls. The inboard walls mount to the upper fuselage half and then the other three walls go together and drop into place. I didn't find it quite that easy so I glued up the three walls, inserted them into place, glued them to the molded ridges in the upper fuselage halves, and then to keep them in place, I dry-fitted the lower fuselage half into place and clamped around the main wheel wells to get them solidly located. That worked perfectly. Don't forget to install the poly caps inside the stabilator hinges and get them installed in the rear of the upper fuslage half.
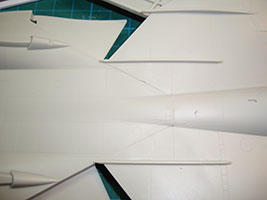
Here's my first trouble spot. The upper fuselage half is actually two pieces: the mid-section over the wings/intakes; and, the rear section that mounts the tails. The two joins have dovetailing tabs to help with alignment but I must have had some warpage in my parts as alignment wasn't pretty no matter what I did. I let the glue set up the joint and solved the problem with Mr. Surfacer 500.
With the mid and rear sections of the upper fuselage assembled, the upper and lower fuselage halves are finally joined. No problems here. The nose section is dry-fitted to the main fuselage and looks pretty nice so far.
It was time to build up the intakes. The two intake ducts were painted white and the TF30 compressor faces painted steel. The two intake assemblies went together smoothly and literally snapped into their respective intake trunks. The trunks fit nicely to the upper fuselage mid-section and you can see how they look from the front. Tamiya did a nice job of hiding the intake seams.
Then we got to the two inserts that link the trunks to the lower fuselage half's trunks. These are parts K14 and K15, and while they fit OK, these need Mr. Surfacer 500 as well. In these shots, I've applied Mr. Surfacer to the trunk inserts as well as to that slightly warped upper joint. I initially applied Mr. Surfacer to the entire upper surface seam but as one reader reminded me, there is a natural step there and I removed the excess Mr. Surfacer restoring the step. Only the spine still needed the putty. Here is a reference photo to help show what the step will look like.
To be continued, stay tuned...


