Tamiya 1/48 Mosquito FB.VI/NF.II Build Review
By Michael Benolkin
| Date of Review | December 1998 | Manufacturer | Tamiya |
|---|---|---|---|
| Subject | Mosquito FB.VI/NF.II | Scale | 1/48 |
| Kit Number | 61062 | Primary Media | Styrene |
| Pros | Easy build | Cons | Nothing noted |
| Skill Level | Basic | MSRP (USD) | $38.00 |
Build Review
As the clouds of war loomed on the horizon, the Royal Air Force realized in the mid-1930s that its bomber fleet would have to be modernized. Sir Geoffrey de Havilland believed the key to survivability for the next generation of bombers was speed. Building upon the experience he had gained since the First World War in commercial aviation and air racing, he proposed an unarmed medium bomber whose key to survival was outrunning the enemy's fighters. The Air Ministry repeatedly rejected de Havilland's proposals, preferring the more conventional, heavily armed (and therefore slower) bomber approach.
In 1940, Air Vice Marshal Sir Wilbert Freeman, the only member of the RAF to agree with de Havilland, was able to obtain approval for a single prototype, the D.H.98, to prove that the concept was feasible. W4050, the first Mosquito, was a bomber that flew like a fighter! The success of the prototype lead to the development of numerous variants of the Mosquito throughout the war and made it the first true multi-role combat aircraft. The Mosquito was made in several different bomber, fighter-bomber, night fighter, reconnaissance, and even cargo and special mission variants. BOAC used the Mosquito to fly special missions to and from Sweden during WW2.
De Havilland's design was an aircraft constructed from a variety of wood laminates (composite construction) at a time when metals were a strategically limited resource. Construction manpower would make use of carpenters and wood shops. While various powerplants were examined and rejected, the Rolls Royce Merlin became the only engine for the Mosquito. Without the weight and drag of defensive armament - gun turrets and the manpower and ammunition that goes with them - the Mosquito was faster than all of the operational Luftwaffe fighters available throughout the war (with the exceptions of the Ta-152H and Me-262). The Mosquito easily out-paced the P-51 Mustang.

418 Sqn (City of Edmonton), RCAF, was created in November 1941. By March 1942, they had completed an accelerated training program and begun intruder operations flying the Douglas Boston Mk.III. While having mixed results (aircraft/crew attrition versus enemy targets destroyed was too high), 418 Sqn was taking a toll on German operations on the continent. The intruder mission was intended to intercept and shoot down enemy aircraft over their home airfields, interdict rail supply lines, and engage other targets of opportunity.
In February 1943, 418 Sqn received its first de Havilland Mosquito. TH-K was a Mosquito NF.II without the radar set. The NF.II was armed with four .30 cal machine guns in the nose and four 20mm cannons in the forward bomb bay. The radar set, while useful for night intercepts, was removed from the intruder aircraft to preclude it falling into enemy hands in case of an aircraft loss over the continent. At that time, radar-equipped aircraft were restricted to flights over 'friendly' territory. The NF.II version without radar led to the FB.VI version that also had provision for more fuel and underwing stores.

By mid-1943, 418 Sqn had replaced all its Bostons with the Mosquito. 418 Sqn's losses dropped dramatically while its kill record rapidly grew. By the end of the war, 418 Sqn had become the highest scoring Canadian fighter unit; the majority of the kills being credited to the Mosquito. The final tally was 178 enemy aircraft destroyed (105 air-to-air), 83 V-1 Buzz Bombs, over 200 ground vehicles and 16 locomotives.
The 418 Sqn's assigned code during the war was TH. The squadron adopted Al Capp's "Lil Abner" comic strip characters for its nose art. These included:
- TH-D/Unk "Moonbeam McSwine," flown by Lt JF Luma, USAAF
- TH-M/NS850 "Black Rufe," flown by S/Ldr RA Kipp
- TH-T/NT137 "Lady Luck," flown by Flt Lt JH Phillips
- TH-Z/HR147, "Hairless Joe", flown by Sqn Ldr R. Bannock
- TH-(Unk)/MM421, "Lil Abner", flown by Wg Cdr H.D. Cleveland
This kit reflects the very highest of Tamiya's modeling standards. There are very few kits on the marketplace that can literally "fall together", but this is one of them! What distinguishes this Mosquito from its older Airfix brother includes beautifully detailed wheel wells and main gear including the oil tank in each well for the Merlin engine; a highly- detailed cockpit including radios and a radar set for the NF.II version; bomb bay doors that can be positioned open to reveal the bomb bay fuel tanks and two 500-lb bombs; choice of underwing stores including slipper tanks, external bomb racks, or rockets; positionable crew-entry door and access ladder; removable nose fairing to reveal the four .30 cal machine guns; choice of single or dual-light wingtips; and a choice of narrow or wide chord propellers.

The only things I found disappointing in contrast to Tamiya's other recent releases are that the wing flaps are molded in the "up" position, and there are no flattened tires. One other minor glitch turned up in the kit as well - the bomb bay fuel tanks. While the detail is beautiful, these tanks could not have been used on the NF.II or FB.VI variants of the Mosquito. The forward portions of the fuel tanks are obstructing the area where the 20mm ammunition cans would be located to feed the 20mm canons. In this configuration, a differently shaped fuel cell is used in the bomb bay (if any were installed at all) for the fighter variants. These tanks would be typical of the fuel cells fitted to the bomber and reconnaissance variants of the Mosquito.

The first thing to do is to pull out the instructions and study them. I know, this is not my normal approach either, but this is a highly detailed kit and there are 22 steps to get this out of the box and onto the shelf. Your first step is to select which of the three versions you want. For this review, I chose option A, Mosquito FB.VI. There are differences from the instructions that will be mentioned later, but for the most part, follow option A. I ran through the instructions and found where the unique steps were hidden for option A. This exercise ensured that where I skipped around in the instructions, I would not inadvertently skip a critical step. If you are choosing an aircraft not portrayed in the instructions, you'll want to take a highlighter and mark the options that the aircraft you are building is equipped with (narrow or wide-chord props, covered or uncovered exhaust stacks, antenna mast, underwing armament or slipper tanks, etc.).

I shot the interior items with Testors Model Master RAF Interior Green. While this dried, I shot the main gear struts, cross-braces, mud guards and wheel hubs flat aluminum. Finally, I extracted part A13 (bomb bay ceiling and bottom of fuel cells) and both parts E20 (oil tanks). I mixed up a batch of Tamiya Acrylic Red, darkened with Tamiya Acrylic Brown to get a reasonable tank color. I masked the framework on part A13 and shot all three parts with the red mixture.

Before starting the assembly process, ensure that you have sharp blades installed on your X-acto knife, and that your files and sanding sticks are handy. The biggest secret of success in building this kit is to ensure that each and every part has any molding tabs, tree attachments, molding seams, etc., cleanly removed. All the parts in the fuselage assembly are closely packed, so one bulkhead that isn't properly 'cleaned' will thwart the magic moment when the fuselage halves go together. More on this later. I used Tenax as the building cement throughout this project applied with a needle applicator.
The engine nacelles and wings go together first. You must chose and open the appropriate holes under the wings for whatever external ordnance your bird is going to carry. Interestingly enough, there is no mention in the instructions for the installation of the slipper tanks. You'll note the two holes that are not mentioned in the instructions are between the two inboard rocket mounting holes. Grab the slipper tanks and you'll see the pins line up. Drill these holes out and leave the rest alone.

This is where you begin to see the close tolerances that the Tamiya engineers designed to. Once the nacelle installs into the wing, you are hard-pressed to find seams. The weakest point that may require filling is where the upper wing fairing meets the rear of the nacelle. Not a big problem, but after watching all of the other seams virtually disappear, it was almost startling to see a small gap. The positionable underwing radiator flap is a nice touch!
You'll notice that the only difference between the left and right main landing gear is the retraction arm (parts D5 or D6). When using wheel hub E9, both sides of the main wheel are the same. With wheel hub E10, there is a difference. In the Mosquito, BOTH E10 hubs face to port (left). This design simplicity enabled the de Havilland engineers to use interchangeable parts for the main gear.

Steps 8 through 14 are focused on the fuselage interior. This is where attention to detail will pay dividends. Paint and detail all of the interior assemblies according to instructions and/or to your references. Dry fit every part to ensure a snug fit. Starting with step 10, start dry-fitting the interior into the fuselage halves. If all is well, the fuselage should snap closed with no gaps. If there is any binding at any time, check to see if the interior bulkheads are properly aligned with the fuselage alignment tabs, and ensure that there is nothing protruding from the interior assembly that doesn't belong there. When you reach step 15, if all is well, the fuselage should snap closed. You'll also note that the separate nose blends into the fuselage as if it had been a single piece from the outset. (This means that we might see a bomber nose in the future!).

The wings are literally pinned to the fuselage with parts B4 and B5. I installed and glued the pins in place and one of the two wings was mounted flush against the fuselage. The other wing had only the slightest gap on the upper side. I suspended the aircraft on the bench with a bottle under each wingtip. The weight of the model closed that gap in the wing. I applied Tenax to both wing joints and set it aside to dry.
The design of the model really stands out when you install items like the bomb bay doors and landing gear doors. These types of details have always been challenges to get a good mechanical join of the parts. Tamiya has solved this problem in the Mosquito, so installation of the details is a non-event. Bravo Tamiya! There were no other problems with the assembly of this kit. Now it is time to paint.
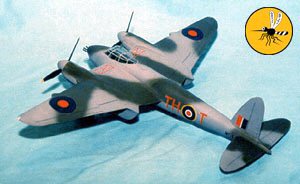
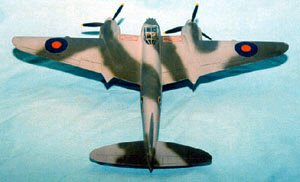
I decided to build 'Black Rufe' which is painted overall Ocean Grey with the standard disruptive pattern of RAF Dark Green on the upper surfaces. I liberated a set of decals from the Airfix Mossie kit for this project, though Aeromaster is scheduled to release some nice Mosquito decals in the coming weeks.

The hardest part of the whole project is masking the canopy. I use Scotch tape for masking, carefully cutting the frames away with a sharp X-acto knife and a light touch. The effort done in masking is well worth it when you've completed the project and look at the results!
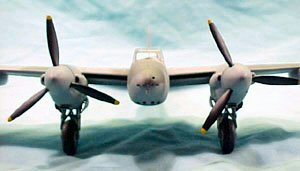
After I finished painting the aircraft camouflage scheme, I painted the propellers flat black, masked them, and painted the tips and spinners Insignia Yellow. Once completed, I shot the entire aircraft with Future Floor Wax to create a surface ready for the decals.

I was hoping that Aeromaster's planned Mosquito releases would be available in time for this article. I had originally planned to do TH-M "Black Rufe". I attempted to use the Airfix decals for TH-M, but my examples that exceeded their shelf life and died on the model. After removing the expired decals from my model and touching up the affected paint, I settled on TH-T "Lady Luck" decals that were available in the Monogram re-released Mosquito. These decals responded well to Super Set and Solvaset. One note here, I built the Coastal Command Mosquito a few months ago and used the decals straight out of the Tamiya box. These are the first decals that I have ever encountered that ignored Solvaset! It took four applications of Solvaset to get these markings to respond and settle down on the paint. If you choose to use these kit decals, be patient and don't touch the decals once the first couple of applications of Solvaset are applied! Keep brushing on the Solvaset, let it dry, lance any bubbles, and reapply. It works, but it takes work to get there.

The Mosquito was probably the most versatile multi-role aircraft of WWII. Variations of the basic aircraft allowed de Havilland to create numerous radar-equipped night fighter, bomber, fighter-bomber, and reconnaissance versions. The Tamiya kit will facilitate reproduction of virtually any night fighter or fighter-bomber with the help of some aftermarket parts.
Despite the challenges with the decals and the minor glitches in the painting instructions, this is easily Tamiya's best kit to date, and certainly the best Mosquito available in any scale. I am planning on building several more of these! I highly recommend this kit to anyone.
Bibliogaphy
- "Camouflage & Markings," James Goulding, Ducimus Books Ltd, 1970.
- "Mosquito at War," Chaz Bowyer, Ian Allan Ltd, 1973.
- "Mosquito Fighter/Fighter-Bomber Units of World War 2," Martin Bowman, Osprey, 1998.
- "Mosquito: The Original Multi-Role Aircraft," Graham M Simons, Arms & Armour Press, 1990.
- "Night Stalker," Wings/Airpower Magazine, Bob Grinsell, pp 42-51, Sentry Publications, date unknown.
- "The de Havilland Mosquito, A Comprehensive Guide for the Modeller," Richard A Franks, SAM Publications, 1998.
- "The Mosquito Manual," Royal Air Force Museum, Aston Publications, 1977.


