Tamiya 1/48 Spitfire Mk.Vb Build Review
By Kelly Jamison
| Date of Review | March 2009 | Manufacturer | Tamiya |
|---|---|---|---|
| Subject | Spitfire Mk.Vb | Scale | 1/48 |
| Kit Number | 61033 | Primary Media | Styrene |
| Pros | Very simple build, nice detailing out of the box | Cons | |
| Skill Level | Basic | MSRP (USD) | $29.00 |
Background
For me to write the history of the Spitfire would be akin to Baby Einstein writing the Theory of Relativity. There is so much information out there on “The Net “ and in books about this subject, it is pointless for me to try to cram in a cheap history lesson about this icon. So off to the build we go.
The Kit
Subject today will be the Supermarine Spitfire Mk Vb. Modeled in 1/48 scale by Tamiya. This kit has been around for awhile and is easily available. You can see more about this kit in an in-box review here.
Spitfire experts might be able to tell you some detail about the kit that is not correct but I needed this baby to break a string of AMS filled projects. Coffee pot full: afternoon to myself. I was off onto another modeling adventure. I still get the same rush as I did as a kid when starting a new kit.
Very well molded in a medium grey plastic and engineered with Tamiya’s usual efficiency the kit practically falls together. My particular kit needed a good washing of soap and water to clean off the mold release. It was the thickest I have ever seen on any Tamiya kit before or since. I can’t explain. It was time to start clipping sprue trees now.
Construction
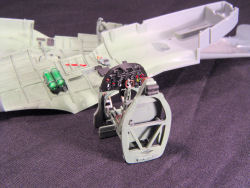
I used Model Masters Acryl RAF Interior Green in the cockpit area. As usual, good engineering by Tamiya gives you a very passable cockpit, especially if you don’t plan to have the cockpit entrance door open. The headrest got a quick coat of Rust and the seat was painted a deep reddish brown then over painted with the interior green to simulate the paint coming off a Bakelite seat. There is a height handle on the right side that you need to attach. I painted it the same interior color. Don’t forget the small voltage regulator that goes on the backside of the headrest. Silver rudder petals and dark brown yoke handle finished the cockpit sans the instrument panel.
For that, I used my Waldron hole punch set and knocked out some gages from an old decal in the decal dungeon and some detailed painting of the gages as I saw them in my reference photos. Be careful not to use modern pictures of restored aircraft as your main source. Many have modern instruments and navigation equipment installed.
On the fuselage halves there are a few fixtures that you need to glue on. Nothing fancy or funky here except for the oxygen bottles on the left fuselage half. I painted the bottles a clear green with a silver base. I think the color is similar but not the same as the interior green in some references. I have seen 10 different variations so go with what you know. At this point, you need to make the decision to have the pilot access door open or not. And you need to paint that crowbar. This is another subject.
Some say it was painted red. Some say it was steel color and others say that most of the time it was gone from the plane completely. You have to come up with what you want to do on your own. Other things you have to add to the left fuselage are the radio and throttle lever. One mistake I made but you should avoid is to drill a small hole directly aft the exhaust stacks in accordance with the instruction sheet. This is for a small tube that comes off the exhaust manifold.
Gluing the two fuselage halves together is easy. Tamiya engineering made sure of that. I usually use superglue in the tail area and Tamiya liquid glue down the rest of the seams. I found that sometimes the Tamiya liquid glue melts and distorts the thinner training edges of the rudder and wings. Superglue keeps this from happening. I held off on putting the elevators at this time until I had the wings on to help get them straight, true and level. Before I put the cockpit assembly in to the joined fuselage halves, I went ahead and sanded the fuselage and tail seams. I will also hold off putting on the tail wheel per the instructions till the end of the build.
Step 5 of the instruction sheet was completely ignored. I did not install the cockpit glass, exhaust manifold, fuel filler cap or gun sight. Along with not installing the antenna mast, upper ID light or rear view mirror. So much for Step 5.
The wing assembly could be a matter of philosophy. I choose to glue the upper wing halves to the fuselage so I could get a good alignment in the wing root area then glue the bottom of the wing on to the fuselage and upper wings. This makes it harder to get the right “up-bend” and fuselage alignment but leaves you with good wing root seams. In my case, I did not notice that the left wing root had moved a bit after gluing it up and it was discovered after the glue had hardened. Lesson learned for the next Spitfire I build. Once the wings were finished, you have to decide on if you want a clipped wingtip or a standard wing tip. This locks you into the subject you are building. I choose the classic wingtip when I decided the plane I wanted to model.
I held off on Step 7, the landing gear until later in the build just to keep the amount of extra stuff from getting lost off the sprue tree. But I move on to Step 8 and glue up the radiator faring with the vents and the oil cooler and carb intake, but left the pitot tube off until the end of the build to keep from breaking it off and loosing it during the sanding and painting process. Not to mention, it makes decaling a lot easier too.
Step 9 got omitted until later for the same reason as Step 7. I put the elevators on now and got them perfectly leveled. I was amazed at how quickly this plane was coming together. There was a little putty and sanding that needed to be done. One place was the wing root areas on both side and the bottom fuselage where the wing assembly meets. I left the bottom of the engine cowl off until after painting. Don’t be fooled, not all Spitfire’s used this panel line to change the color from the bottom to the top camouflage. Back to your reference.
After sanding all the seams, I glued the wind screen and the aft stationary windows in using Kristal Kleer. I taped them off with Tamiya’s Low Adhesive tape and blocked out the cockpit with some tissue. Now I was ready for painting.
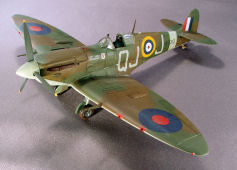
I decided to use “Tally Ho’s” decal sheet Spitfire Mk V Aces part I. More specifically, Squadron Leader James Rankin’s mount of 92 Squadron QJoJ or AC# W3312, Biggin Hill, August 1941. This is important because this is when RAF colors started to change and there are lots of variations in schemes around this time.
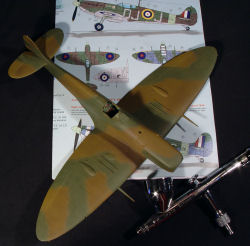
This is where I also learned you can ask 20 different Spitfire experts about proper colors and get 20 different answers. The decal sheet calls for the bottom to be painted Sea Grey Medium. After lots of consultations, I believe this to be in error. The paints I used (after lots of questions from those who know) on this build will be the acrylic line of paints by Aerohobby Acrylics for the top colors and MM Acryl RAF Sky Type “S”.
The fun was slowly bleeding away from this build with all the research into the colors. So I made the decision to go with what I got. It was time to airbrush using my trusty Iwata HB-CS. The Aerohobby paints do not need to be thinned. I found the paint to be a bit finicky but useable. It took a little time to get use to the flow of the paint. With about 20PSI from the compressor and a steady hand after a pot of coffee, I got the camo pattern down. Again check your references. Some Spitfires from this time had very tight patterns and some had a more feathered edge look about them.
Tamiya supplies a 1/48 scale drawing you can use to mask off your plane if you wish. I believe there are a few companies out there that make masks too. By using silly putty and other techniques, you can get a really tight pattern and a very realistic effect. I did go with a sharp line for the lower fuselage color and I taped off the leading edge to continue the sharp line around the entire airplane. Don’t forget to paint that lower engine cowling now. A quick coat of Future Floor Wax sets up the gloss coat and we were ready for decals.
I like Tally Ho’s subject matter but the decals were just a tad out of register. It showed up on the tail flash and the kill markings. I had a tough time getting them to lie down properly so I had to “go nuke” and use Solva-Set straight from the bottle. This is a very hot emulsifier. But it did get them to adhere better. But this set up another problem.
The red dot in the middle of the roundels comes as a separate decal. I put that decal on after the main part of the roundel on the lower wing had dried and hit it with a dot of Solva-Set. It literally melted the decal to the roundel and caused a faint orange bleed over of the smaller decal. I cleaned it up with a bit of white dry brushed over the area but it was still a new problem I have never had. I did not use Solva-set on the fuselage roundels.
Back to Step 9, the propeller assembly. I like to use MM Acryl Aircraft Interior Black. It is a type of chrome black and to my eye looks more realistic in scale than flat black. So that is what was used on the propeller blades. Tips were quickly masked off and painted chrome yellow. I painted the spinner cone and after body Sky Type “S”. Later research reveals that this color may have been a sky blue but that’s another argument for another time.
I did not get a good feel for how the blades were to fit to the after body spinner section. But I got them lined up and glued in. There is also a small spike that glues onto the end of the propeller shaft. This helps the alignment of the prop when installed.
Back again to Step 7 to get the plane up on its legs. A quick coat of silver and chrome for the oleo struts and the legs were ready. The wheels got a coat of flat black with the words “DUNLOP” highlighted with white chalk and they were ready. I choose the spoke wheels and painted them flat silver. A coat of interior green on the inside of the landing gear covers and Sky on the outside and the gear was ready for installation.
The landing gear struts have a very positive feel when installed. I had to work on that unique camber the wheels had, a slight toe-in look. Back to the reference books to get it right. She was on her own legs now. The tail wheel assembly was engineered as an easy slot and stake style. It was surprisingly solid for such a small piece.
I did not pre or post shade the painting. It is very easy to overdo the technique if you are not careful. Instead I used mineral spirits tinted with enamel black. I wicked it up into a paint brush and would just touch a panel line to let the thinned paint flow along the panel lines. I went over the plane many times, going slowly and lapping the different stains at hinge points, panel lines and high wear areas. After a while you will see it all come together and you will know when you are done.
I used a silver pin to do all the chipping. Again, as if you haven’t heard it enough, go to your references to see how much chipping is done. That is another technique that is real easy to overdo. I think it is better to under-do than over-do. A flat coat will tone down the silver and blend the decals nicely into the paint. Just a few more small things and it will be finished.
The antenna mast, upper ID light, lower ID light and canopy with rearview mirror can go on now and don’t forget that pitot tube! Exhaust stubs painted earlier snapped right into place and looks great with some pastel browns to build up the rust. A small dab of white for the tail light on the rudder and the formation lights done in silver with Tamiya Clear Green (right) and Clear Red (left) painted on and I was done.
I decided not to put the antenna wire on but I might change my mind later. The wing root alignment was a bit tricky and getting that toe-in for the wheels was a bit of a pain. The hardest part was gathering up some reference material, choosing the subject, learning about all the different types of wings vs. production models and figuring out the right colors to use. I guess the reason it is still a popular subject is that there is still so much to learn about this plane.
Conclusions
You can build this kit right out of the box or you can go full photo-etch, resin, decals, scratch building, vac-canopy, etc. It is ready for at least two different versions from the box. There is also some consternation about the strengthen strakes on the top of the wing and the spinner having small plateaus near the prop blade on this kit but you can always go aftermarket.
In conclusion, I had fun building this kit. It is my first Spitfire I have ever built in nearly 35 years of building and I learned a lot about the subject. I think this is a great little kit and it didn’t bother me that the wing washout was the wrong shape or the tail was two millimeters too short. It looks great sitting on the shelf. I highly recommend this kit to break AMS when it sets in hard.


