Tamiya 1/35 M4A3 Sherman 105mm Build Review
By Jack Bruno
| Date of Review | October 2006 | Manufacturer | Tamiya |
|---|---|---|---|
| Subject | M4A3 Sherman 105mm | Scale | 1/35 |
| Kit Number | 35256 | Primary Media | Styrene |
| Pros | Great detailing throughout/outstanding | Cons | |
| Skill Level | Basic | MSRP (USD) | $34.98 |
Background
The Sherman Tank was built in vast numbers totaling about 50,000 units and served with great distinction on all fronts during W.W.II and carried on into Korea. The reliable dreadnought carried on in several different Armies into the 60's and 70's including up-gunned vehicles in Israel and Pakistan and several South American Nations. The 105 Version was a brilliant SPG that gave a hard punch where ever it was needed and manufactured units topped out at 800.
Construction
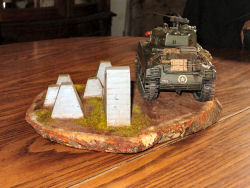
Here I go again with my Third Sherman in less than a year and BOY was it a gas. To begin this build.....I imagined a finished kit and started to think about the various settings I wanted to put my 105 Howitzer version in. I was leaning toward the Box Art example with the Battle of the Bulge snow scheme, but after finding some Verlinden Dragon's Teeth in the drawer, I decided on a Seigfried Line monster crossing the border into the Fatherland.
I started building the Turret first and using some helpful advise from the IPMS/USA Forum , used simulated welds to seal the side turret hatch closed after seeing pictures of the real tank. Minor sanding of the mold lines was needed and done with a #11 blade and my assorted Flex Files. Can't leave home without them. After completing the Turret I set it aside and started the suspension and again there were no surprises, just a lot of sanding. I did throw a couple of Formations resin wheels on just for grins. After the wheels and such were mounted the entire hull just fell together. On to the paint shop.
Never changing a good thing, I painted the entire kit flat black and succeeded by airbrushing progressive shades of olive drab. I sealed all this with Future and gave the tank three good Van Dyke Brown washes using my trusty Windsor-Newton tube. Dry-brushing was done with PollyScale white, yellow, light brown and middlestone. Handles and tools were then touched up accordingly and given a few more hits with the wash.
This time around I did not want to overload the tank with crew equipment, so I opted for very little courtesy of Tamiya and Verlinden products. I then painted and washed these trinkets and mounted them in the best places. Scale rope was the used as tie-downs. On to the Base.
I get a thrill every time I walk into a Goodwill Store. They have such useful stuff that I could spend all day looking around. I found this twenty-five cent plaque with tree bark and turned it upside down for my base. I told the guys in the club it was a piece of cut tree from Germany -they bought it. I sealed it with Future before applying the Celluclay and roadside dirt. I pressed the Dragon's Teeth in a pattern using a couple of pictures as a guide. The tank was pressed into the wet clay leaving behind the treadmark effect that I was going for.
After the base was dried I painted the Teeth a light gray and several shades of Brown for the ground work. Using some Verlinden static grass in key places was a must. This was held down by diluted white glue. I dry-brushed lighter shades then hit the entire base with a few dark oil washes. I dry-brushed again just to highlight. After that, put on the Sherman and ride to glory.
Conclusions
I had a great time building this kit as well as the base. I even picked up more German Tree Bark on my last visit. High marks all around!


