Tamiya 1/35 US Willys MB Jeep Build Review
By Michael Benolkin
| Date of Review | May 2015 | Manufacturer | Tamiya |
|---|---|---|---|
| Subject | US Willys MB Jeep | Scale | 1/35 |
| Kit Number | 35219 | Primary Media | Styrene |
| Pros | Nice details, easy build | Cons | Nothing noted |
| Skill Level | Basic | MSRP (USD) | $22.50 |
Build Review
After a family emergency a few months ago, I'd lost interest in modeling and set aside the projects on my bench. In an effort to restart my builds, I performed a major spring cleaning in my workshop and one project kept catching my eye. As a Jeep owner and lover, I had Tamiya's Willys MB Jeep kit in the stash and decided this might be just what the doctor ordered.
The name 'Jeep' is the phonetic sound of the Army acronym 'GP' which was the requirement for a 1/4 ton four-wheel drive utility truck for 'General Purpose' duties. This requirement resulted in the Ford MA, Willys MB, and a few other innovative designs. The Willys MB was put into mass production with over 600,000 built between Willys (GP) and Ford (GPW). The iconic Jeep evolved into the Korean War era M38 and into the hugely popular series of off-road vehicles produced for the civilian market.
The Tamiya kit is a very simple and straightforward model of the Willys MB. The kit is molded in olive green styrene and presented on two parts trees, plus one tree of clear parts. Don't confuse this simple kit as not having nice details though, you can see in these images that Tamiya provides some great detailing that just awaits some careful painting and weathering to stand out.
For this build, I also used some of the detail parts from Eduard's 35347 Jeep detail set as well as a set of Eduard's Jeep paint masks.
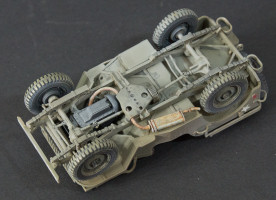
Construction was according to the instructions with a few augmentations from the Eduard parts set. In the photo below, I've assembled the chassis, replaced the engine fan with the photo-etch as well as added the ignition coil parts from the Eduard set. The radiator has photo-etched grille details added to both sides of the shroud. Inside the body tub, I've added the photo-etched textured floor boards under the dash.
Here is the body tub primed with Vallejo OD Green and mounted to the chassis that was also primed with OD Green and various details painted out. The exhaust manifold was painted gray and then treated with the first rounds of AK Interactive Rust. The wheel rims were also painted with Vallejo OD Green then masked from the Eduard mask set. The tires received a base coat of Vallejo NATO Black primer and then oversprayed with a mist of brown on the sides. The treads were dry-brushed with tan, then the wheels were washed with a homemade lamp black oil wash. The underside of the chassis was also washed with the lamp black solution.
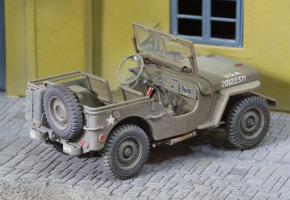
In truth, construction doesn't take much time. Most of the effort was painting, detail painting, and weathering. The hood was left loose so it could be posed open or off when needed, the windshield likewise can be folded down. Given that this vehicle is essentially overall OD Green, the results could very well be boring until you give attention to the Khaki seat covers, the wood tools, the finished wood of the M1 Garand in the windshield scabbard, the driver's fire extinguisher, etc. To keep the contrasting colors from popping too much, the upper surfaces of the truck get a misting of a lighter green for fade and then the overall vehicle received a misting of AK Interactive European Dust.
While this Jeep turned out nice, there are a few things I'll do differently on the next round (yes, I have another one waiting in the wings). I did attempt to use the Eduard photo-etch dash board but it is too large to fit. While I made it work, it wasn't worth that effort. Careful painting and using placards and instrument faces on the kit dash board will offer better results. The remaining Eduard parts that I did use worked well. I will use this Eduard set again in the next build and I'll be using more of the engine bay details that provide some additional eye appeal to the die-hard Jeep fans.
Conclusions
You'll be seeing this Jeep again as part of a larger diorama that is already back on my bench. This project wasn't intended to be a contest contender, merely part of the backdrop of my larger project. The next Tamiya Jeep will be built along with the recent Bronco Models 1/35 Jeep that also looks really promising.


