Skyhook Models 1/72 Icarus Kit Build Review
By Steve Causey
| Date of Review | March 2014 | Manufacturer | Skyhook Models |
|---|---|---|---|
| Subject | Icarus | Scale | 1/72 |
| Kit Number | N/A | Primary Media | Resin |
| Pros | Unique Subject | Cons | Nothing noted |
| Skill Level | Experienced | MSRP (USD) | $49.95 |
Build Review
I found this little gem last week. It's a cast resin kit of the Spacecraft from the movie: Planet Of The Apes. This craft has never, to my knowledge been released in styrene but several resin casters have released kits of the ship. My diorama is based on the Skyhook Models 1/72nd scale kit. The kit comes in two solid pieces, one being the ship; the other piece is a base that poses the ship in a water display. The castings are lovely; I didn't find a single pinhole or flaw in either piece. Assembly began with a soak in purple power cleaner, then a wash in a dish soap and bleach mixture. After a good rinse in clean water I let the ship air-dry. I decided to not use the provided base because I wanted to do a water landing diorama that has been in my mind's eye for many years.
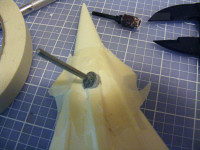
Once the model was dry I decided to open up the escape hatch in the upper nose of the ship. This involved using many gradually larger drill bits and then, dremel grinding stone bits that I used with my variable speed hand drill to better control the bit speed and torque.
Once the hatch was opened up, I painted the kit with Tamiya fine white primer. When the primer was dry I masked off the nose cone for the copper color. For this I used Krylon " sparkling canyon" color. After this color had dried, I masked off the anti glare portions of the ship, using Tamiya masking tape and silly putty for the open hatch. Silly putty is a great masking tool for difficult areas. After the anti glare was painted I started on the diorama base. For the base I used foam core board, it comes in many sizes and is easy to find, even Wallgreens carries it now!
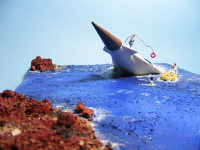
I cut out some scrap foam to use as the beginning of the two small rocky outcrops I had planned. I used white glue to attach the island parts to the foam base. For the water texture I used acrylic gel. The brand I used here was Decoart Dimensional effects. It's has a frosting like consistency and smell like ammonia.
I covered all the areas that were to be "water" with the gel; it applies very smoothly and dries white. I used my fingers and a few tools to create waves and ripples. Once the gel was dry, I used several colors of blue for the water. Lake Powell, where this scene was filmed is a very deep, very blue body of water with a bleak red/tan landscape. Once I had the water in the colors I wanted, I added the ship, I glued it to the base with thick white glue. Since I had opened the escape hatch, I needed a crew. I sourced the life raft and crew from the old Monogram Albatross Seaplane kit.
I found to my enjoyment that the figures needed little modification. I removed life vests, pistols, etc. I painted the figures and used some small flag decals for the crew patches. I used thin solder to depict the line attached to the life ring.
Returning to the base, I sprayed a base color of terra cotta on the islands, when this was dry I added more gel medium and sprinkled tiny rocks and gravel into the gel. When the gel dried, I re shot the terra cotta until I had achieved an uneven, natural looking effect. Then I added some thinned white glue to different areas and sprinkled on some of my Wife's souvenir lake Powell sand in beach and flat areas.
I set the Diorama aside to dry for a day, and then applied future to the water areas and the ship for a shiny effect and also added more gel medium to the ship, raft and the figure in the water for a foamy /choppy effect.
This was a very fun build and only took a few days.


