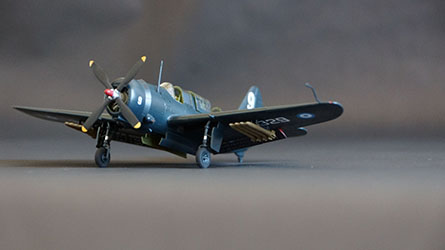
Special Hobby 1/72 SB2C-5 Helldiver Build Review
By Fotios Rouch
| Date of Review | February 2018 | Manufacturer | Special Hobby |
|---|---|---|---|
| Subject | SB2C-5 Helldiver | Scale | 1/72 |
| Kit Number | 72350 | Primary Media | Styrene, Photo-Etch, Resin |
| Pros | Only SB2C-5 kit in any scale at present | Cons | See text |
| Skill Level | Experienced | MSRP (USD) | $39.95 |
Build Review
I stopped building small 1/72nd scale models about 20 years ago. I decided to build a few of the planes my father flew for the Hellenic Air Force and the Helldiver was the first plane he flew after he graduated from Academy. My intent is to present him this model when I visit Greece again and due to space limitations in his bookcase, 1/48th scale was out of the question.
As usual, I cannot build a model straight out of the box and always feel the need to buy accessories to spruce up my builds.
For this build I chose the Quickboost exhausts, the Eduard interior and flaps/dive brakes and the Aires wheel wells.
I started the build by following the Special Hobby instructions but also looking at all the Eduard interior set instructions.
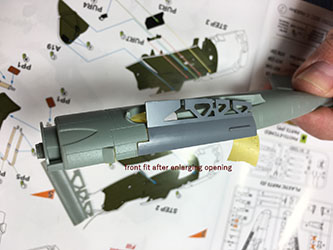
The bomb bay doors for the -5 Helldiver were larger than the older variants because it had a larger bomb bay. The kit instructions only show a small cutout to be made to the fuselage, but this is not enough to accommodate the longer bomb bay doors. Also, the rear portion of the fuselage bomb bay opening does not match the new doors' shape. Special Hobby gave the proper bay doors but did not provide two new fuselage halves.
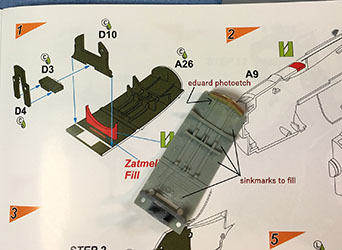
The bomb bay roof needs modifications as well and I followed the kit instructions for that. Lots of ejector pin marks need to be filled as they are visible if you were to look inside the bomb bay. The bomb bay doors have sink marks that I filled as well.
I was a little apprehensive using the Aires wheel wells not because they did not look good (Aires stuff always looks superb) but because I was not sure if they would fit inside the wing. Some sanding of the plastic parts and the resin top surface was necessary but there were no issues at all.
The Eduard cockpit parts look great in the fret, but I had the same issue I always have with their seat belts. They look very nice but once you start manipulating them and bending them to conform to the seat the paint on the photoetch starts to lift. In the end I had to touch them up with paint.
The pilot's instrument panel looks great with all of its dials, but it was wider than the underlying plastic panel and I had to sand down the photoetch edges of the panel to make it fit between the fuselage parts.
I like that Eduard updated the gunner's communications equipment to the-5 configuration. Looks pretty convincing and saves a lot of time from scratch-building it in 1/72nd scale!
The pilot and gunner used a tube that went from the front to the rear compartments and they moved handwritten messages back and forth via a pulley system. Eduard replaces the short and stubby kit part with a longer tube and it provides the tube in two half parts. Although this is accurate to the real tube, it was impossible for me to bend the photoetch accurately enough and get a good fit between the parts. So I decided to use plastic hollow tube which I thinned down a lot and engraved it on both sides to make it look as it is comprised of a top and bottom part.
After all the sidewall details were added, the fuselage was put together. I decided to build my Helldiver without the rear guns installed as it was usually the case with the Greek Helldivers.
The photoetch flaps/dive brakes are complicated, but they look really good. There is no way to fold them without a good tool.
The engine looks nice with a decent paintjob and the cylinders look dressed up with the Eduard ignition wires. Eduard even provides a tiny pre-painted engine identification tag.
It took me much longer than anticipated to install the flaps and the dive brakes. The main problem was that after cutting the wings they lost what little structural integrity they had and the open gap for the flap/brake assemblies was too flexible to accommodate the boxed photoetch complex assembly. I separated the top brakes and kept the blanking wall with the flap part together. It was easier for me to securely install that part and then add the top brake part.
After that, installed the landing gear and the resin accessories for some activation rods and the machine gun portion visible inside the wheel well. Some masking went on and then it was time to paint. I used gloss dark sea blue from Modelmaster.
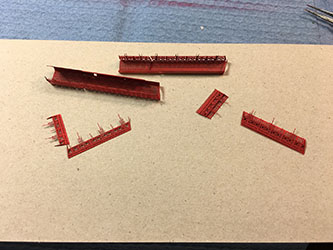
Work continued on the Helldiver with getting the resin rocket rails ready. I found out that it is much easier to clean and work on the rails while they are still attached to their resin pouring block. Easier to drive the x-acto blade through and easier to sand as opposed to putting undue stress on a removed rail and risking breaking it.
The rockets look fine in their olive drab but their fins will not allow them to fit next to each other. The instructions tell you that although accurate scale wise they need to have 1mm off each fin so they can fit together. This is how closely spaced they are.
I dipped the clear parts in Future and they look great. I placed them without glue in their respective spots and they fit pretty well, except maybe for the stationary rear piece that sits a little too high for a good fit, although it does not interfere with the large sliding part that goes over it.
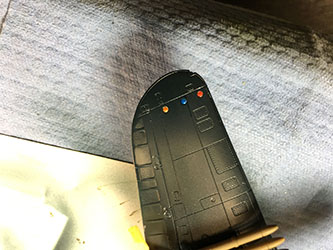
Painting continued with masking the three landing lights under the wing. I used a punch tool to make the masks and applied a layer of silver first before painting with the Tamiya clear red, orange and blue. During the final assembly I managed to break the pitot tube but it was superglued back with no issues.
The transparencies were masked using Eduard's masks. The masks are very helpful but need modifications for a -5 set of canopies.
Then I started applying the decals and found them extremely thin and very sensitive. I started with the walkways which are provided as decals. The first walkway immediately stuck to the surface where I first laid it down and did not want to budge when I tried to coax it to its correct location. Eventually it got torn and folded as I pushed it with the brush. I am glad I had this issue first because it gave me an idea about the sensitivity of the decals but was also very fixable as I masked and airbrushed the walkways.
The rest of the decals were carefully cut and very deliberately placed in their exact location by gently sliding them off the backing paper. In the end the decals look OK and they let the panel lines show through nicely. The other major problem with the decals is that Special Hobby forgot the small white serial numbers that were painted on the fuselage sides next to the national insignia. I do not have a sublimation printer with white ink so I tried to created them by using white decal paper and design a dark blue background in the software with white numbers before sending it to the inkjet printer. I did not like the results and so the models is finished with this important omission.
In conclusion this is not a bad effort but still incomplete as it is not easy to get from a -4 to a -5 without new fuselage parts. Special Hobby could have done a better job with the instructions and with the decals. The model looks like a -5 in the end and I hope my father likes it when I present it to him in a few months.


