RVHP 1/48 TF-8A 'Twosader' Build Review
By Fotios Rouch
| Date of Review | July 2004 | Manufacturer | RVHP |
|---|---|---|---|
| Subject | LTV TF-8A 'Twosader' | Scale | 1/48 |
| Kit Number | 4811 | Primary Media | Resin |
| Pros | First conversion in this scale for the two-seater | Cons | Casting problems & bad canopy |
| Skill Level | Intermediate | MSRP (USD) | $81.00 |
Background
The F8U-1T was created by Vought to fulfill a requirement for a two-seater version of the Crusader by NATC. The goal was to maintain commonality while still incorporating all of the customer's requirements with a minimum loss of performance or increase in weight.
Vought used the F8U-1 Bureau Number 143710, which had already been modified once to do the F8U-2NE prototype. It retained the ventral fins and the afterburner air scoops. It first flew on 6 February 1962. Soon afterwards the F8U-1T was redesignated TF-8A under the new Tri-Service designation system.
The aircraft maintained its original length. Many publications claim that the fuselage was lengthened but this is not so. The back seat forced the equipment that was formerly located behind the pilot's cockpit to be moved to a different area inside the fuselage. Two of the ammunition cans were deleted as well as the two upper 20-mm cannons.
The back seat was raised by fifteen inches to give the instructor better forward visibility during takeoffs and landings. This gave the F8U-1T its distinctive hump. Both pilots were given a full set of flight controls. A wind blast protection shield was installed behind the trainee's ejection seat to protect the instructor in the case of a canopy loss or high speed ejection.
The TF-8A could land at smaller airfields and it possessed a parachute that was installed in a housing at the base of the rudder. Additionally, low pressure tires were fitted to allow soft field landings.
The TF-8A Crusader was never ordered into production because of the fiscal 1964 budget cutbacks. The sole TF-8A spent several years at Patuxent River, served with NASA at Langley, Virginia and then it went to Edwards AFB.
In 1977 the TF-8A came back from NASA to serve as a trainer for the transitioning Philippine pilots that were training for their newly acquired F-8Hs. Sadly, on July 28 1978, while on a routine training flight, a Vought pilot and his Filipino trainee encountered engine trouble near Dallas and were forced to eject. The TF-8A crashed in a farmer's field and was destroyed.
The Conversion
I have been wanting to add a TF-8A in my collection for some years now. I remember buying from Hannants the Maintrack conversion for the Monogram Crusader. One single monolithic casting with engraved panel lines. It looked like a lot of work and I was not thrilled with the shape of the canopy or with the fact that I would have to re-scribe the plastic to match the resin. When the RVHP conversion was unannounced my interest in the Twosader was certainly rekindled.
Eli Raphael had already gotten his and had already sent me some comments and pictures of the parts. I had asked him to check the fuselage length and tell me if RVHP had kept it the same length as the Hasegawa fuselage. As I mentioned above the TF-8 had the same fuselage length as he F-8. Eli taped one plastic fuselage half to one resin one and gave me some funny stories about the length. I had already ordered mine so there was no going back. The moment the kit arrived out came the Hasegawa donor kit and it was comparison time!
Well, the fuselage was kept the same length by design but the resin had shrunken and on such a long resin fuselage piece it made a difference as you can see in the picture.
After this observation I turned my attention to the kit contents.
You get the resin fuselage parts. The extra cockpit with resin copies for all the needed parts (stick, seat, etc).
A resin plug for the in between the wings area that has a differently shaped bulge. In my case an awfully unclear vac canopy . The decals for one relatively early stage of the TF-8As life. The parabrake housing.
The resin quality is ok but not great. Lots of pinholes in certain areas and chipped parts.
The master maker did a good job with keeping the panel lines the same depth and width providing a great match to the ones in the Hasegawa kit. The characteristic engraving on the bulkhead between the wings that shows when the wings come up is missing. The master maker did a very good job in capturing the shape of the canopy and a lousy job in vacuforming it for the customer.
The decals are of ok quality as far as to how they go down. They are translucent though and with a bright orange background you are heading for trouble. The decal research was poor and unfortunately I was suckered in using them instead of making my own. You can see the results in my finished model. Note that the tail tandem control stick logo shows extraterrestrial pilots' hands with three fingers grabbing the stick instead of four! I realized it way too late to fix the problem.
The instructions are very basic. You better research your subject before you begin.
Construction
The moment I noticed that the resin fuselage halves were short I had made up my mind on cutting off the rear portion of the resin fuselage and grafting the plastic parts from the Hasegawa donor kit. One more reason made it clear to me that this was the best way to go.
RVHP would have you remove the pouring stubs from the top of the rear fuselage first. Then cut the tail off the plastic kit and graft it onto the resin fuselage! Those of you that have the Hasegawa kit already have noticed the multitude of tiny rivets and beautiful detail that is all around the exhaust area. The only reason why RVHP decided to do such a thing has probably to do with pricing the kit. So out came the razor saws and the Dymo tape. I decided to cut the resin ¾ of the way ahead of the rear wheel well bulkhead as per picture.
If you cut the parts carefully with your finest razor saw you will have no problems mating the resulting pieces. Test fit the pieces carefully and lightly sand the parts to ensure a perfect joint.
It will work well as you can see in the picture and it will take very little surface work later.
Next thing to do is fitting the wheel well bulkheads. The rear bulkhead is a piece of cake to install since we have kept the plastic rear fuselage intact. Some work is required to get the front wheel well bulkhead to fit the resin space provided. There is excess resin blocking the groove and you need to Dremel it out or the fuselage halves will never close.
The next item that needs work is the cockpit. The seats need to be the early type Martin Bakers and you are on your own there. The control sticks need to be modified. The instrument panels are not just right but I felt it was ok to leave them alone. The rear instrument panel cover is not bad at all. The reason I inserted pilots in the cockpit was simply because I could not find proper seats and did not feel like scratchbuilding them. The most important problem is that the rear cockpit does not fit at all. Lots of trimming is required to get it to sit just right. Do not forget to add the wind blast shield out of clear stock.
Some good hours later of test fitting, sanding and gluing and we end up having mated the fuselage portions. The wing conversion is not bad and the instructions do point where you need to cut.
Painting & Finishing
The next stage is priming. I use for this stage automotive primer. I transfer it from a big can a little at a time so it does not dry up. I thin it with lacquer thinner and airbrush it for better control. You can use automotive primer out of a spray can but control is limited and it spits out too much. Automotive primer is a bit rough at first. After spraying you will notice all the surface problems that were hidden in the cream color resin. Many times poor quality resin casting results in countless pinholes that you have to deal with.
I have found this technique to be helpful and speed the process up a bit. After the primer is dry, use 3M Acryl Blue and fill the pinholes with small passes over them with a small putty knife. The primer is a bit rough and it grabs the Acryl Blue nicely. When all is dry start sanding lightly under running water. Inevitably the Acryl blue that is sticking up will be sanded out first and then you will start hitting the automotive primer. Slow down here. Use a finer polishing cloth (I like 3200 at this point) and maybe a dish washing detergent as you start polishing the primer. Stop and inspect your work often. When the resin underneath barely starts showing it is time to stop. I spray at this point Mr. Surfacer 500. I inspect for blemishes and items I missed.
You might use some more Acryl Blue at this point but use it sparingly and contain it with masking tape so it does not cover panel lines and rivets. Again go through a polishing cycle. When all looks good and the dreaded pinholes are gone you want to start attending to the details you obliterated. A little scribing or micro-drilling and panel lines and rivets are all back. Time to spray Mr. Surfacer 1000. Final polish and your model looks like it was all made out of shiny plastic.
After the fuselage was taken care of the wings got their turn. The hump over the wings does conform nicely in shape and you will need to use some putty to fix the contact point between the hump and wings.
The project was coming along great up to this point. Laborious but the results were good. When I got to the canopy the wind was taken out of my sails. For all practical purpose it looked useless.
I emailed RVHP at the email address provided in the instruction to request a replacement copy but to no avail. I though that maybe RVHP did not believe that I even had the kit so I emailed again including a picture of the painted up kit that was so close and was only missing a canopy. Nothing.
I gave up and tried to clean it but the surface had so many pinholes and so much junk embedded in it that I gave up trying to remove it from the plastic. Additionally to the pitiful state the master must have been in before it went in the oven it also appears that the maker forgot to turn on the vacuum. You can clearly see that there was not enough "pull" to get the framing to come out.
So I filled the canopy with modeling clay and stretch-formed another canopy with Squadron's clear stock. It was not perfect but it was better. For the life of me I cannot understand why a kit that costs almost $90 does not have two clear canopies. I think QA control in the Czech Republic is an unknown concept.
The rest of the kit assembly went on fine with two exceptions. Pay attention to the exhaust because somehow it does not fit well and it is sticking out quite a bit. Maybe it was something with my kit but I had to trim it and make sure it was about flash with fuselage end. The other thing of note is the position of the aux cooling intakes for the afterburner which I had to reposition a bit to match the TF-8A photos.
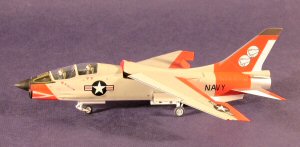
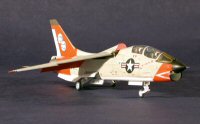
Painting was fun with such a cool scheme and I used ModelMaster for the basic colors and Alclad II for the metal shades.
The decals are very translucent. After I put on the jet intake chevron I realized that the orange was showing through. For the tail logo I cut out white circles from white decal stock and laid them down prior to the actual decal. It helped a lot. I used the Hasegawa national insignia from two kits because they were translucent too. I discarded most of the RVHP decals, like warnings and rescue arrows because they were way off. I used the RVHP BuNo number and I regret that now because it was about 30% larger than what I see in the pictures.
 |
 |
 |
 |
 |
 |
The model was not weathered much at all because the TF-8A was mostly pristine and was repainted in different schemes many times in its life.
Conclusions
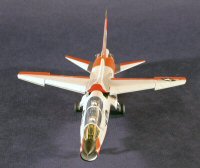
Overall I am happy with the results of my efforts. The TF-8A goes now next to my other NAVY trainers and fills a gap that I was meaning to take care of for a long time now.
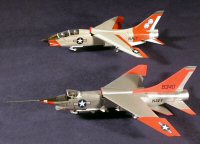
I hope my notes will help whoever else is interested in building this beautiful aircraft. I am also including a picture of the Twosader next to my other favorite monster, the Super Crusader but this another story for another day!
Many thanks go to my wife that made a painting of the TF-8A for this article. I was totally bummed out when she sold it a few days ago!
For more of my wife's art please visit www.rouchworks.com


