Roden 1/72 Opel 3.6-47 Omnibus Stabswagen Build Review
By Llarry Amrose
| Date of Review | April 2012 | Manufacturer | Roden |
|---|---|---|---|
| Subject | Opel 3.6-47 Omnibus Stabswagen | Scale | 1/72 |
| Kit Number | 0723 | Primary Media | Styrene, Photo-Etch, Acetate, Paper |
| Pros | Nice detailing | Cons | Ejector pins, ejector pins, ejector pins |
| Skill Level | Intermediate | MSRP (USD) | $19.98 |
Background
Mobility has always been essential in warfare. Once motor vehicles were developed, they quickly found their way into military service. It wasn’t just combat vehicles, but all manner of transportation, for troops and supplies. Cars, trucks and even buses were used. Buses were used to carry personnel around behind the lines, as ambulances, and some were converted into mobile staff offices.
Buses were often built on truck chassis, so naturally the most common trucks became the most common buses – in Germany, that meant the Opel Blitz. After 4,000 3.5-183 buses were built from 1932-36, an improved platform was developed, designated the 3.5-47 and 3.6-47. Over 9,000 buses of this type were built, including 2,880 by the Ludewig firm, based in Essen, as depicted in this kit.
The Kit
Roden is a company based in Ukraine, whose catalog is an unusual mix of WWI aircraft and WWII German vehicles, mainly trucks and armored cars. They seem to be a descendent of the earlier company Toko, which would explain some of the assortment. This is their second bus kit, the first being a standard passenger version for troop carrying.
The box is end-opening and not exceptionally sturdy. It has attractive cover art on the front and the first painting scheme on the back. Inside are six sprues of grey plastic. As an Eastern European company, Roden is usually considered “short-run”, but that’s not really fair. The details are crisper and the sprue connections are smaller than that. The only criticism I can offer is that the ejector pin marks are numerous and prominent. Most will be hidden, but a number will need to be filled and sanded.
A sizable photo-etched brass fret contains a roof rack, window shields and smaller details including mirrors and a pair of windshield wipers. There is also a sheet of acetate for the windows, marked with the outlines, and even a paper map to cut out to put on the chart table. The small decal sheet contains two sets of registration plates and a few additional markings. The instruction sheet includes an extensive history section in Ukrainian, English and German and the parts diagram has the unneeded parts shaded out.
Construction
The instructions include 29 steps, but that’s misleading as many of them involve 1-5 parts, including a few that involve bending (but not yet attaching) brass details. This allows a number of the steps to be performed in whatever order ends up being most convenient.
The biggest challenge in this kit is to manage the sequence of building and painting. There are essentially three major subsections that can be worked on independently and which will need painting along the way. With careful handling, these three assemblies can be frequently dry fit at many stages along the way to make sure everything is staying lined up. Eight holes need to be drilled in various body panels, and it seems a relatively good idea to just go ahead and do them early, before assembly.
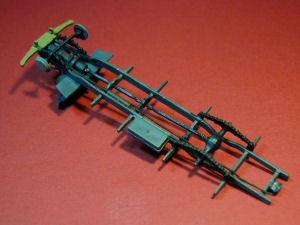
The chassis consists of steps 3 through 11, plus 16, 17, and 18. It includes the very detailed through almost completely unseen (without significant reworking of the front end) engine. The suspension, dashboard and steering wheel, wheels and transmission also come together here. In steps 8 and 11, wheel parts 3B and 4B are misidentified. Step 11 is the spare tire and should be 4B with the larger center hole. Step 17 has you connect the two parts of the exhaust before mounting them to the chassis – I think it is better to attach them to the chassis and only to each other at that point, where the frame will help align them.
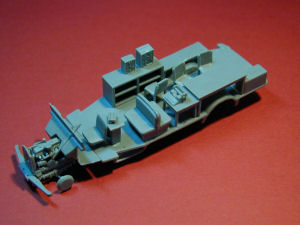
The interior is quite elaborate, even if it will be hard to see. Steps 12 to 15 create the furniture, 19 to 21 make a few pieces of equipment, and 22 brings them all together. The floor has a large number of locator holes, which are used for all the bus seats in the previous version. You can fill them all, but if so, be sure not to fill the single hole near the front for the driver’s seat. I didn’t bother to fill them as 1) they’ll be nearly impossible to see, 2) furniture covers many of them, and 3) as a post-factory conversion, the seat mountings would likely still be there. There’s an opportunity for some fancy painting, which is kind of a shame, but hey, at least you’ll know it’s in there…
The exterior consists mainly of butt joints, yet, with plenty of test fitting using the interior floor, it squares up pretty nicely. Attaching the roof rack, rear ladder and window shields (step 25) will help with painting, but will require careful handling during the joining of the major assemblies. You will likely want to do most or all of the exterior painting before mounting the windows inside.
Once these major sections come together, what’s left is the engine compartment and fenders, and all the little exterior details such as tools, lights and mirrors. The fit of the engine compartment is a bit tricky, but it’s not a real problem since those were parts that saw a lot of abuse and would likely not have stayed perfectly aligned.
Painting and Finishing
Two paint schemes, both from the infamous “Unknown Unit”. The first is on the front and back of the box and is overall Panzer Dark Yellow with an irregular squiggle of dark green. It is listed as being from the Deutsche Afrika Korps in Tunisia, late 1942 and includes the window shields. The second is at the end of the instructions, from the Eastern front in late 1941. It’s overall Panzer gray, and without the window shields, which will at least make the interior a little more visible. Still, I went for the more interesting African scheme, and finished it off with some light dusting using Tamiya Weathering pastels. Many of the Afrika Korps vehicles were delivered in standard colors and repainted in the field, so I did the interior in Panzer Gray. The decals went on easily, though you will want to trim the front and rear ID plates fairly closely to avoid overhanging the edges of the parts they go on.
Conclusions
And now we have another interesting vehicle in 1/72. After years with not much more than the most common tanks and the occasional halftrack, we’re seeing a great selection of important, though lesser-known vehicles. They look great on the display shelf and the contest table, but it’s the diorama builder who comes out the big winner.
This is not a simple kit, there are a lot of subassemblies and detail parts, but it all goes together well. It’s not a kit for the absolute beginner, but with some care and patience, almost any builder should be able to handle it. The interior is impressive, though unfortunately it ends up hard to see much of, especially with the window shields of the Afrika Korps version.
Some of the parts are delicate, and the sprue connections are large enough to require some special care, but really, the only, and I do mean only, shortcoming I can pin on this kit are the ejector pin marks. There are a lot of them, some in prominent places. Most can be hidden, and a few of the smaller ones underneath can be lived with, but some are going to need attention. It’s a small price to pay for the rest of what we get in this model, so I still recommend it highly.
I want to thank Squadron/MMD for this review sample to build.


