Roden 1/72 Opel Blitz (Kfz.305) Build Review
By John Kelley
| Date of Review | November 2011 | Manufacturer | Roden |
|---|---|---|---|
| Subject | Opel Blitz (Kfz.305) | Scale | 1/72 |
| Kit Number | 0710 | Primary Media | Styrene |
| Pros | Good detail and fit, choice of cargo beds, complete engine is included | Cons | Wheels are for a 4x4 |
| Skill Level | Basic | MSRP (USD) | $9.98 |
Background
In 1937, production of the Opel Blitz was begun. It was three tons, and had a 4x2 wheel drive chassis. Production ran from 1937 to 1944, and over 140,000 examples were produced. Most of the trucks were of the cargo variety, but some were special purpose vehicles and included radio, ambulance, and even laundry trucks. Its drivers like the ease of maintenance and the reliability of the truck. The Opel Blitz could be found everywhere the German army went, and it served until the last days of the Second World War.
The Kit
Roden has produced a 1/72nd scale model of the three ton Opel Blitz. Until this kit, the only plastic options were Airfix in 1/76th scale and ESCI in 1/72nd scale. The Roden kit is a major improvement over these two models. The kit consists of 118 light gray parts on three trees, and a sheet of clear plastic with the windscreens outlined in black for ease of cutting. The kit also comes with two cargo bed options; one full sided with a molded canvas top, and the second with open sides and bows molded in the stowed position. The kit also includes separately molded tools as well. For me, the highlight of this kit was the complete engine. There was more detail on this engine than I have seen in some 1/35th scale after-market kits.
Construction
Steps 1 and 2 concern construction of the engine, and this went together with no problems.
Step 3 has you remove two side braces, which are not used on this version of the kit.
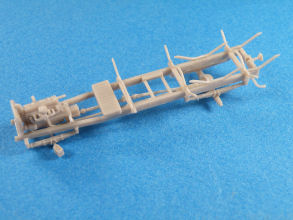
Step 4 is assembling the chassis. I completed this, with the exception of leaving the spare tire off until everything was painted and ready for final assembly. Before I mounted the spare tire I drilled out the hub and the bolt holes to make it look more like a spare tire.
To ease painting I added the engine, exhaust system and drive shaft. The drive shaft location pin needed a little trimming off the end to fit between the transmission and rear axle. Part 29A, the tow hitch, unfortunately does not resemble the real thing. The kit is rounded on the end, whereas the real hitch is rectangular on the top and bottom and round on the sides. To correct this, I simply cut the top and bottom off of the tow hitch, and sanded those areas flat and using a Dremel tool to open up the end of the hitch.
From here, I went to step 5 and completed the interior, but left off the dash and steering wheel to ease painting. I was impressed with the fact that Roden had molded dial faces on the dash and included clutch, brake, and accelerator pedals molded separately as well as the shifters. This is the most complete 1/72nd truck interior I have seen yet.
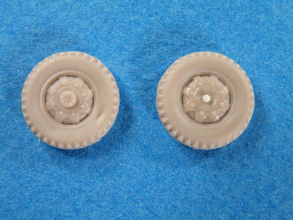
Step 6 is construction of the axles and the wheels. I followed the directions, except I left the wheels off until final assembly. For the front axle, I set Part 16 and 17D at an angle so that the wheels would look as though they had been turned by the driver. Unfortunately no tie rod for the front axles is included. Since the model is a 4x2 vehicle, the hubs for the front wheels are not correct. They represent a 4x4 wheeled vehicle. To correct this is very easy. I cut the hub off with my knife and, using a Dremel tool, ground a depression in the center of the wheel. I then drilled a hole and added .030 rod to represent the smaller hub of the 4x2 front wheel.
Steps 8, 9, and 10 cover cargo bed assembly. Since I intended to make mine as a cargo truck and not a troop carrier, I removed the supports for the troop seats from the bed sides. There are four large ejector pin marks on the underside of the cargo bed that need to be filled. I added Parts 21D to the bottom of the bed, and filled ejector pin marks on the bottoms of these as well. Part 8A, which is a reflector, was badly formed, so I made a new one using rod and a disk of plastic for the reflector. I added the license plate, but I lost it later on so I made another one out of plastic sheet and rod.
Step 11 is assembling of the cab. The only issue I had in this area was the large sprues that are attached to the tops of the doors. Instead of cutting them off, I sawed the sprue off the tree using a razor saw well above the door frame and then trimmed them carefully back to the doorframe top. Even then, I still broke one of the frames, but glued it back together.
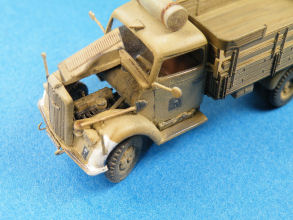
In Step 12, I added the radiator and fender, but deviated from the instructions by making a change to the hood. The engine in this kit is just too nice to keep covered by the hood. I took a sharp #11 blade and scored the separation line down the center of the hood and at the firewall, and glued the left side of the hood up. After I had glued the hood, I noticed that Parts 13A and 12A were longer than the hood itself resulting in a notch in the cab instead of a near vertical line that is continuous all around the hood. To eliminate this notch, I cut-off the ends of Parts 13A and 12A that were longer than the hood, and glued them to the cab. I then filled up the gap and this gave the look of a single line all along the top and sides of the hood, and not a notched appearance. The only problem with this is that the louvers on the sides of the hood are closer to the rear of Parts 12A and 13A than they should be. In hindsight, I would fill the notch with plastic and trim both ends of the hood sides until the vents were centered in Parts 12A and 13A.
If you dry fit the hood/windshield you will see how the sides of the hood extend past the top hood hinge line. This may require a little trimming of the wheel arch, but I think it would be a better approach than what I originally did. Again, the top of the cab assembly was left off to ease painting, and was added at the end.
Step 13 involves adding the final details. I added the tools, Notek light, and headlights. The headlights had two sink holes in them which I would normally use as a starter hole to drill out the headlights. However, since I was building a DAK version, I added black-out covers to the headlights using styrene. Part 26A is raised when a trailer is towed and lowered when not towing. Since this kit has no trailer, I left Part 26A down. The final details in assembly of the kit were completed after the model was painted and weathered. Unfortunately, the kit windscreens were not included, so I added my own using clear plastic sheet. I didn't add the side windows, reasoning that the hot temperature of Africa would have kept them down. When I did the final assembly I found it easier to add the cab first then the cargo bed. Since the cab fits over the fuel tank its position is fixed but the cargo bed can be adjusted to fit on its supports.
Painting and Finishing
The model was first sprayed Tamiya TS-82 Rubber Black and then sections of the front of the fenders were sprayed white. After this had dried I masked off the white with Tamiya Masking Tape according to the kit instructions and painted the frame, body parts and wheels XF-59 Desert Yellow. From my research I found the frame was painted the body color and not black as is suggested in the instructions.
I removed the tape and mixed 4 parts XF-55 Deck Tan to 1 part Desert Yellow and this was sprayed on the bed, cab, hood, and wheels. The frame and bed under sides were left in the base Desert Yellow as I felt these areas were less prone to fading then the upper surfaces.
The engine was left in black and the valve cover and air filter were painted Desert Yellow. The exhaust manifold, drive shaft and exhaust pipe was painted XF-64 Red Brown. This same color was used to paint the driver’s seat as well. The starter and transmission were finished in silver. German Grey was painted in squares on the doors and the front fender for the DAK palms. The tool handles were painted Model Master Wood and the metal parts were painted Model Master Interior Black.
The model was then given a coat of Pledge Floor Wax with Future for the decals and to protect the paint from the oil washes. The decals were applied with no problems but the license plate decals needed the clear film trimmed so the decals would fit. A wash of Windsor and Newton Van Dyke Brown oil paint was brushed over the entire model except for the tires and cab. The cab was given a pin wash of the same brown to bring out the details and a Lamp Black wash was applied to the radiator grills.
After everything had dried I mixed Yellow Ocher and White and dry brushed the bed and cab heavily. The tires were dry brushed with a mixture of Lamp Black and white. This same mixture was used inside the bed and various areas to show paint wear. TS-80 Flat Clear was then sprayed over the entire model before the clear parts were added. After final assembly the reflectors were painted silver then X-27 Clear Red was applied over the silver. A pencil was used last to show additional wear on the cab. A Prismacolor Brown pencil was used to show scratches in the cargo bed.
Conclusions
It is not very often that I find a review kit that I find I'm excited to build, but this was one. I cannot highly recommend this model enough. If you have any interest in WWII soft skins, this kit is a must buy. While there were a few issues, there is nothing that cannot be solved easily. The details are very well done and the inclusion of two different beds and a complete engine make this an incredibly well done kit.
I want to thank Squadron/MMD for this review sample to build.


