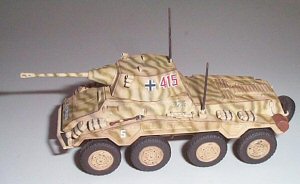
Roden 1/72 Sd.Kfz.234/2 Puma Build Review
By Jay Stevens
| Date of Review | February 2005 | Manufacturer | Roden |
|---|---|---|---|
| Subject | Sd.Kfz.234/2 Puma | Scale | 1/72 |
| Kit Number | 0705 | Primary Media | Styrene |
| Pros | Great details | Cons | Nothing noted |
| Skill Level | Basic | MSRP (USD) | $7.98 |
Background
To say that the Sd.Kfz. “Puma” was the “King Tiger” of the armored cars would be close to a factual statement. Weighting in at 11 tones, and possessing a high-velocity 50 mm anti-tank gun, it was as big as most tanks. It truly was an impressive vehicle. Germany led the way in design of armored cars in 1939 and when the war broke out.
The blitzkrieg tactics employed by the panzer divisions depended on the speed of it’s armored reconnaissance units. German armored cars became legends in Poland, France and the Balkans. In Africa, many of Rommel’s victories came in part because of his eyes up front…the elite and proven armored cars.
But, in 1941, when Hitler decided to kick in the door of Soviet Russia, the armored cars of the panzer divisions found the tasks assigned them to be almost impossible to complete. The fire-power of their 20 mm cannons, against Soviet armor was woefully inadequate and the mud of Russian roads and rugged terrain often disabled them.
The German panzer commanders were fed-up and something had to change. German designers had already been at work on pre-production models of the Puma in 1942, but the Tatra 103 engine was having several teething problems and production was delayed a whole year. Added to this was German tank losses that skyrocketed and production of armored cars was given low priority. Never-the-less, production did start in the winter of 1944 and panzer division reconnaissance units started taking delivery in the spring of that year.
The Puma fought in the Normandy Campaign and the Battle of the Bulge. It was well liked by it’s crews and gave excellent combat performance. But, like all German weapons of the later half of the war it was too few in numbers to change the fortunes of war. After the war was over, the Russians and other Allies captured many examples of the Puma and studied them. Many design characteristics of today’s modern U.S. Army and German armored cars owe their features to the Puma layout. The Stryker, the U.S. Army’s latest and most sophisticated armored weapons delivery system was highly influenced by the 8-wheeled armored cars of the German panzer divisions.
The Kit
In the past two years, there has been an explosion of 1/72 nd scale armor kits. Old manufacturers, such as Hasegawa and Fujimi, have re-introduced old 1970’s kits along with brand new ones. Russian new-comers have taken an aim at the market, flooding it with a dazzling array of wonderful hard-to-find subjects in this scale.
This new, 2005, Roden brand kit is one of them. Roden started last year with it’s line of the Sd.Kfz. 231 8-wheeled armored cars. By most revues, these are solid and well-engineered kits. This year, the plan to continue with the Sd.Kfz. 234 series, with the Puma, is the first one to be introduced. The 234/1 and others are to follow.
The kit comes in a handsome box with a great painting of a Puma, on the box-art, at an unusual angle. Inside the box are two light grayish tan, and two black sprue trees that greet you. The colors of the trees are well-thought out, bringing back memories of the old Matchbox kits. Light grayish tan is used for the hull and turret and black for the tires and jerry cans. This eases painting quite a bit. The detail is excellent and the only exception is the front head lights.
Getting Started
Step 1-3: I found the smoke dischargers on the turret were hard to cut from the sprue tree and lost two of them in the process. I would not recommend you build this kit without the aid of a white tiled floor and a glass of Scotch. I ended up sweeping the floor twice in order to find missing parts. Thank God Roden molded these on the black tree or I would never have found them again.
Now, comes the part about drinking the glass of Scotch. Roden wants you to position all six of the dischargers on their mounts. A needle-nosed tweezers, used for assembling wristwatches, and a whole lot of intestinal fortitude was used. Not to mention a lot of swearing. However, after forty-five minutes, it was thankfully over.
Step 4: This was easy, for the most part, with the exception of part no. 1C. This is the gun mantle. It had flash on it and had to be carefully removed. I also had to open part 8C, the turret front plate gun mount. I found the light grayish tan plastic to be strange and brittle to work with. However, it did sand very nice.
I bored out the gun muzzle; part 5C with a 73 wire gauge drill bit and my pin vice. This made it look menacing and I left off the antenna – part 14A.
Step 5: I found this step was unnecessarily complicated and really wrong. The tires are overly-complicated. The consist of four pieces for each of the eight tires. Part 18A was really hard to use and position. For a 1/72 nd scale kit is became overly tedious and part 17A: the spring leaves suspension should be left off until step number 11.
Step 6: This step is also hard and tedious. I ended up cutting off the tabs and gluing the two halves of the tires by eye-balling it.
Step 7: Is not needed. The interior cannot be viewed when the model is completed and the hatches in the kit are molded shut. It does have nice detail, in there, however. I suspect that the 234/1 and 234/3 will benefit from this detail as they have open-topped turrets.
Step 8: This was a easy step (thankfully) and fit was superb.
Steps 9-10: These were also easy. The parts are so well-made that the side storage locker doors can be left open…which I did. There was a bit of flash on the right fender. I left off the jerry cans, tools and muffler to ease painting them later.
Step 11: This step separates the bad modelers from the good. Roden went out of it’s way to capture every aspect of the Puma’s 8-wheeled suspension. Indeed, it was all the parts you see in Italeri’s 1/35 th scale model and just as hard to complete. Now this is why I am a good modeler. The suspension arms: part 26A should be glued on to the hull. They look good and easy to glue. Wait for them to dry, at LEAST a whole day. Be sure to check alignment. Make sure all 8 arms are straight. On the next day, you can glue parts 17A on.
The leaf-springs should clear over the suspension arms and lock on to part 12A.
Parts 9A and 10A are another nightmare cooked up by Roden. Be very, very careful with these parts as they are hard to position and easily lost. Fortunately, Roden does give excellent drawings to use as reference for these.
Step 12: All these parts fitted perfectly. A little putty was used on the rear hull. This was not so much the kit’s fault as mine. I cut a burr off the hull and took too much off. I left the bumper off: part 13B and the spare tire: 20B to ease later painting of them.
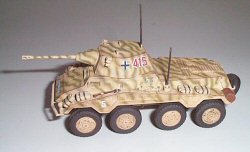
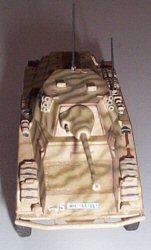
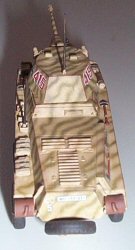
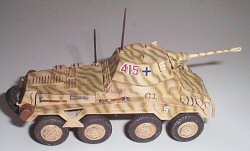
Painting: I chose to do a dark yellow and olive-green scheme. Because the name Puma congers up images of a large predator cat, I decided on a tiger stripe pattern. I primed the hull with Floquil antique white enamel paint and found some small sink-marks in the front of the hull and on the lower sides. These were filled with A-Poxy putty and sanded smooth. I then put on my yellow, which was a mixture of Apple Barrel brand American Desert Sand and Tapioca. This made a wonderful light yellow-orange sandy color. The olive-green was Apple Barrel’s Timberline Green, darkened with just a touch of Night Black. I airbrushed it with a Badger 150 double-action airbrush.
I let the kit dry for a week, then touched up the camouflaged scheme a little and darkened the olive-green with some pastels.
I then super-glued all the wheels on and found these to be a bit trying to align. The tires were of course painted and I chose a black-brown color – other than true black.
Next, came al the other things I had left off earlier. The tools were painted, and instead of painting the axe head and shovel with gun-metal, I simply colored them using a lead pencil. This works well with 1/72 nd scale molded-on tools.
The rest of the painting was pretty straight forward and all tools, jerry cans and spare tire were super-glued on.
Decals: I chose vehicle number 415 of a unknown unit. This was said to be at Normandy in the spring of 1944. The decals were great. The white tactical marks and license plates showed up really well. The only fly in the ointment was the red and white turret numbers were out of register.
Weathering the kit was easy. I did this with artist pastel chalks, dry-brushed with care. Everything was dull-coated and the antennas were attached.
Conclusions
I found the Roden kit was hard and tedious. You might say over-engineered at times. It makes up into a great model, but you better be ready for a hard build.
I want to thank Squadron/MMD for this review sample to build.


