Roden 1/48 T-28C Trojan Build Review
By Fotios Rouch
| Date of Review | July 2013 | Manufacturer | Roden |
|---|---|---|---|
| Subject | T-28C Trojan | Scale | 1/48 |
| Kit Number | 0451 | Primary Media | Styrene |
| Pros | Nice detailing | Cons | Ejector pins |
| Skill Level | Intermediate | MSRP (USD) | $55.98 |
The Build
For an inbox first-look and history please visit here:
The Trojan is of interest to me and I acquired all of the Roden variants available.
Well, time came to do the Navy version first so it could go in my display case next to all the other US Navy trainers.
The kit engine and cockpit are acceptable but I wanted something more detailed since the cowling is so open and the engine shows so prominently. Same goes for the large cockpit, especially when the canopy is open. The Quickboost offering was used for the engine and the Aires set for the cockpit. I also decided to give a try to the Eduard self-adhesive photo-etch panel surface details.
Work started with the resin engine which is very nice but not specific to the Trojan. Parts were borrowed from the plastic engine and parts were added for further detail such as the push rods and the ignition harnesses. The engine was painted with Alclad II paints. It was then set aside to be installed much later.
The cockpit was then started with test fitting of the parts first. Boy, when the instructions tell you to remove material they are not kidding.
The fuselage halves were taken down to almost nothing and even the resin had to be thinned as well.
Taking a break from grinding plastic and resin I moved on to building the instrument panels. That was more fun. I decided to enhance the instrument dial "pop" effect by applying bare metal foil on the resin portion of the panel, then lay the film on top and then put the photo-etch panel on top of that. This helped a lot. Alternatively you can paint the resin part a contrasting color, maybe even gloss white.
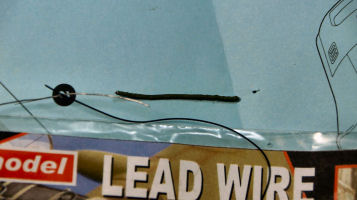
I decided to add an oxygen hose for the front cockpit. The rear cockpit has an oxygen hose molded in resin. I made it by winding soft lead wire around a harder wire. It is very easy to do and you just cut a portion out of it, paint it, stick a small piece of sprue at its one end to represent the connection point to the mask and then tuck away the other end. I hid mine between the seat the sidewall. The rest of the cockpit was assembled per the instructions. Painting was done by looking at various photos. There are photos on the internet of various Trojans spanning different time periods, including slightly modified Trojans with some modern avionics included. So be careful with what images you are using.
I turned my attention to the exhausts next. I could have bought the resin set but I decided to do something on my own. I removed the plastic stubs and replaced them with copper tube that hollowed out a bit for better scale effect.
Closing the fuselage with the resin cockpit inside was real work.
Eventually it all went together and the fuselage sides matched up pretty well with panel lines matching pretty good. The next job was to add sufficient lead weight up front to get the Trojan to sit on all three wheels. I stuffed lead everywhere including a bit extra for margin.
Those lead weights with self-adhesive backing that you get with your house fans for balancing are great for stuffing in narrow areas between a cockpit and a fuselage wall for example!
The wings went on with some difficulty. The problem was to get the correct dihedral and also have a minimal seam between wing and fuselage. A small seam is present on the real aircraft between fuselage and wing so make sure you rescribe the line.
Next job was to eliminate the rather large sink marks on the wings right above where the flap nests are. I next worked on the flaps to see how well they fit into their slots. This is when I noticed how rough they are. If Roden meant to depict them as made out of wood, then they did fine with an excellent representation of wood-grain! This will require lots of sanding and Surfacer.
After priming the whole model I decided to apply the Eduard self-adhesive panels.
They go down OK when the receiving surfaces are flat but they lift up when they are placed on curved surfaces. They then need to be helped with CA glue. I am not thrilled with the look of the panels. They make the plane look like a tank! They stick out way too much. Even after priming the Trojan it still looks like an armadillo...
Next step was to fix all the ejector pin marks on the inside of many small parts such as landing gear doors, cowling flaps, etc.
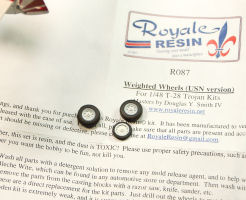
A great surprise came to me when Royal Resin aftermarket wheel guru Doug Smith contacted me offering samples of his brand new Trojan wheels for review and inclusion with the model. These wheels are extremely well molded. They are not a correction set per se. The kit wheels are pretty accurate. What the Resin Wheels offer can be seen in the images I have included. They solve the biggest problem with injected wheels that come in two parts. That is having to get rid of the sprue marks and having to recreate the lost tread patterns. That alone makes them totally worth it. The restrained weighted effect is an added bonus. Well done!
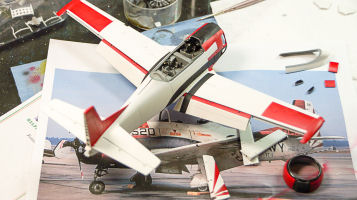
Painting the Trojan came next. I used Mr White Surfacer just in case to check for blemishes, then Reefer White and then I masked and sprayed red and the black.
What is left now is to finish off the model and get it ready for the final photo-shoot and putting it in the display case next to the other Navy Trainers.
Here is the finished aircraft. Hope you like it!
I want to thank Squadron/MMD for this review sample to build.


