Monogram 1/48 T-28B Trojan Kit Build Review
By Kelly Jamison
| Date of Review | September 2008 | Manufacturer | Monogram |
|---|---|---|---|
| Subject | T-28B Trojan | Scale | 1/48 |
| Kit Number | 5100 | Primary Media | Styrene |
| Skill Level | Basic (Unless you do this stuff...) | MSRP (USD) | Out of Production |
The Project
I was commissioned to make a T-28 in natural metal and flown by the Navy. That order seemed to be an easy task but turned out to be 6 months of cutting, grinding and research. If it was going to be in 1/48 scale, my choices were limited to say the least.
The choice is what year did you want the Monogram T-28B kit molded in. I found a 1965 Trojan on eBay as the foundation of a lot of work. I wanted the cleaner mold and better plastic. In hindsight, it would not have mattered. I sanded down all the detail, puttied and primed all the flaws and replaced about 60% of the kit with resin and brass anyway.
The first step and no matter how in depth you want to build your kit is to take care of those exhaust stacks. A few minutes with an Exacto knife to gouge out the old ones and replaced them with some appropriate brass tubing. I put a little plasticard behind the stacks to blank them off but you have to keep this area tight to make room for the resin cockpit.
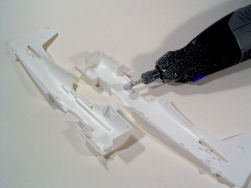
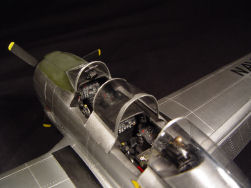
I used my Dremel tool to grind down the old locating rails for the stock cockpit and smoothed down the inner fuselage walls. The only cockpit to use is the Blackbox one. They are getting harder to find but I spend some time on EBay and found one. I then finished out the Blackbox T-28B cockpit using Mike Grant Instrument decals I punched out with a Waldron Punch and Die set.
There is a lot of fitting that went on after that. Grinding, sanding and fitting. Right when I thought I had it all in place, I discovered that the nose wheel well did not fit because of the front part of the resin cockpit. I used a steel grinding bit to grind away a notch in the cockpit plug to make clearance for the wheel well. The floor of the cockpit was eggshell thin.
Once I was satisfied that the cockpit and nose wheel well fit, I glued them into the right side of the fuselage. I used rubber bands to temporarily hold the fuselage together and tweaked the fit of the nose wheel well and cockpit before the superglue could set up. Once the superglue was thoroughly dry, I closed up the fuselage using thick superglue. It took a long time to slowly “zip” up the fuselage halves starting at the tail. Little by little.
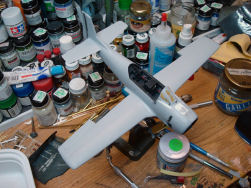
While the fuselage sub-assembly was drying I turned my attention to the wings. First step was to grind away anything that would interfere with the Lonestar wheel well set I got from Mike West. The area has to be ground down to paper thin along with the upper wing panels and the top of the resin wheel wells. The tolerances here are very very thin. I also drilled out the speed brake holes and put a blank piece of sheet plastic over the top of the holes allowing the area to look more cavernous.
More cutting and grinding to get the bottom of the wing to fit onto the fuselage. Clearance of the bottom of the cockpit tub and the top of the wheel wells was a real pain. Many hours of grinding and trial fitting took place. Finally I was able to get a satisfactory fit and superglued the wheel wells to the bottom wing and then glued that into place. Make sure the wing makes a perfect cross with the fuselage or the wing top panels will not fit properly. This was the next step. They fit rather well all things considered. Thinning them to get the clearance for the top of the wheel wells paid off well here.
Now blending of the wing roots and fuselage to wing panels took the remainder of the week. Lots of sanding and smoothing and filling and more sanding was in order. Then it was time for the Quickboost engine and cowl ring. The engine detailed out nicely but after looking at lots of pictures, I have to conclude that the gear box seems a bit undersized. Using a different R-1820 might yield you better results. I believe Verlinden makes a nice one out of resin. The cowl ring has a small tab that goes into the carburetor intake area. It is a tight fit and can break easily. So be careful when gluing it in. I painted the inside of the cowl silver and put the engine in. A small piece of brass tube acted as the propeller shaft.
I filled the rest of the area with lead shot. Where ever there was spare room, lead weight was added. I did not want this thing to be a tail sitter after doing all this work. The cowl fit well and was superglued into place and blended in the nose gear wheel well and around the rest of the fuselage cowl.
The wing tips and elevator fit very well with just a bit of Tamiya putty to blend them in. Lots of sanding is needed to take off all those rivets and panel lines. The hardest part was filling in the faux exhaust line scribed along the side of the fuselage. That took lots of work to keep the shape of the fuselage right and still fill in the curved line. The wing roots were difficult too and needs lots of work.
The kit landing gear is made to retract in a toy like fashion. I scratch built new gear using brass rods and lead free solder. This takes time but makes for a strong and more accurate landing gear. I am thinking of making up another set that are a little more detailed and casting them in white metal if the interest is high enough.
The propeller suffered from being a bit misshaped and bad sink marks on the backsides of all the blades. Those were filled in and the proper shape worked into the blades. The hub is also grossly too long. I used a razor knife to cut the hub off and then inserted a small piece of tubing to fit on the new propeller shaft I put in the engine earlier. A few swipes of a sanding stick and a few test fits is all I needed to glue the prop hub back into place.
It was time to tackle the windscreen. I cut out the Squadron Vacuform canopy and superglued it into place. Then I used Tamiya tape to mask off the clear areas to protect them. I used Mr. Surfacer 500 to build up the canopy framing which is soft on the Squadron Vacuform windscreen. The tape will be removed after the final coat of silver. More Tamiya putty was used to blend the canopy and sanded smooth. Another coat of Mr. Surfacer 1000 got the plane ready for paint. I used Model Masters Flat Black Enamel and then polished the flat black to a high gloss. I left small swirl marks in the paint with my Dremel polishing wheel. When I sprayed the SNJ Polished Aluminum over the black, it gave it a hand polished metal look. I achieved the look I was going for but I have to admit it might not be for everyone.
I installed the landing gear and painted the OD anti-glare panel on the front of the cowl. More research became available to me after I painted the OD on the canopy frame so it was later painted silver to match the new pictures I received.
The decals went on with no problem but when I used Solva-Set (I know it is a hot emulsifier) it left a mark around the star and bars on the wing in the silver paint. I tried to rub it out using SNJ silver powder but I never got it to my satisfaction. The choice was to strip off the paint on the wings and reshoot it. I was getting burnt out on turning this toy into a presentable model so I decided to live with it. As you can see in the pictures, it really isn’t that bad but we are our own worse critics.
The walkways came from the decal dungeon and were hand painted with flat clear to give it a nice grip paint look. The rest of the decals were from the Superscale T-28 decal sheet.
It is time for the last little bits and pieces to be assembled. I had to rework the flaps a bit trimming and fitting them to the wings. They got primed and sanded a few times before I shot them with silver. The prop, canopy and other little items went on. A few more touch ups here and there and the kit was finished. It took nearly 6 months working on and off. Tackling each problem one at a time until the plane was finished.
I have the parts to do one in white but might take a break from this plane for a little while. I think it was worth it in the end and I hope that someone comes out with a modern version of this kit. It would be nice. I thought Murphy’s Law would have taken over and a new kit would have been released the day I finished the kit. But it didn’t happen. If you are looking for a challenging build while staying with plastic, try out this project. You might meet your match but what a neat aircraft to add to your collection.
Here are some of the shortcomings of this kit made by my good friend Allen Yee. We have corresponded many times over email talking about the shortcomings of this kit and his positive words kept me going on this project. Thanks Allen!
- It doesn't scale out at 1/48, but 1/51 (51.2 actually) If you use scale drawings you need to reduce them to that scale to get proper alignment and sizing.
- The tail plane thickness is much less than it should be and needed to be increased. I believe they made it as skinny as it is to slide thru the rudder area.
- The fork on the nose gear is on the wrong side, all of the gear legs will have to be scratch built, and suitable replacement wheels obtained.
- The wheel wells needed to be boxed in and the outlines corrected. A nose gear well needed to be made if you do not use the Lonestar resin set.
- The exhaust ports needed to be cut out & replaced.
- The propeller needed to have the blades increased in width, re-shaped, and the dome shortened.
- A complete interior would need to be made, complete with instrument panels and seats unless you can find the Blackbox upgrade set.
- The wing flaps needed to be re-worked as almost all T-28 s are shown with them down, as they have entry steps on them. A set of the Lonestar flaps will hook you up.
- All of the heavy riveting needed removal and most panel lines needed to be re-scribed in the correct place.
- New canopies would be needed. Squadron Vac Formed is the easiest and most accurate one.
- If you want a T-28C, the tail end needs to be modified and a hook made, possibly doubling as a tail prop, if I couldn't get enough weight in to stop it tail sitting.
- All of the landing gear doors would have to be scratch built, with the curved ones over the wheels being the most difficult. They come in the Blackbox upgrade set.
- The kit has only a rudimentary engine molded with the cowling and ideally a separate engine would probably be easier than cutting out the kit one. Quickboost can solve this problem.
Special Thanks to Allen Pomianek, the true owner of this plane and a true aviation nut! Thanks for the inspiration to do this subject.


