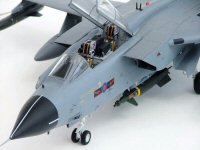
Revell-Monogram 1/32 Tornado GR.1 Kit Build Review
By Mike Williams
| Date of Review | April 2006 | Manufacturer | Revell-Monogram |
|---|---|---|---|
| Subject | Tornado GR.1 | Scale | 1/32 |
| Kit Number | 4705 | Primary Media | Styrene |
| Pros | Great fit | Cons | |
| Skill Level | Basic | MSRP (USD) | $49.00 |
Background
The Panavia Tornado was initially known as the Multi-Role-Combat-Aircraft (MRCA) and was designed to be a replacement for the F-104G Starfighter by the air forces of Belgium, West Germany, Italy and the Netherlands. The conceptual phase of MRCA was launched in January 1968, in March of that year Canada joined the consortium and the UK joined in July 1968. By October, Belgium and Canada withdrew due to mounting costs and other complications, followed by the Netherlands in July of 1969. This left BAC (now in BAe) from the UK, MBB of West Germany and Fiat (now Aeritalia) from Italy to develop the MRCA into what had been defined into seven roles required by the member air forces:
- Interdiction
- Counter-air attacks
- Battlefield interdiction
- Close air support
- Reconnaisance
- Maritime strike/attack
- Point interception
Also it had to be compatible with a range of weaponry in use by all member air forces plus new weapons that would be designed solely for the MRCA.
In August of 1974, MRCA made its maiden flight in Germany, the next month the name MRCA was given the title of TORNADO, under which name it made its maiden flight in the UK from Warton on 31 October. After this, Four more Tornados flew in 1975, two in 1976, three in 1977and two in 1978 and 1979 thus completing the initial trials. Soon after they were delivered to the RAF to under go test and evaluation before entering service in the late 1970’s. The rest is, as they say, history.
In 1991 Iraq invaded Kuwait giving the Tornado a chance to prove itself in combat and it proved to be a very potent weapons platform undertaking low flying missions over rugged terrain against heavily defended enemy targets using its sophisticated terrain following radar and advanced avionics and defence systems.
The Kit
In the massive box you get seven large sprues of grey styrene and two sprues of clear styrene. The decal sheet is almost as big as the box and gives you three options of markings, ZG791 of No.31 Sqn RAF Germany in special anniversary markings,ZA462 of 617 Sqn Dambusters and a Gulf war 1991 version in the shape of ZA447 ‘MiG Eater’ with the famous shark mouth in the RAF desert pink overall colour. The instruction sheet is of the usual Revell standard and runs to 27 pages including the painting and marking guide.
The kit is moulded very finely in light grey plastic and has beautifully fine recessed panel lines, included are underwing stores consisting of two 1500 liter fuel tanks and a pair of the enormous ‘Hindenburg’ 2250 liter fuel tanks as well as two Laser Guided bombs, four 1000lb British bombs a Sky Shadow ECM pod and a BOZ107 chaff/flare pod plus a pair of sidewinder missiles.
Overall detail is very good, you get an in flight refuelling probe which can be built extended or retracted as can the air brakes on the rear of the aircraft with detailed interior. Nicely detailed undercarriage bays and undercarriage including separately moulded landing lights. Cockpit detail is very good for this scale and has everything in it that should be in it, although the Martin Baker Mk.10 ejection seats are very good representations as they are, I used the Eduard detail set for various additions to the cockpit interior and the seat straps and harnesses. In the separate nose cone there is a complete and detailed radar set up that can be built on display although quite where you would put the 60g nose weight needed for this model is not apparent if you build it with the radar on display!
Construction
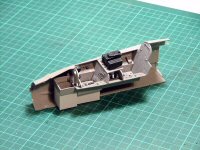
As normal, the cockpit is the first area to be built and is simple to construct, consisting of a one piece tub with front and rear instrument panels, control columns and rudder pedals. The instructions give a very comprehensive detail painting guide and even include decals for he displays on the various screens in the front and rear instrument panels. The MB Mk.10 ejection seats are made up of 10 pieces each, I used the kit parts and scratch built some details and added seat straps from the Eduard set to give good examples These seats could of course be replaced with aftermarket items.
The seats fit into the one piece cockpit tub which just needs careful painting to get a pleasing result from the raised detail, I sprayed the cockpit interior parts and the interior of the fuselage sides with Tamiya XF-19 Sky grey and added a thin black wash to enhance the detail I then added the fine details by hand with a 2/0 brush using Humbrol enamels. Some good reference is essential to do this well. The whole cockpit tub fixes to the front undercarriage bay, then this assembly simply slots into place in the fuselage side. Then I added the middle control console between the front and rear cockpits, I added some details here from the Eduard set and scratch built some wiring to busy it up as the moulded in wiring is underscale anyway. I opted to leave the ejection seats out until much later in construction to avoid them getting damaged and to ease masking of the cockpit area for painting of the main airframe. The head up display (HUD) I replaced with the Eduard set and added the glass parts from sheet acetate much later on to avoid damaging it. Once installed, the cockpit looks very good and really makes a nice centrepiece of the model.
Next you have to decide if you want the nose cone open with the radar on display or not, when building the kit with the nose cone closed as I did, then there is a slight bit of sanding to be done to get the cone and cone ring to blend in with the front fuselage portion. Construction moves along at quite a rapid pace after this. Next are the wings, and they are designed to be able to move or ‘swing’ just as on the real aircraft, but the swing wing joint inside the fuselage is very basic and I don’t think it would stand up to much playing with so I opted to fix mine in the open position, on this note, the all moving tailplanes are also designed to be workable but the internal connecting rod joining them is also very weak and they too are best fixed in the desired position, although I guess you could strengthen them using brass rod or the like.
The main undercarriage bays are well moulded and have nice amounts of detail in them and are fixed to the inside of the lower rear fuselage section. Both the wings and the tailplanes are then sandwiched between the horizontally split rear fuselage, also in there is a blanking plate for the engines with simple turbine fans moulded in to help avoid the see through appearance. The underwing pylons are designed to be attached to the wings so that they can move with the wings as per the real aircraft, this was another weak spot on the kit as the mechanism for allowing this is a little crude, consisting of a four little plugs that are attached to the various pylons through holes in the lower wing parts, but it makes the pylons very wobbly so I opted to leave mine off and fix them in place later,as I was going to have the wings fixed in the forwards position.
One area that is definitely worth enhancing is the wing root pneumatic seal where the wings retract into when swept If the kit parts are used there is an apparent gap and you’d be able to see right through the fuselage, I replaced the kit parts using some foil from a wine bottle cut to shape and scored to represent the shape and look of the real thing, which should form a seal around the wing. The large tail fin is tackled next and when I first looked at it, it seemed out of proportion to the rest of the kit, but it is in fact a good representation, there are some holes that need to be drilled out on either half of the fin to enable the blade aerials to be attached either side at a later stage.
The jet pipes are excellently detailed inside and out including even the cogged wheels that actuate the thrust reversers, they need careful painting to get a realistic burnt metal look, I airbrushed mine with Humbrol Metalcote ‘Polished Steel’ thinned with cellulose thinners, left it for 30mins and then buffed it with an old piece cotton cloth. Next all these sub assembles are joined together, and this is the part where I had trouble.
The front fuselage and the rear fuselage join at a seam just behind the cockpit, and I don’t know whether it was just me being awkward or whether it is a difficult part to tackle on this kit, but it needed a couple of applications of filler on the underside to avoid a step between the two sub assembles, consequently I lost a bit of detail and had to resort to rescribing it, luckily there is not much detail to rescribe on that part of the fuselage..
I left the jet pipe assembly off until after I had finished painting the whole aircraft to avoid fiddly masking on the metallic finish. I also opted to close the rear top mounted air brakes as they are rarely seen open on the real thing when parked, the same goes for the in flight refuelling probe.
The air intakes are made of five parts each and are nicely done but are a tight fit into the fuselage, after I dry fitted them to make sure of the fit, I couldn’t get them out again, luckily they are a good fit so I just run a thin bead of liquid poly in to secure them.
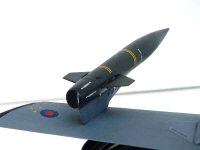
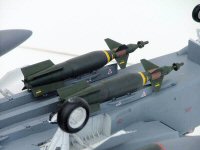
Next its all the fiddly little bits such as antennae and blade aerials and the like, there are various parts throughout the instructions where Revell point out where holes need opening up for various aerials etc, I opted to leave them all off until the end to avoid damaging or losing them in the carpet. The underwing stores are nice little kits in their own right and assemble with ease, I opted to load my Tornado with the two Laser Guided Bombs which are made up from eight pieces each, two 1500 fuel tanks moulded with separate fins and the BOZ107 pod and Sky Shadow pod, the painting and marking is very clear for these and I got these finished before I painted the actual plane, adding them last of all after all the main painting and decaling had been done.
Painting & Markings
I decided from the start that I was going to build the 617 Squadron ‘Dambusters’ aircraft as I like the look of this particular squadron markings of the red lightning bolt on the black background. After a quick internet search for reference pictures I found pictures of the Tornado GR.4 in the current two tone grey tactical colour scheme which looks rather nice with the 617 Sqn markings on the RAF website ( www.raf.mod.uk).
I painted the fuel tanks in the wrap around green and grey scheme worn previously on Tornados, as I have seen pictures with the first GR.1’s wearing the two tone grey scheme still carrying the green and grey tanks, this adds a bit of interest too. I also painted the BOZ107 pod in the camouflage green and the Skyshadow pod in the sea grey.
I used the 617 Sqn decals from Xtradecal for the right size roundels, as the kit items are designed to be used with the earlier grey/green camouflage and are therefore too big. The instructions for the Xtradecals show a Tornado GR.1 in the two tone grey that the GR.4 currently wears, so that decided it.
I masked up the cockpit area and also added the front part of the canopy to get a nice smooth joint between the canopy and the fuselage before painting, to affix the clear parts I used Kristal Klear. I masked the canopy parts before attaching them to ease the masking process. The main part of the canopy was also masked up ready to be sprayed whilst I was doing the main aircraft paint job.
Paints used were from Humbrol who make the correct colours for the two tone tactical grey scheme, the undersides were sprayed with Humbrol 156 camouflage grey and the top surfaces were sprayed with Humbrol 164 Dark sea grey, this was an easy process and required little masking. The difference is subtle between the colours, but on further inspection so is the difference on the real aircraft. The nose cone was masked up and sprayed Humbrol 85 satin black. I then let all the colours fully sure for a day then gave the model a generous coat of Johnsons Klear to give it a tough glossy surface to which I could add the myriad of decals.
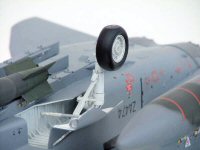
Attention was now turned to the undercarriage, the nose undercarriage is straight forward and after assembly I just sprayed the leg and wheels white Tamiya XF-2 and added a grey wash to bring out the detail and tone down the brightness of the white and the leg drops in with a nice positive location in the nose undercarriage bay. The main undercarriage needed a bit more care because the breakdown of parts is quite complex with no less than seven parts making up each leg plus the two parts for each wheel but I followed the instructions carefully and it didn’t present too many problems, I used the same painting method as for the nose undercarriage of white with a grey wash. One thing I will mention is that I let the undercarriage fixings cure fully before standing the aircraft on it, as it is quite a hefty model and the undercarriage might have collapsed if I stood it on its wheels too soon after gluing them, I used Grip medium superglue, then once everything was in the correct place and at the correct angle I just touched superglue accelerator on all the attachment points to further strengthen the joints.
The wheels, both nose and main, are moulded in two parts for each wheel and have moulded in flat spots to give the right ‘weighted’ look to the finished model. I also added the undercarriage doors at this point too and these have very positive locations and nice actuator arms for the main gear doors.
The decaling took a while as there are a lot of stencils and they are all very readable in 32nd scale, I was worried about the dreaded carrier film silvering that Revell have been notorious for in the past, however I seem to have been lucky with this model. The fiddly part of decaling was putting on the walkway strips on the wings and fuselage as I had to follow the instructions to the letter and each piece had to be cut to length and positioned on the model following the decaling marking guide closely, working in millimetres with a fine steel rule it was a long process and I kept checking and rechecking each measurement to ensure the correct lengths would each match up to the next piece. I used the squadron markings from the Xtradecal sheets and the roundels and fin flashes too, I risked the stencilling decals from Revell as I could not find any aftermarket replacements for these, and I think coating the model with Klear first definitely helped to cure the silvering problem. All decals reacted well with micro set and sol that I always use on my models.
Once all the decals had dried thoroughly, I washed off any excess decal glue and decal solvent, added all the weaponry/stores and aerials/antennae etc, then gave a final coat of flat acrylic varnish from the Vallejo Model Air range.
The final touch was to add the ejection seats and remove all masking tape and fix the canopy in the open position using Kristal Klear holding the canopy open with a strategically placed cocktail stick resting on the seat pad and on the front edge of the canopy until it was dry. That’s it, its finished!.
Conclusions
Overall this was a very satisfying build and the first time I have built a jet in this scale, it is not one for a beginner by any means, but any experienced model makers should find no difficulty in this relatively simple kit, it builds into a very impressive model straight out of the box, but there are lots of various aftermarket detail sets available in resin and etched sets.
The finished model measures approx 22 in (56cm) long by 17 in (43cm) wingspan which makes it near enough spot on as regards accuracy, this also means its quite an impressive model when built and needs a large display area, especially as the wings are unswept on my model.
For Further Information:
- World Air Power Journal volume 3, Autumn 1990
- Gulf Air War Debrief, Aerospace Publishing 1991
- Tornado Online Reference
- www.raf.mod.uk


