Revell 1/32 Spitfire Mk.II Build Review
By Larry Horyna
| Date of Review | March 2015 | Manufacturer | Revell |
|---|---|---|---|
| Subject | Spitfire Mk.II | Scale | 1/32 |
| Kit Number | 3986 | Primary Media | Styrene |
| Pros | Nice details, easy build | Cons | See text |
| Skill Level | Experienced | MSRP (USD) | $29.95 |
Build Review
The Supermarine Spitfire is one of the all time iconic fighters to come out of the Second World War. While the model is well represented in every scale, a good modern tooling of the early variants has been lacking in 1/32. Revell of Germany attempted to 'come to the rescue' with their new offering of the Mk.II. Revell did indeed spend some time researching this aircraft but unfortunately, as most everyone has now heard and figured out, they measured and copied an extant example that was something of a 'hybrid', having parts from other variants on it. In the end, what they ended up with is much closer to a Mk.Va than anything. I don't know where the propeller came from on the aircraft Revell measured, it does not look like any propeller the Spitfire used, De Havilland or Rotol.
I decided to do what I will call an 'economy' build and correct the major problems myself (although several companies now offer corrected resin aftermarket parts) and do a simple backdate to Mk.I standards. This required making the ailerons look like fabric covered ones instead of metal. The oil cooler had to be modified to make it the earlier half-round shape. The seat needed to be re-shaped a bit and have the back padding added as well as a Sutton harness. The curiously missing pilot armor behind the seat had to be fabricated. Although the radiator is not completely correct (it lacks the front and rear ramps) I decided to leave it alone as the overall shape is close enough. The wheels are a little odd looking, but not so much that did anything to them. I also decided to re-shape the spinner and propeller blades to get them as close to a De Havilland look as I could. The spinner is still way too short but in the end, the model looks like an early Spitfire.
Overall construction was straight forward and offered very little in the way of fit issues. You will need to take a little time when fitting the wings to ensure there are no gaps, especially under the fuselage at the trailing edges. Again, careful fidgeting will result in very little to no filler being required. Revell uses a pretty soft plastic which usually results in sink holes and there are few that need filling, mostly along the forward fuselage joint.
The cockpit is a little sparse, but not bad. I added a little wiring and made a new oxygen hose out wrapped wire. The back pad on the seat was made from Apoxy Sculpt and the Sutton harness was make from scrap RB Productions material with buckles from the photo-etch scrap box. The instrument panel ends up pretty nice using the kit supplied decals. The pilot armor is a pretty simple shape cut from card stock. I also dug through the spare decals box and found some unused stencils at threw a few in the cockpit.
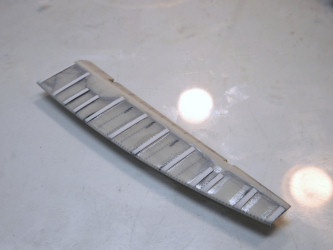
To simulate the fabric ailerons, I first filled the metal rivet holes in the kit ailerons with Tamiya putty and sanded them smooth. I then added strips of plastic, cut them to length and sanded them down. The oil cooler was bit more tricky. I cut the kit one in half lengthwise. The tricky part of this is in the way the part is broken down. You end up with a notch in each side that I filled in with card stock and putty. You also end up with a gap all the way around the cooler which I filled with Apoxie Sculpt and added the rivets with a pounce wheel.
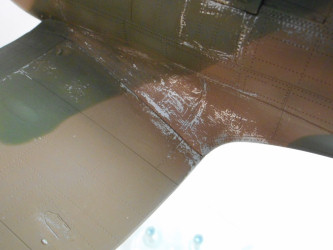
With the major mods out of the way I was ready to paint. I decided to do this airplane in top Battle of Britain ace Eric Lock's markings. I wanted to make a pretty beat up looking Spitfire so I went with the 'hairspray' method for heavy weathering. I first sprayed the areas to be heavily worn with decanted Tamiya Silver Leaf spray paint. Tamiya's Silver Leaf is a great, durable metal finish and goes on like a dream through the airbrush. Next, the silver areas were sprayed with Aqua Net hairspray, also decanted (you can by this stuff in a pump bottle an just pour it into your airbrush, no thinning required). I let the hairspray dry overnight before commencing with the paint work.
The model was pre-shaded with Tamiya flat black then the bottom color was applied. After masking, the first top color was applied. I masked off the second top color with poster tack and Tamiya tape. Here is where I ran into a dilemma. To achieve the chipping effect with the hairspray, I had to go through two colors where the second top color was applied. When I applied water with a brush to start the chipping on the green, the brown came through first before the metal and it was difficult to not have any brown showing on the green where the chipping was. I was able to accomplish the effect, but in future I will rethink this on multiple layers. I know there are some good articles out there on multi-layer chipping which I believe involves chipping a color, sealing it, then applying hairspray again followed by the second color and repeating the process. The effect was also used on the propeller and spinner.
In the end, I was very happy with the result and would recommend this technique for heavily weathered subjects. After the chipping was finished I clear coated the model with Future Floor Polish and added the decals. This is where the kit shinned best! The kit deals were simply fantastic. With a few applications of Micro Sol, the roundels looked painted on! No edging, so silvering and all the rivets were visible. The only trick is on the bottom wing as the roundels go over the large cooling vents. I had to cut and touch up the roundels there. Even the stencils went down with no silvering, which I typically find common on stencil decals. Unfortunately, to get the codes and serials for Eric Lock's airplane, I used decals out of a Pacific Coast Hurricane kit. These did not perform nearly as nice as the kit decals. I had to modify some of the code letters to make what I needed. The 'Bs' are made from two 'Rs' and the 'Qs' are modified 'Ds'.
After the decals were dry I applied an enamel wash using MIG Pigments dark brown wash. This was followed by an airbrushed post-shade using a mix of Tamiya flat black and red brown thinned about 80%. The post-shade was applied between the camouflage colors and streaked along the wings in the direction of airflow. I also used the post-shade color for initial cordite stains around the guns and shell ejection ports. This was followed by pastels to further accentuate cordite, exhaust and oil staining on the bottom of the airplane.
All that was left was final small details and adding the middle canopy section. This is where I am most disappointed in this kit. What is the point of offering a sectioned canopy when the middle section does not fit at all in the open position? Revell is of course not the only company guilty of this but it really does astound me that so many manufacturers cannot get that right. To get it at least close, applied a little Testors clear parts cement to the rails and carefully pressed the canopy down and secured it with Tamiya tape until the cement dried. It's not all the way down, but it's close enough to not bother me that much. It is one of my biggest 'pet peeves' with airplane kits. The side door is a bit thick and the detail is a bit heavy as well but I left it. The antenna wire is made with Uschi's fine elastic thread (this stuff is great as well, by the way. It comes in three sizes; standard, fine and extra fine).
So, in the end, I am happy with the results for the economy of the kit. I found my kit on sale for $20.00 and other than time, paint and glue, I didn't spend anything else on it. For that, this kit is a great value for the money. It would have been amazing without the silly errors Revell made measuring a pieced together museum airplane. The only thing I would truly recommend buying for this model is a corrected aftermarket propeller.


