Revell 1/24 1970 Boss 302 Mustang Kit Build Review
By Stephen Sutton
| Date of Review | May 2012 | Manufacturer | Revell |
|---|---|---|---|
| Subject | 1970 Boss 302 Mustang | Scale | 1/24 |
| Kit Number | 2841 | Primary Media | Styrene |
| Pros | Easy to assemble, two options for engine, accurate wheels | Cons | Decals will not lie down |
| Skill Level | Intermediate | MSRP (USD) | $23.95 |
The Kit
The kit review can be found here.
The Build
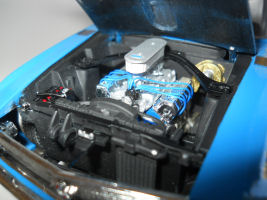
First up was the assembly of the engine, I went with the custom version which included the “Cross Boss” Intake manifold, Autolite inline carburetors and air cleaner, with this set up I’ll be using the hood scoop. Engine block was painted Ford blue with the heads and manifolds painted aluminum. I wired the distributer cap with TJ Models blue spark plug wire; you can use colored beading wire from your local craft store. The engine went together with no issues and minor cleanup.
The interior was assembled as per the instructions, the seat halves were glued together then filed and cleaned up with an X-Acto blade. I did not paint the seats and I left them the natural white plastic, the carpet was painted semi-gloss black. The dash gages were detailed with a fine brush then Super Kristal Kleer was applied over the gages, this result wasn’t as clear as I liked so next time I’ll use Future floor wax.. The dash and steering wheel was painted with Tamiya XF-64 red brown to represent wood grain, then I over coated them with future.
The body was inspected and mold lines cleaned up with fine sanding sticks, next I washed the body of any mold agents and oils from my hands. I painted the body with Model Master 2940 rattle can Racing Blue enamel, and I allowed the paint to dry for a week, no primer was used, then I sanded the orange peel and any dust that was in the paint. One coat of lacquer clear coat was applied then I applied the black racing strip decals then two more coats of Testors glosscote was applied and then I sanded the whole body with Micro Mesh sand paper and I polished up everything with Novus plastic polishing compound. Using enamel rattle can spray paint took more time to cure and polish then I wanted so next time I will use Model Master Lacquer based paint next time.
The decals would not lie down completely and setting solution made them worse. This was almost a disaster! Next the windshield was prepared for installation, I tried to paint the side the rear windows with Testors 1634 Transparent Black Lacquer Window Tint, but this just bubbled and looked awful. So now I had a real problem, how do I remove lacquer paint from clear plastic? Micro Mesh polishing system was used to clean off the lacquer then I dipped the windshield in future to restore its luster. I gave up on the tint idea; I’m not sure what I did wrong with the window tint. Please email me if you have had any luck using this stuff. Next the window trim was given the Bare Metal foil treatment and Humbrol silver was painted in areas I didn’t use the foil.
The rear suspension followed, suggest you follow the instructions as I didn’t to install the exhaust first then the rear axle and springs, the belly pan and frame was painted flat black and suspension components painted gloss black with steel bolts highlighted with steel paint, and the exhaust and mufflers where cleaned up of mold lines and painted aluminum and steel. The body was fitted to the frame easily. The engine compartment was detailed with the radiator assembly, oil cooler, battery and top support brace, custom radiator hoses were installed next.
The rear valance included the tail lights and bumper, the rear sheet meat was painted semi gloss black and the clear tail light lenses was treated with Tamiya clear red then backed with Humbrol silver. The rear valance was glued in place; I had to grind off the excess plastic on the back of the valance to get it to lie down right.
The front grill was treated with a wash of flat black to keep the chrome honeycomb grill pristine. The clear headlights were treated with future and attached to the headlight bezels with more future. The front chrome bumper and spoiler were glued next. The very nice 5 spoke wheels where painted black in the recesses and the tires installed. The rear window louvers and rear spoiler was carefully glued in place. The last items I installed was the side mirrors.
Conclusion
Overall this is a well engineered kit with very little fit problems and everything lined up properly with the exhaust and body to frame attachment. I like this kit so much that I bought another one.
I highly recommend this kit. Many thanks to Revell for supplying this review sample.


