Revell 1/32 DH.82 Tiger Moth Kit Build Review
By Michael Benolkin
| Date of Review | May 2018 | Manufacturer | Revell |
|---|---|---|---|
| Subject | DH.82 Tiger Moth | Scale | 1/32 |
| Kit Number | 4712 | Primary Media | Styrene |
| Pros | Best kit of the Tiger Moth in this scale | Cons | Only kit of the Tiger Moth in this scale |
| Skill Level | Experienced | MSRP (USD) | See text |
Build Review
For a brief history of this aircraft and a look at the kit out of the box, look here.
So what do you do when you're making good headway on a detailed project only to run into a logistics problem? I was well on the way with the Italeri 1/32 F-35A Lightning II when I decided to use the MRP series of paints to replicate the stealthy colors of the aircraft. The problem happened when I ordered the paints and my order was put on hold because something was out of stock. I set the F-35 aside and tackled two other projects, and even finished them. Still no MRP paints, so it was time to tackle another project on my bucket list, the Tiger Moth. I ran into examples of this trainer in my travels to the UK and elsewhere, but never had the opportunity to fly one. I did have the old Matchbox kit stashed away in my collection before this kit was reissued by Revell AG a decade ago. Matchbox kits were designed to be simple in construction as well as somewhat basic in detail, but I've seen this kit built-up by some talented folks and wanted to give this a go myself. The real question is whether I'm building a period RAF trainer or a later restored warbird. I am leaning toward a privately-owned aircraft for this project.
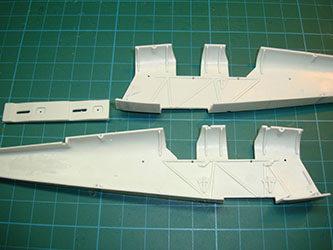
I pulled a book on the Tiger Moth out of my reference library and started sizing up the project. While much of the kit will be fine out of the box, the cockpits and engine are begging for some attention. In the photo below, you see the cockpit floor with the center control box that runs from front cockpit to rear and houses the rudder and control stick mechanisms. The kit provides the control box, but there is no separate floor, the box drops into the fuselage halves.
Looking inside the fuselage, the steel tubular structure is molded onto the fuselage sides along with the throttle and 'altitude' controls (fuel mixture). While most folks simply paint and weather the frames, I want to use tubular stock to replicate the framework and scratchbuild the rest of the details.
After some careful measurements and test-fitting, I fabricated a floor for the cockpit. I also started the process of modifying the control box by opening up the control stick openings and adding the aileron linkage.
Using my Mission Models 2mm chisel, I removed the interior frames and details out of the fuselage sides. What remains are the locators for the rear bulkheads and instrument panels. I also filled the holes that are molded into the fuselage sides for the sliding canopy frame, but since I'm not using that option this time around, Mr.Surfacer 500 has closed up those holes.
I primed interior light gray, and I've also painted the floorboard using brown as the base color and then shooting mahogany through an RB Productions wood stencil for the grain. While there are some good wood grain decals out there, I have had bad experiences working over decal surfaces.
Using Evergreen round stock, I put together the interior tubular side frames for the cockpit interior. I've also removed the molded-on compasses on the instrument panels.
The floor now has the center pedestal in place with added torque tubes for the pitch controls as well as rudder bars for the front and rear cockpits. The instrument panels have been rebuilt using Airscale instrument decals, and the compasses were made from 1/48 Mk.82 500lb bomb cross-sections.
The front and rear cockpit rear bulkheads were updated with cross-tubing and cut-outs to mount the shoulder harness mounts. Everything was carefully fit inside the fuselage halves and since the fit was right, I glued the subassemblies together.
Here's a look into the rear cockpit with the new instrument panel and compass.
Stay tuned...


