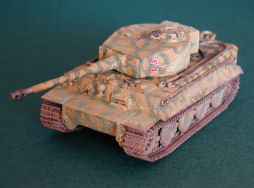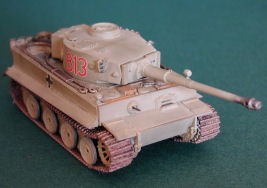
Revell 1/72 Pz.Kpfw.VI Tiger I Ausf.E Kit Build Review
By Llarry Amrose
| Date of Review | October 2009 | Manufacturer | Revell Germany |
|---|---|---|---|
| Subject | Pz.Kpfw.VI Tiger I Ausf.E | Scale | 1/72 |
| Kit Number | 3116 | Primary Media | Styrene |
| Pros | Nice detailing | Cons | No Zimmerit as depicted in box art |
| Skill Level | Basic | MSRP (USD) | $13.20 |
Background
Tiger! There are few single words which had as powerful an impact in the ears of soldiers on both sides during World War II. The Panzer VI, immense, with its heavy armor and powerful 88mm gun, is an enduring symbol of the German army, recognizable in name if not shape even by many unfamiliar with much of the history of the war. In his book "Patton's Best", American tanker Nat Frankel made frequent references to "Tiger 6s" as being the panzers he was most afraid of.
When the war began, tanks were smaller and lighter, but then a race developed between armor and firepower, with each side trying to create the ultimate - the tank that can defeat all comers and survive itself. In 1942, after some unpleasant surprises on the Russian front, such as the T-34 and KV-series, Germany needed a new heavy tank. Eventually the Panzerkampfwagen VI, later to be known as the Tiger, was approved for production. It matched up parts from two designs, the turret by Porsche and the hull by Henschel. The front armor was 100mm, but not sloped like on the Panther. Weighing in at 63 tons, the Tiger was not fast and maneuverable. The exceptionally wide tracks helped reduce ground pressure, but there were places a Tiger simply could not go. It was so wide that for rail transport, the outer row of road wheels could be removed, and narrower tracks fitted. As with many late-war vehicles, the design was spectacular, but in places overly complex, and as a result, mechanical reliability in the field suffered.
The first units were finished in August 1942, and among the earliest appearances were in North Africa and at the Battle of Kursk. With updates along the way, production continued until August 1944, and 1349 were built. By that point, production turned to the even bigger Königstiger (King Tiger) or Tiger II.
The Kit
Revell of Germany has released two kits of the Tiger, the early Ausf. H (which I already had in the stash) and this kit of the late Ausf. E. The box is the usual black, but is lid-and-tray instead of end-opening (like my H). A quick look at the shelves at my Friendly Local Hobby Shop showed that Revell is using more of these boxes, a welcome change.
Comparison of the two kits shows that Revell has been most efficient in their tooling. The primary difference is one sprue unique to each kit, containing the right turret half, with or without the mid-late escape hatch, the cupola, front fenders and a few other parts which changed during production. Also, the Ausf.E, in addition to the stock rubber-tired roadwheels on the standard sprue, includes a partial sprue containing the late-model steel wheels.
The tracks are link and length, which is generally my preference. The instructions are the usual Revell multiple pages on folded newsprint, with the steps broken out in reasonable detail, and markings diagrams for two schemes. A small decal sheet with the ID numbers and Balkan crosses completes the contents.
One criticism I have seen a couple of times of this kit concerns Zimmerit, the German anti-magnetic-mine coating. The kit does not include it either molded onto the hull and turret, or in some mountable way. However, the cover art is of a Tiger wearing it, as most mid- and late-period vehicles did. As it would require separate tooling of even more parts, it is understandable that Revell would skip it, though it is a disappointment to the builder. The topic bears further discussion.
Zimmerit
To help the infantry, Germany came up with an anti-tank mine that could be attached magnetically to the target, which also helped maintain the optimal distance for the shaped charge explosive. As standard procedure, they also devised a counter to it, in the event any of their enemies fielded a similar weapon. Zimmerit was a paste made from Barium Sulfate which was intended to weaken the magnetic attraction intended to hold the mine in place. It was generally applied to heavier tanks and tank destroyers, and on vertical and sloped surfaces (gravity being enough for horizontal surfaces anyway). It was introduced in December, 1943 and applied in factories until August, 1944, though there is some evidence that some factories phased it out earlier. There were various methods of application, leading to characteristic trowel patterns on the different vehicles it was applied to.
So what does that mean for our Tiger? The early Tigers, such as in the Ausf.H kit, were produced before the introduction of Zimmerit, so they're fine without it, as even once it was authorized, not all tanks in the field received it. The end of Zimmerit usage almost exactly matches the end of Tiger I production, so pretty much all mid- and late- models (like the Ausf.E kit) should have it. It's certainly possible that some were made in factories which quit using it earlier, but I haven't seen any pictures to confirm it. It is also possible that it was removed from some tanks, but again, there's little or no firm data to support that.
Models of late Tigers have been built without Zimmerit for years, and there is enough doubt about the final production that there is no trouble justifying such a build, and leaving it to any doubters to prove otherwise.
But if you want to show Zimmerit, what to do? Builders in 1/35 have a great selection of options, including appliqué in plaster, resin or photoetch, as well as tools designed specifically for replicating the various patterns in putty or other media. These sorts of aids are starting to become available to a limited extent for us small-scale builders, including a photoetch set for this kit from Extratech. The timeframe for doing this review made that option impractical, so I decided to try manually creating the Zimmerit.
A quick web search turned up a number of articles with a variety of techniques, mainly consisting of either modifying the surface of the plastic with solvents or heat, or adding a coating of epoxy or putty and shaping it. I decided to use 3M Acryl Blue putty and a tool carved from a stray piece of sprue. Once the kit was assembled to a suitable stage, I went to work.
There are a couple of things to be careful of. The putty needs to be thin enough to stay reasonably in scale, but thick enough to replicate the characteristic trowel pattern. It’s also important to work in sufficiently small sections that the putty stays soft while you work. I used masking tape to keep the putty from getting onto the adjoining surfaces.
I should probably have done more practicing on scrap plastic/kits than I did. Still, for a first attempt, and sitting on the shelf rather than a contest table, I’m reasonably satisfied. Next time, I will probably look to a slower-setting material to give longer working time, which will allow me to get a more even, tighter, more accurate pattern.
Construction
Building begins with the lower hull, and proceeds to the running gear. The sides of the upper hull are molded together with the lower hull, which makes attaching the tracks a little more challenging. The instructions do a very good job of depicting the layout of the multi-row overlapping road wheels, including a separate drawing as seen from directly underneath. The tracks are depicted next, but between the addition of Zimmerit and painting plans, I left the tracks until closer to the end, before only the front and rear fenders and the last detail parts: headlight, machine guns and tow cables.
The hull parts all fit together well. I ended up adding the side skirts earlier than I would have liked because of the Zimmerit. The turret got built up separately along the way, as it too, was going to get Zimmerit. The fit was good enough that I could put the roof in place without glue to help align the sides and gun mount, and then pop it out so as not to get stray putty onto it. It was added back in after the coating was finished and cured.
The tracks are link and length, and very nicely detailed. There are plenty of extra single links, as well as seven with extra pins to be attached to the turret sides (the Ausf.H kit only uses five of them). Note that the tracks are asymmetrical, the guide teeth staying towards the inside. What this means is that the tracks are essentially oriented in opposite directions around the wheels. The overhang of the upper hull and side skirts restrict access to the upper run of the tracks, which makes installation a little trickier, but not problematically so. The links mesh together nicely, but the fit around the sprocket and idler, and the contour to the tops of the road wheels are a little less smooth. This should pose no trouble to any builder who has done a couple of sets of link and length tracks before, but if you haven’t, I would recommend getting a couple of simpler sets under your belt before trying these.
Colors and Markings
Two schemes are provided. The first is from Panzerabteilung 503 in France in July, 1944. It is panzer dark yellow under an irregular pattern of panzer red-brown and panzer dark green. The second is from Panzerabteilung 506 on the Russian front in the summer of 1944, dark yellow with an irregular pattern of dark green. The colors are given in Revell colors, but since they’re the standard German armor colors, this presents no problem, no matter what line of paints you prefer.
The Ausf.H kit’s early schemes involve more unusual and somewhat controversial colors, and the Revell mixes make it more challenging. The decals are marked as printed in Italy by Revell, though they look to me like the work of Propagteam, and are suitably thin and well printed. They handle well and even snuggled down into my Zimmerit with only a moderate amount of setting solution.
Conclusion
A winner from Revell, rather accurate in dimensions and shape, including the off-center mounting of the main gun. I can’t speak to the newest Dragon releases, but this beats all previous options. Between the Ausf.E and Ausf.H kits, it should be possible to model just about any Tiger I made. The only real drawbacks I can see are the Zimmerit question as discussed above, and the tracks. For a builder experienced in link-and-length tracks there should be no trouble, though I still don’t like the outcome as well as some other kits I’ve built. I have to recommend that less experienced builders may want to set this one aside until they’ve done a few tracks of this style first.
Revell rates this kit as Skill Level 5, but their ratings are based largely on parts count, and the tracks and the extra set of wheels drive that count up. Aside from the tracks, everything else goes together easily.
References: Wikipedia.com, Absolute Air Land & Sea CD-ROM (Cassell / Tamiya), “Panzerworld” ( http://www.panzerworld.net) and various book off the book shelves.


