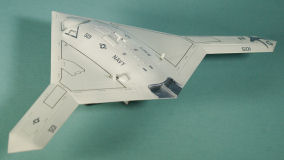
Platz 1/72 X-47B UCAS USN Build Review
By Michael Benolkin
| Date of Review | September 2012 | Manufacturer | Platz |
|---|---|---|---|
| Subject | X-47B UCAS USN | Scale | 1/72 |
| Kit Number | AC-7 | Primary Media | Styrene |
| Pros | Easy build, nice details | Cons | Nothing noted |
| Skill Level | Basic | MSRP (USD) | $50.95 |
Background
For some background on the X-47B program or a look at this kit out of the box, look here.
The Build
To be perfectly honest, the build didn't take very much time at all. It took longer to paint the model than to built it. I did use some filler at the joint between the fuselage and the outer wing panels, but that was all. If this would have been a snap-tite model, it still wouldn't have been any easier.
Painting
The model was painted gloss white in the intake, wheel wells, and weapons bay areas and allowed to dry. Next came the gray which was applied after the white areas had been masked off. The exhaust duct was sprayed with Alclad Steel and will later get some weathering/discoloration. The red warning lines around the edges of the gear and weapons bay doors was applied with a Gundam Red Marker. The whole model was given a coat of Testors Gloss Clear Lacquer and set aside to dry.
Markings
Now there is a reason why I'm addressing the markings separately. I spend far more time applying decals than building and painting this model. This isn't a fault with the kit, just the reality of the type of paint scheme applied by Northrop Grumman to Air Vehicles 1 and 2. When I first saw this kit with its decals, I was surprised to see that these markings are all indeed on AV1 and AV2 as provided in the box.
The decal sheet that Platz provided has each of the walkway stripes as individual strips and while it took more time to apply them individually, the results are outstanding. There was no issue with silvering or settling into the surface contours of the model. It took several days to get all the decals in place as I'd place a few, then wait for them to dry so I could add the adjacent stripes or markings without messing up my previous work. Once the decals were all settled and any water spots removed, the model was given another coat of Testors Gloss Clear Lacquer to seal everything in place.
Conclusion
I'm quite pleased with the results. What the model (and real aircraft) lacks in surface details, it easily makes them up in the stenciling and the results look great. You'll be seeing more of this aircraft in the near future as the test program transitions from land-based testing to catapult and arrested landing tests at Patuxent River before the program goes out to sea for carrier trials aboard one of the Nimitz-class aircraft carriers. If all goes well, you'll be seeing more of these aircraft flying off the decks in the future.
My sincere thanks to Platz Hobby
and DML for this review sample!


