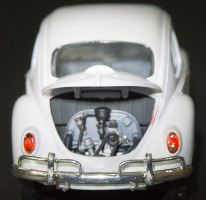
Polar Lights 1/25 The Amazing Spiderman Volkswagen Beetle Kit Build Review
By Michael Benolkin
| Date of Review | December 2013 | Manufacturer | Polar Lights |
|---|---|---|---|
| Subject | The Amazing Spiderman Volkswagen Beetle | Scale | 1/25 |
| Kit Number | 0927 | Primary Media | Styrene |
| Pros | Nice details | Cons | Not suited for young modelers |
| Skill Level | Experienced | MSRP (USD) | $26.99 |
Build Review
When the Polar Lights Volkswagen Beetle arrived in the Cybermodeler Online labs, I had to push it to the front of the line since I have a fondness for the old Beetle - my first car was a 1955 (small rear oval window) Volkswagen Beetle with a 1963 rebuilt engine. I was tempted to do a quick build of this kit to see how it went together but I changed my mind and decided to do a white Beetle that was more or less stock.
The first step was to prime all of the non-chromed parts. The orange plastic would be a bit problematic under white paint, so Tamiya gray primer was applied. The primer would also highlight some of the bodywork needed before getting started.
The body shell has the usual mold lines typical of car body shells and I carefully filed these away and then buffed the surfaces and re-primed the body. The interior of the Beetle is usually the body color, so I applied a several coats of Tamiya acrylic Gloss White to the body shell (inside and out), truck interior, hood and trunk lids, and floor pan interior. When all of this was dry, I masked and painted the floor pan Bosch gray (Tamiya acrylic German Gray) as well as the ceiling liner that was part of the clear windows. The underside of the chassis and inside of the engine compartment were painted Tamiya acrylic NATO Black. All of these parts were set aside to dry.
I assembled and glued the rear covers on the stock front and rear seats. A little filler was used to close the gaps around the edges and the seats were painted Tamiya acrylic Medium Gray. The engine was assembled and given an overall coat of Tamiya acrylic Metallic Gray and individual parts were detailed with various colors.
It was time to assemble the kit. This is supposed to be a snap-it kit but with a few exceptions, the parts didn't go together very easily. Since this is a snap-it kit, it is supposed to go together once and stay that way, so test-fitting isn't easy here. More care was needed to address any flash or mold lines on smaller parts as these interfere with assembly. The larger challenge was the chromed parts - the kit may have been engineered to go together as bare plastic, but the heavily chromed parts do not fit into the holes/slots easily. I wound up drilling out many of the mounting holes to get this kit together.
This is a kit that comes close to the level of detail of a standard car kit but trying to use construction techniques that make it buildable by younger modelers. Given the tools and time to get the model together, I wouldn't recommend this kit for younger modelers without experienced supervision. If you have the tools and experience, this model goes together with few challenges.
My sincere thanks to Round 2 Models for this review sample!


