Otaki 1/48 Ki-44 (Tojo) Build Review
By Kelly Jamison
| Date of Review | January 2018 | Manufacturer | Otaki |
|---|---|---|---|
| Subject | Ki-44 (Tojo) | Scale | 1/48 |
| Kit Number | OT-2-14 | Primary Media | Styrene |
| Pros | Easy build | Cons | See text |
| Skill Level | Basic | MSRP (USD) | OOP |
Build Review
This unusual aircraft was commissioned by the Japanese Army Air Force and flew from 1940 to the end of the war and even as late as 1949 by both sides of the Chinese Revolution with Japanese mercenary pilots at the controls against the Chinese Communist. The aircraft continued to serve in the People's Liberation Army Air Force into the early 1950's. That is impressive for this little stubby fighter designed in the late1930's. It was disliked over the Ki-43 but was a superior interceptor to the Ki-43 even with its numerous flight restrictions. The Shoki was widely used in Sumatra, China, Burma, Korea and the Philippines but is best known in the defensive air war against B-29's in the closing stages of WWII. 1,225 examples were made during the production run. It would be an understatement to say the Ki-44 is an exotic looking aircraft. I always thought it would look right at home cutting pylons at Reno.
The Otaki kit has been around for a long time. It was first released in 1974 and was a very nice kit for the time. It was released under the Arii name in 1986 and went out of production in 1991. For a while it was the only game in town in 1/48 scale until the new tool Hasegawa kit came out in 1995. The kits can be found on online auction houses and at your local model show for bargain prices. Even though the Hasegawa offering beats this old kit in just about every category, a very nice model can still be made with just a little work.
As with most of the Otaki/Arii kits the style of box art is some of my favorite in the industry. The box art depicts the Ki-44 in its best suited role as an Area Defense Interceptor against the mighty B-29. The instruction sheet is done in a rust brown ink and long folded booklet style. My version of the kit is completely in Japanese but the assembly drawings and the simple construction is easy to understand. The parts are molded in a light grey plastic on three trees.
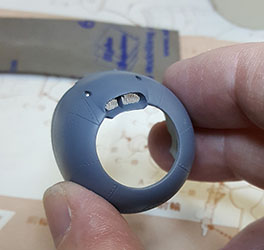
I have done this kind of build before where I buy the latest aftermarket bits and pieces for the latest wonderkit. So when I picked up a new resin cockpit for the Hasegawa kit, I regulated the Hasegawa cockpit to this project to the Otaki kit. I drilled out the seat and bulkhead stiffeners along with scratch building some machine guns and an oxygen bottle. Careful detail painting and some Eduard Zoom seatbelts really made for a nice little pit. I used some Mike Grant decal dials and a drop of watered down Krystal Klear, picked out the details with a fine hair brush and the instrument panel was complete. The cowl needed a little work so I carved out the carburetor intake and put some fine mesh screen in its place. It helps but honestly is not 100% accurate.
The fuselage halves went together with ease along with the standard construction of the wings and tail planes. I drilled out the exhaust stubs and made some new ones by flaring out some plastic tube to give that distinct spill out exhaust look. I noticed that the landing light on the left wing was just a panel line so I notched it out and filled it in with a piece of clear plastic stock and superglue. I shaped it and polished it out but the clear plastic was harder than the kit plastic which made it difficult to blend the shape of the leading edge smoothly. You can see a slight bulge of the harder clear plastic. I should have worked this area a bit more on hindsight.
The propeller was cast poorly. It needed a lot of work. I reshaped the backside of the blades and then cut them off this circular cuff they were molded to. I used an old hub from the scrap pile and glued each blade onto that. I ended cutting the hub off (picture doesn't depict that) becuse the blade assembly would not fit into the spinner. I also made a disc for the backside of the spinner and painted it red. The blades got a coat of yellow and then I masked off the tip markings and the little rectangle yellow pieces which were blade information tabs in real life. The end result came out nicer than the stock propeller would have been.
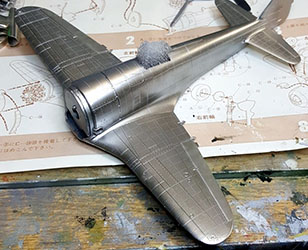
Once all the seams were filled and sanded and the overall aircraft got cleaned, I painted it Vallejo Metallic Silver. It is a fantastic acrylic silver that I swear by. It takes the fear out of painting silver aircraft for me. I use it more than Alclad by far. Easy to clean up and it airbrushes right out of the bottle with no thinning.
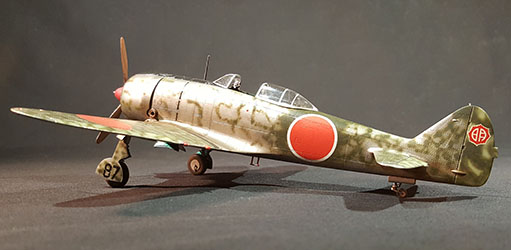
I wanted to paint the kit in an unusual scheme. There are plenty to choose from. I ended going with one from a training squadron based in Akeno Field, Japan. So I got out the airbrush and started painting with Tamiya IJA Green thinned a bit. I hated it. It looked terrible. The airbrush wasn't cooperating. The paint wasn't cooperating. Nothing was working for me that day. It looked awful. After it was dried, out came the Vallejo Metallic Silver and I wiped the slate clean.
This time I gave the airbrush a thorough cleaning and measured out the paint to thinner ratio with an eyedrop. Everything worked in my favor this time. I was much happier with the camouflage effect I was going for and the paint worked perfectly. Oh yes, don't forget the landing gear covers. Otherwise you will be loading up the airbrush again and painting them. Trust me on this one. I know.
With the nose temporarily installed, I painted the antiglare panel a dark black-blue and started on the yellow ID bands on the leading edge. They were a bit difficult to paint since they come so close to the fuselage. The engine was detailed out but I didn't spend too much time on it because it can't be seen much anyway. A trip to the decal dungeon got me the hinomarus sorted out and the tail flash came from an old Nichimo Ki-43 kit.
The gear went on with no problem and the wheels were a simple one-piece design with the hubs in two pieces that sandwich together. I used the Hasegawa canopy since I had a vacuformed one for the Hasegawa kit anyway. More bits and pieces like the landing gear doorlets, inner wheel well covers, foot step, some micro-tube for machine guns and antenna, finishes off this kit.
It was fun to take a kit I bought for $3.50 and make a real nice model from it. I used stuff that would have been thrown away. Decals were scavenged from leftovers and the scratch-building was very basic. I enjoyed this build very much, even though I had to repaint it once. It still turned out to be worth the effort. Don't walk past some of those older kits. There might be value in them to get you to build something you wouldn't normally build, save a buck and have fun with your hobby for Pete's sake!


