Moebius Models' 1/25 International Prostar Build Review
by Stephen Sutton
| Date of Review | October 2013 | Manufacturer | Moebius Models |
|---|---|---|---|
| Subject | International Prostar | Scale | 1/25 |
| Kit Number | 1301 | Primary Media | Styrene |
| Pros | Detailed cab, engine comparment, chassis | Cons | Cab doors molded closed |
| Skill Level | Moderate Experience | MSRP (USD) | $79.95 |
Build Review
For a look at this kit out of the box, look here.
All parts where washed with a mild dish soap, this is a must as I did see some mold release agent on the kit parts. Next the Prostar body components were examined and the mold seams were sanded lightly, the cab roof was glued to the cab body making sure everything lined up. Then the cab roof was sanded to level out the seam. The cab hood was prepped for painting and since the real cab hood is fiberglass and normally painted white I needed to clean up mold dimples and I filled these with 3M Acryl-Blue Glazing Putty. After this dried and sanded everything smooth then I painted this with Mr Surfacer 500 spray can primer. Next I painted over the primer with a white enamel and I clear coated this.
The cab body roof was painted gloss black to light block this area as I want light up this model with LEDs and fiber optics, more on this later.
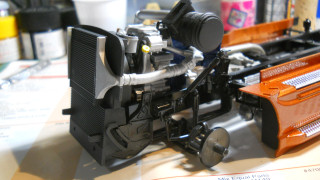
Next the Maxforce 15 Engine was assembled as per the kit instructions. The paint color call outs are actually found on a separate instruction sheet so some searching of the name and part number was needed to find what color to paint the parts. Not all parts are listed on this sheet. So an educated guess was need to figure out the color to use on some parts, no big deal here. The engine took some time to assemble as it had 36 parts total for the assembly. After the engine was complete I set it aside.
Next the front and rear axles were assembled as per the kit instructions. The front axles are steerable so careful application of the model glue is required here, I painted this axel a flat black then I lacquer clear coated it so this would not interfere with the movement of the steering. Both rear axles where assembled and painted the same way.
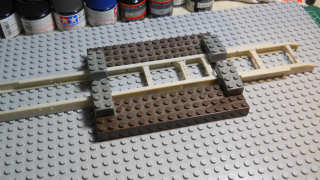
Now to assemble the Frame, to make sure the entire frame cross members were square and properly located I created a jig out of some Lego blocks. This worked very well and kept every straight. All related spring perches and shocks where glued in place. The frame was treated with a coat of flat black and then a coat of gloss clear lacquer.
Time to paint the body components, I painted three thin coats of Testors "One-Coat" Fiery Orange Lacquer, then I top coated these parts with three coats the Testors Wet Look Clear Lacquer. I plan to wet sand everything to remove any orange peel in the paint. I'm still not finished with the paint as I plan on doing a two tone color scheme.
Battery Box, muffler and air bags where assembled next, the battery box is chrome plated and the tree stubs when cut remove a lot of chrome, luckily this will not be seen when the side aero skirts are attached. Next all the axles where glued to the chassis taking account to follow the directions as the rear and main drive shafts are inserted into the axles. The exhaust pipe was painted with Vallejo aluminum and attached to the top of muffler.
Both fuel tanks are chrome plated and suffer the same problem as the battery box, the chrome was touched up with a Fiber Castell silver artist pen. These fuel tanks will also be hidden with the side aero skirts.
Next the side Aero Skirts where assembled, the inner structure was painted flat black and glued in place with 5 minute epoxy, next all the skirt brackets where painted gloss black and glued with regular cement. Make sure to use the longer brackets (241) for the rear of the skirts.
Fuel tank braces where painted gloss black and attached to the tanks, after these dried I then glued them to the chassis along with the tank braces.
Next all the wheels and tires where assembled, everything went together with no problem and they look very authentic.
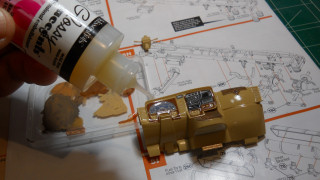
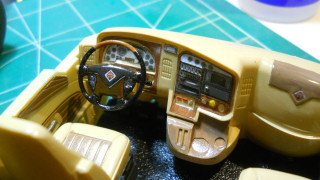
Next the cab interior components was painted with various tan and brown shades of Vallejo acrylics', Flames of War Iraqi Sand (819) was applied overall, and then the various panels was painted with Flames of War German Camo Pale Brown (825). After this had dried I gave all the interior parts a coat of Testors Wet Look Clear Lacquer (1834). This was necessary so I could apply all the interior decals. All the decals where applied as per the instructions. The decals are great, they release from the backing pretty fast and work great with Walthers Solvaset Decal Setting Solution. The solvaset was necessary to get the decals to lay down over the instrument details. Next I used Glossy Accents over the instrument gages, this dries crystal clear. After the decals had dried, I rinsed off any remaining solvaset with water, then over coated all the interior parts with Testors Wet Look clear lacquer.
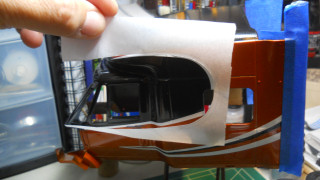
Now it was time to finish up with the paint job on the Prostar body. I really liked the picture of the real International Prostar truck that is illustrated in the kit instructions and the kit includes the decals to do this. Using the kit decals for a template, I use parchment paper and outlined the white graphic strip decals, then using Tamiya tape I laid down the pattern for the two tone paint scheme. Before putting the tape down I lightly wet sanded the clear coat with 600 grit paper.
I used Testors one coat lacquer Blazing Black (1832) for the second color, while this was drying I removed the Tamiya tape and after this dried I lightly wet sanded the color borders. Next another clear coat was applied over everything. After the clear coat dried I wet sanded any dust particles in the paint with 320, 600, and then 1200 grit paper. The white stripe decals went down great with the help of solvaset and no opaqueness came through, all the decals laid down flat over the body curves. Finally after all the decals had dried I washed off any solvaset residue then I applied another coat of Testors wet coat lacquer.
The Aero Skirts where glued to the chassis with 5 minute epoxy to give added strength. Fuel filler caps on the aero skirts where painted with Vallejo aluminum.
Next the engine and radiator stacks where glued into place taking care to align the exhaust pipe and main drive shaft, everything fit like a glove. Now was the time to install all the wheels and tires. The mud flaps were painted with gloss black for the frame and matt black for the rubber portion.
Now the front splash guards were glued in place with CA same as the rear mud flaps.
The chrome exhaust stacks where assembled and sprue attach points painted with Prismacolor Metallic Silver pin. After these dried, I glued the exhaust stack mounting brackets and exhaust stacks with 5 minute epoxy to the truck chassis taking care again to align the lower exhaust pipes, then I secured exhaust pipes with CA. I almost needed three hands for this.
Next I assembled the front bumper bracket, the directions have you glue the front bracket (270) first then glue the hinge retainers after, this was very difficult to do, I would recommend gluing the hinge retainers (271) and bracket (270) first to the bumper (244) then glue the whole assembly to the front chassis. The tiny driving lights (292) were giving a coat of silver on the back then they were glued to the front bumper with Glossy Accents clear medium.
Now the interior was assembled as per instructions, all the parts were clamped and glued with CA and left to dry overnight. Next the rear cab wall working lights were painted metallic silver then over coated with Glossy Accents 3D medium. Too bad that no clear parts were provided for this. They still turned out convincing. Next the rear cab fairing braces were painted semi-gloss black then glued into position with CA.
Now the front windshield and cab windows were coated with Future floor finish, then they were glued in place with CA and kicker (accelerator). Take care during this step as the windows are tight and snap right into place. I did paint the border around the windshield gloss black with the help of Tamiya masking tape.
Next the Interior assembly was inserted into the cab body, no glue was used as everything snapped right in place. Now the rear wall assembly was glued in place.
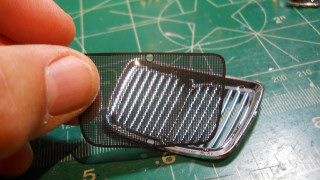
The hood assemble got a coat of matt black for the interior then the hood opening hinges were assembled as per the instructions taking care not to use to much glue so the hood hinge can function as the real truck. Next the Headlights and clear covers were assembled on the hood. Moebius provided a very nice photo etch Stone Guard for the grill, this was glued in place with CA.
Now the cab was mounted to the chassis, I didn't need to glue this as it fit like a glove. Next the hood was attached to the chassis using the hinge brackets.
Finally all the marker lights where painted with Tamiya Clear orange and glued to the windshield visor and cab body. The cab marker lights (291) in the instructions are incorrect, marker lights (292) are the right ones.
Murphy's Law stepped in on my next step, as I was cutting off the mirrors one arm broke off and vanished into thin air!! Two hours later after cleaning up my work bench and crawling on my knees in the carpet I finally found the arm. I found the arm in the model box 3 feet behind me, go figure. Now I assembled the mirrors as per the instructions and I repaired the mirror arm with CA and kicker. The mirrors were glued to the cab with CA.
I decided not to light this kit with LED and fiber optics as when I started to assemble the parts everything fit like a glove and I know my limits and decided not to do this. Hopefully someone can do this, it would look very cool with working lights.
Over all this was a fun build, it did require some experience with modelling skills to complete this, and I opted for the more difficult paint job.
My sincere thanks to Moebius Models for this review sample!


